Craft a thoughtful Valentine’s popcorn box photo ornament with your kids. Perfect as a gift or decoration, this DIY project is easy and memorable!


Mother’s Day is a special time to celebrate the amazing women who brighten our lives. If you’re looking for a heartfelt, fun, and easy way for your kids to create a personalized gift, today’s Muffin Photo Ornament craft tutorial is the perfect choice.
Combining creativity and personal touch, this DIY craft will leave mom grinning from ear to ear! So grab your crafting tools, and let’s get started!
Craft Supplies:
Before you start, gather the materials to ensure the crafting process goes smoothly. Most of these are common items you likely already have at home or can easily pick up from a craft store.
- Muffin Ornament Printable – from our landing page
- White Cardstock Paper
- Crayons, Markers or Coloring Pencils
- Scissors
- Clear Contact Paper
- Loose Craft Glitter
- Single Hole Punch
- Ribbon or String
- Printed Picture
- Embellishments
This list is easily customizable. Feel free to add your own flair with materials you already have at home!
Directions:
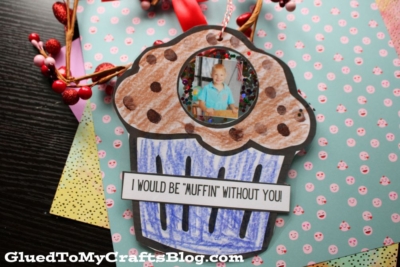
- First things first – download the free “I would be MUFFIN without you” printable listed above in the supply list.
- Print out the provided file on a single sheet of white cardstock paper {or any colored paper instead!}
- Go ahead and color in the muffin design however you like. For added fun, use a washable ink pad to add some fingerprints on the muffin top design and give it some depth.
- When done decorating the muffin frame, use scissors to trim it out from the paper, along with the wording. Go ahead and also cut out the circle design in the middle of the muffin as well.
- Go ahead and secure the wording ANYWHERE you like on the muffin design.
- Next up – cut two equal sized piece of contact paper.
- Peel the backing off of one piece of contact paper and lay it down, sticky side up, on your work surface.
- Lay the present cutout on top of the contact paper, facing towards you.
- Trim down your picture so it fits inside the ornament. Lay it inside the design.
- If desired, sprinkle some loose craft glitter now on top, to fill in blank spots and add some sparkle.
- Now peel the backing off the second piece of contact paper and lay it on top of the first.
- Use your hand to make sure everything is sealed together and that no bubbles exist.
- When ready, use scissors to trim off the excess contact paper from around the edges.
- For the final touch, add embellishments for a customized look.
- Then hold punch a hole on top and string some string through it for easy hanging.
- Then display/gift away proudly your child’s beautiful Mother’s Day inspired muffin photo ornament piece!
RELATED —> Handprint Muffin Keepsake

There you have it—a simple yet meaningful Mother’s Day Muffin Photo Ornament craft idea that your little ones will love making and Mom will treasure forever. Why settle for another store-bought gift when you can create something as personal and beautiful as this?
If you tried this project, we’d love to see the results! Share your creations on social media and tag us. Happy crafting, and here’s to making this Mother’s Day extra special!

"Muffin" Without You Photo Ornament
Craft a thoughtful Valentine’s popcorn box photo ornament with your kids. Perfect as a gift or decoration, this DIY project is easy and memorable!
Here’s your checklist of supplies to bring this craft to life:
Prepare your creative haven by laying down a protective cover before the crafting magic begins!
Directions:
- First things first - download the free "I would be MUFFIN without you" printable listed above in the supply list.
- Print out the provided file on a single sheet of white cardstock paper {or any colored paper instead!}
- Go ahead and color in the muffin design however you like. For added fun, use a washable ink pad to add some fingerprints on the muffin top design and give it some depth.
- When done decorating the muffin frame, use scissors to trim it out from the paper, along with the wording. Go ahead and also cut out the circle design in the middle of the muffin as well.
- Go ahead and secure the wording ANYWHERE you like on the muffin design.
- Next up - cut two equal sized piece of contact paper.
- Peel the backing off of one piece of contact paper and lay it down, sticky side up, on your work surface.
- Lay the present cutout on top of the contact paper, facing towards you.
- Trim down your picture so it fits inside the ornament. Lay it inside the design.
- If desired, sprinkle some loose craft glitter now on top, to fill in blank spots and add some sparkle.
- Now peel the backing off the second piece of contact paper and lay it on top of the first.
- Use your hand to make sure everything is sealed together and that no bubbles exist.
- When ready, use scissors to trim off the excess contact paper from around the edges.
- For the final touch, add embellishments for a customized look.
- Then hold punch a hole on top and string some string through it for easy hanging.
- Then display/gift away proudly your child's beautiful Mother's Day inspired muffin photo ornament piece!


NEED MORE HELP DOWNLOADING OUR FREE PRINTABLES? PLEASE REFER TO OUR FAQ PAGE
If you've enjoyed our content or have any thoughts to share, we'd love to hear from you! Mention @gluedtomycrafts or tag #gluedtomycrafts on Instagram!