Create a beautiful torn paper cherry blossom tree! Celebrate spring with this fun craft. Perfect for kids and adults - no special skills required!


Spring is here, and there’s no better way to capture its beauty than with an art project inspired by one of its most iconic symbols—the cherry blossom tree. Known for their breathtaking pink blooms, cherry blossom trees have become a symbol of renewal and beauty worldwide.
What better way to celebrate the season than by creating your own cherry blossom tree craft using torn paper?
This fun project is perfect for kids, parents, and crafters of all skill levels. It’s a creative way to explore textures, colors, and the natural charm of spring blooms. Plus, the torn paper effect adds a unique, whimsical touch to this stunning springtime creation.

Spring is the season of new beginnings—so why not start something new with this easy and delightful craft? Today’s Torn Paper Cherry Blossom Tree is more than just an art project; it’s a celebration of creativity, sustainability, and the wonders of nature.
Craft Supplies:
Before starting, gather these essential materials. The good news is that most of these are commonly found in your home:
- Light Pink Construction Paper
- White Cardstock Paper
- Cherry Tree Printable – on our landing page
- Crayons, Coloring Pencils or Markers
- School Glue
- White Cotton Balls
- Scissors
- Embellishments
Directions:
Here’s exactly how to craft your stunning torn paper artwork, step by step.
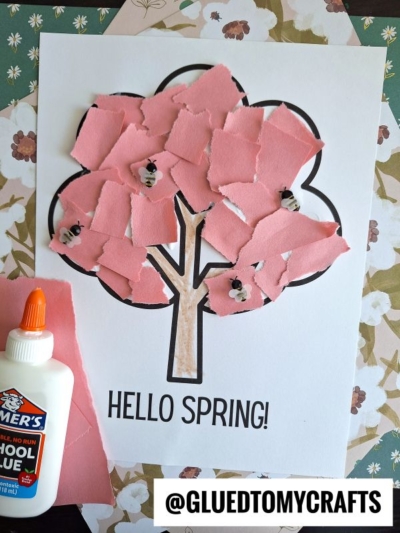
- First things first – download and print out the FREE provided blank cherry blossom tree printable listed above, on a single piece of white cardstock paper.
- Have kids color in the tree trunk of their printable.
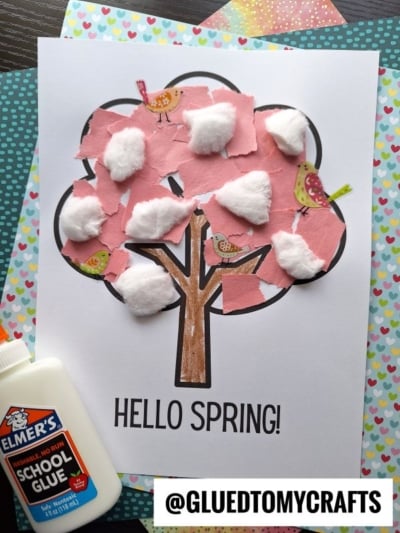
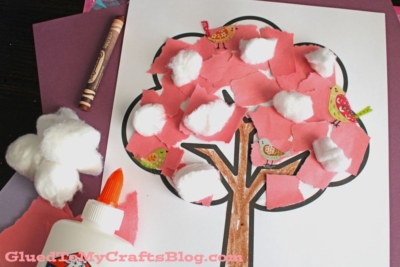
- Next up, help your child cut/tear their pink construction paper into small pieces. Aim to create petal-like shapes, but don’t worry about perfection. Torn edges mimic the soft and delicate appearance of real cherry blossoms.
- Now have them use school glue to glue those pieces on their tree design. Overlapping is encouraged, as it mimics the clusters of blooming cherry blossoms.
- The final step is to take the white cotton balls and cut them into fourths & glue them on the tree design, for some dimension. Scatter them across the “cherry blossoms” and attach them with small dabs of glue.
- Finally, add any other embellishments you see fit.
- Allow the glue to dry completely before displaying.
- Once finished, these cherry blossom trees deserve the spotlight! If you’re in a classroom, dedicate a space on your bulletin board or wall to showcase the students’ work.
- Be sure to also snap a photo and share it with the hashtag #GluedToMyCrafts or tag us to showcase their blooming artwork. We’d love to see what you create!
RELATED —> Flower Photo Ornament
Recreating our torn paper cherry blossom tree is an art project that’s not only fun but also meaningful. It’s budget-friendly, eco-conscious, and an excellent activity for celebrating the magic of spring. Whether you hang it on your wall or use it as inspiration for other crafts, this project is sure to bring joy to your space.
Why not gather your materials today and give it a try? With just a little effort and imagination, you can capture the beauty of cherry blossoms anytime, anywhere. Happy crafting!

Torn Paper Cherry Blossom Tree Craft
Create a beautiful torn paper cherry blossom tree! Celebrate spring with this fun craft. Perfect for kids and adults - no special skills required!
Here’s your checklist of supplies to bring this craft to life:
- School Glue
Prepare your creative haven by laying down a protective cover before the crafting magic begins!
Directions:
- First things first - download and print out the FREE provided blank cherry blossom tree printable listed above, on a single piece of white cardstock paper.
- Have kids color in the tree trunk of their printable.
- Next up, help your child cut/tear their pink construction paper into small pieces. Aim to create petal-like shapes, but don’t worry about perfection. Torn edges mimic the soft and delicate appearance of real cherry blossoms.
- Now have them use school glue to glue those pieces on their tree design. Overlapping is encouraged, as it mimics the clusters of blooming cherry blossoms.
- The final step is to take the white cotton balls and cut them into fourths & glue them on the tree design, for some dimension. Scatter them across the "cherry blossoms" and attach them with small dabs of glue.
- Finally, add any other embellishments you see fit.
- Allow the glue to dry completely before displaying.
- Once finished, these cherry blossom trees deserve the spotlight! If you’re in a classroom, dedicate a space on your bulletin board or wall to showcase the students’ work.


NEED MORE HELP DOWNLOADING OUR FREE PRINTABLES? PLEASE REFER TO OUR FAQ PAGE
If you've enjoyed our content or have any thoughts to share, we'd love to hear from you! Mention @gluedtomycrafts or tag #gluedtomycrafts on Instagram!