Get creative with a paper bag turkey craft. Follow our step-by-step guide to create a cute and festive Thanksgiving project using everyday materials.


Gobble Up Fun with This Paper Bag Turkey Craft Idea
Thanksgiving is right around the corner, and what better way to celebrate than by engaging kids in a fun and creative craft project? Recreating today’s “stuffed” paper bag turkey is perfect for sparking creativity, encouraging artistic skills, and, most importantly, adding a festive touch to your holiday decorations.
This DIY project is not only easy and inexpensive but also provides a wonderful opportunity for children to learn and bond with family and friends.
In this blog post, we’ll guide you through creating your very own turkey made from a brown lunch sack and handprint cutouts, making Thanksgiving a memorable experience for kids and parents alike.

Crafting is a wonderful way to bond with children, engage their creativity, and celebrate the festive spirit of Thanksgiving. Our stuffed paper bag turkey craft tutorial is an easy, affordable, and enjoyable activity that everyone can participate in. Not only does it provide a chance for artistic expression, but it also offers educational value and developmental benefits.
Craft Supplies:
Before embarking on your turkey-making adventure, gather all necessary materials to ensure a smooth crafting session.
- Turkey Head Printable – on landing page
- Large, Brown Paper Bag
- Shredded Paper
- Stapler
- School Glue
- Medium Sized Wiggle Eyes
- Craft Scissors
- Four Different Colors of Cardstock Paper
- Crayons/Coloring Pencils/Markers
Directions:
Ensure each child has ample space to work comfortably, with all materials within easy reach.
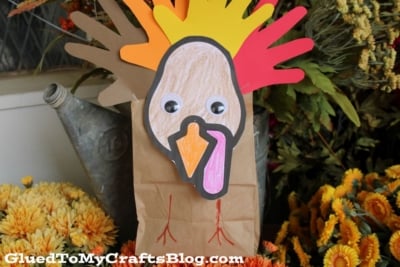
- First things first – if you haven’t already, go ahead and print out the “turkey head” printable that is listed above. Print it out on colored paper and children color in the turkey piece with crayons or coloring pencils.
- Once they have their head design colored in, trim it out. Save the second design from the paper to recreate the craft again.
- Next up – open up and stuff your paper lunch bag with a handful of shredded paper, until it stands up nicely and looks really full.
- Set it aside till later.
- Now, out the remaining sheets of cardstock paper, trace & trim out FOUR handprint cutouts for the “feathers” for the turkey.
- We are ready to assemble! Take the head cutout and glue the four handprint cutouts to the back.
- Follow that up by stapling that piece to the stuffed paper bag to close it up.
- To finish off the lunch sack turkey craft – add the wiggle eyes so the turkey can see and take an orange marker & draw on stick legs on the front of the paper bag, so he can “stand.”
- Add any other embellishments you see fit.
- Then display your finished turkey paper bag piece proudly for ALL to see!
RELATED —> Paper Bag Scarecrow

This Thanksgiving, gather your supplies and create lasting memories with your children. Allow their imaginations to run wild as they bring their turkeys to life. And remember, the joy is in the process, not just the finished product. Happy crafting and happy Thanksgiving!

Paper Bag Turkey Craft Idea
Get creative with a paper bag turkey craft. Follow our step-by-step guide to create a cute and festive Thanksgiving project using everyday materials.
Here’s your checklist of supplies to bring this craft to life:
- 1 Large Brown Paper Bag
- Thanksgiving Printable - Landing Page
- Shredded Paper
- 2 Wiggle Eyes
- Cardstock Paper four different colors
- School Glue
Prepare your creative haven by laying down a protective cover before the crafting magic begins!
Directions:
- First things first - if you haven't already, go ahead and print out the "turkey head" printable that is listed above. Print it out on colored paper and children color in the turkey piece with crayons or coloring pencils.
- Once they have their head design colored in, trim it out. Save the second design from the paper to recreate the craft again.
- Next up - open up and stuff your paper lunch bag with a handful of shredded paper, until it stands up nicely and looks really full.
- Set it aside till later.
- Now, out the remaining sheets of cardstock paper, trace & trim out FOUR handprint cutouts for the "feathers" for the turkey.
- We are ready to assemble! Take the head cutout and glue the four handprint cutouts to the back.
- Follow that up by stapling that piece to the stuffed paper bag to close it up.
- To finish off the lunch sack turkey craft - add the wiggle eyes so the turkey can see and take an orange marker & draw on stick legs on the front of the paper bag, so he can "stand."
- Add any other embellishments you see fit.
- Then display your finished turkey paper bag piece proudly for ALL to see!


NEED HELP DOWNLOADING OUR FREE PRINTABLES? PLEASE REFER TO OUR FAQ PAGE
If you've enjoyed our content or have any thoughts to share, we'd love to hear from you! Mention @gluedtomycrafts or tag #gluedtomycrafts on Instagram!