Learn how to make a charming Popsicle Stick Pumpkin Patch Wagon for your fall decor. Easy and fun craft project for all ages!


Create a Popsicle Stick Pumpkin Patch Wagon with Your Kids This Fall
Autumn brings a unique charm that is perfect for crafting. The changing leaves, cooler weather, and abundance of pumpkins create a warm and inviting atmosphere. Crafting during this season is a wonderful way to celebrate these natural changes and bond with your family.
Making crafts like our “first seen here” Popsicle Stick Pumpkin Patch Wagon can help your children appreciate the beauty of fall. They get to explore different textures, colors, and materials while expressing their own creativity.
Plus, it’s a fantastic way to keep them occupied on those chilly afternoons when outdoor activities might not be an option.

Not only is this craft fun to make, but it’s also an excellent way for kids to develop their fine motor skills and creativity.
Craft Supplies:
Gathering the right materials is crucial for a successful crafting session. Here’s what you’ll need to create your pumpkin patch wagon:
- Jumbo Popsicle Sticks {3 per craft}
- Mini Popsicle Sticks {2 per craft}
- School Glue
- White Cardstock Paper
- Gray Cardstock Paper
- Black Cardstock Paper
- Orange Craft Paint
- Paint Brush
- Scissors
- Markers
- optional – pumpkin stickers
- optional – hot glue and string for hanging
Directions:
Now, let’s get to the fun part—making your Popsicle Stick Pumpkin Patch Wagon! Follow these steps to bring your autumn craft to life.
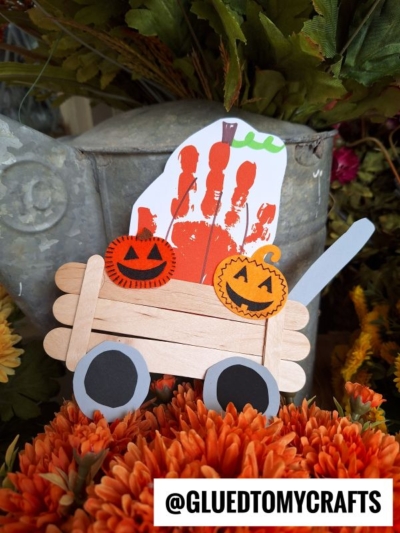
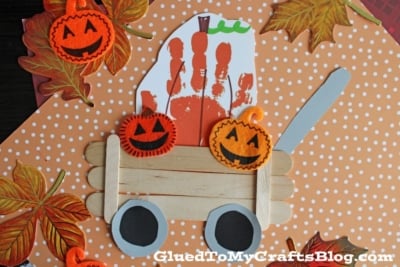
- First things first – grab THREE large popsicle sticks and TWO mini sized ones {this is per pumpkin patch wagon you want to make today.}
- Lay the three large ones next to each other, one by one, on a flat surface.
- Now grab your other two mini popsicle sticks and glue them the other direction, on top of the jumbo sticks, to create a simple rectangle shape.
- Set it aside to allow it to dry a bit.
- While that is drying, grab your white cardstock paper, paint brush and orange craft paint.
- Pick a hand. Any hand will do. Paint the palm and fingers of your hand completely & press it down on the white paper.
- Use this moment in time to wash the excess paint off your hand, while the paint is drying on the paper.
- When it’s dry enough, decorate the painted design with markers and trim it out to make a pumpkin.
- Now for the elements that make the wagon. Out of the remaining grey and black cardstock, cut out TWO wagon wheels, as well as a handle for the wagon.
- To finish off the Popsicle Stick Pumpkin Patch Wagon, glue all the cardstock pieces in place, as as well as securing the handprint “pumpkin” to the back of the wagon.
- Follow that up with a few pumpkin stickers and any other embellishments you see fit {think rhinestones, glitter, holiday stickers etc.}
- Then display proudly for all to see!
- Don’t forget to share pictures with us of your customized pumpkin patch wagon with us! #gluedtomycrafts
RELATED —> Thumbprint Pumpkin Patch

AFFILIATE LINK – PAIR OUR CRAFT IDEA WITH THE BOOK “PICK A PUMPKIN”
Recreating today’s Pumpkin Patch Wagon tutorial is a delightful and engaging activity that captures the essence of fall. It’s a simple craft that yields beautiful results and provides an opportunity for quality family time.
By following the steps outlined in this blog post, you and your children can create a charming fall decoration that you’ll be proud to display. Gather your materials, set up your crafting space, and get ready to make some wonderful memories together.
If you’re looking for additional inspiration, visit our Pinterest board filled with seasonal crafts and activities. Happy crafting!

Popsicle Stick Pumpkin Patch Wagon Craft Idea
Learn how to make a charming Popsicle Stick Pumpkin Patch Wagon for your fall decor. Easy and fun craft project for all ages!
Here’s your checklist of supplies to bring this craft to life:
- 3 Jumbo Popsicle Sticks
- 2 Mini Popsicle Sticks
- Cardstock Paper gray and black
- Craft Paint orange
Prepare your creative haven by laying down a protective cover before the crafting magic begins!
Directions:
- First things first - grab THREE large popsicle sticks and TWO mini sized ones {this is per pumpkin patch wagon you want to make today.}
- Lay the three large ones next to each other, one by one, on a flat surface.
- Now grab your other two mini popsicle sticks and glue them the other direction, on top of the jumbo sticks, to create a simple rectangle shape.
- Set it aside to allow it to dry a bit.
- While that is drying, grab your white cardstock paper, paint brush and orange craft paint.
- Pick a hand. Any hand will do. Paint the palm and fingers of your hand completely & press it down on the white paper.
- Use this moment in time to wash the excess paint off your hand, while the paint is drying on the paper.
- When it's dry enough, decorate the painted design with markers and trim it out to make a pumpkin.
- Now for the elements that make the wagon. Out of the remaining grey and black cardstock, cut out TWO wagon wheels, as well as a handle for the wagon.
- To finish off the Popsicle Stick Pumpkin Patch Wagon, glue all the cardstock pieces in place, as as well as securing the handprint "pumpkin" to the back of the wagon.
- Follow that up with a few pumpkin stickers and any other embellishments you see fit {think rhinestones, glitter, holiday stickers etc.}
- Then display proudly for all to see!

Grab our favorite books via our Amazon affiliate link! In our Amazon storefront you will find books, toys and craft supplies we absolutely love using for our Glued To My Crafts tutorials!
If you've enjoyed our content or have any thoughts to share, we'd love to hear from you! Mention @gluedtomycrafts or tag #gluedtomycrafts on Instagram!