Glued To My Crafts

Join thousands of others who have gotten GLUED to our craft tutorials!

  • Home
  • Safety Guidelines
  • Seasonal Themes
    • New Years
    • Valentine’s Day
    • St. Patrick’s Day
    • Spring
    • Easter
    • Mother’s Day
    • Summer
    • Father’s Day
    • Patriotic
    • Halloween
    • Thanksgiving
    • Fall
    • Winter
    • Christmas
    • Snowmen
    • Story Time
  • About Us
  • Amazon Storefront
  • Monthly Themes
    • January Craft Ideas
    • February Craft Ideas
    • March Craft Ideas
    • April Craft Ideas
    • May Craft Ideas
    • June Craft Ideas
    • July Craft Ideas
    • August Craft Ideas
    • September Crafts
    • October Crafts
    • November Crafts
    • December Crafts
  • Collection Posts
    • 20+ Creative Paper Bag Craft Ideas for Kids to Enjoy Today
    • 20+ Plastic Egg Stamp Crafts for Spring Fun
    • 30+ Creative Thumbprint Craft Ideas for Spring Fun
    • Craft Ideas for Kids Using Egg Stickers
    • Thumbs Up! 50+ Creative Thumbprint Crafts for Kids
    • 40+ Insect Craft Ideas For Kids
    • 50+ Craft Ideas For Kids Using A Plastic Fork As A Paint Brush
    • 30+ Puffy Paint Craft Ideas For Kids To Try Today!
    • 20+ Fun and Easy Paper Bowl Crafts for Kids
    • Pete The Cat Craft Ideas: Fun & Easy Projects for Kids
    • Transform Coffee Filters into 40+ Stunning DIY Projects
    • Transform Crepe Paper Streamers into 60+ Stunning Crafts
    • Pie Server Stamped Craft Ideas Kids Will Adore
    • Paint Splat Pie Craft Idea For Kids

Paper Bag Skeleton Craft Idea

When engaging in craft activities, it is important for young children to have adult supervision at ALL times. It is also recommended to use supplies that are suitable for your child's age. Feel free to modify materials or steps to meet your specific requirements. Please refer to our safety guidelines for more information.

As an Amazon Associate I earn from qualifying purchases. This post may contain affiliate links. For more information, please see our disclosure policy.

UPDATE FOR 2026 - To reduce storage costs and download fees, we recently made some changes to our website. The password for all our files this year is GLUEDTOMYCRAFTS2026. No sign-up is required to download our free printables! You can enjoy our printables without creating an account or paying for Box.com. Simply follow the download instructions on our FAQ PAGE.

Craft a fun and spooky paper bag skeleton with your kids. Easy-to-follow instructions and common materials make this a perfect Halloween craft.
SKIP THE FLUFF AND PRINT THE DIRECTIONS
A paper bag skeleton craft featuring a large skull cutout, cotton swab bones, and a black-painted paper bag. Supplies like glue, scissors, and colored paper are scattered around. Text reads PAPER BAG SKELETON.

A paper bag skeleton craft featuring a large skull cutout, cotton swab bones, and a black-painted paper bag. Supplies like glue, scissors, and colored paper are scattered around. Text reads PAPER BAG SKELETON.

Create Creepy Fun This Halloween with a Paper Bag Skeleton Craft

Halloween is just around the corner, and it’s the perfect time to engage kids in some spooky, creative fun. Bringing to life today’s “paper bag skeleton” tutorial not only keep the little ones entertained but it will also enhances their creativity and fine motor skills. Plus, it’s a fantastic way to bond with your children and get into the Halloween spirit together.

In this blog post, we’ll guide you through a simple yet exciting paper bag skeleton craft idea that kids will love making this Halloween.

Craft Supplies:

Before you start crafting, gather all the necessary materials. This ensures the process goes smoothly and keeps the kids focused on creating their masterpiece.

  • White Cardstock Paper
  • Skeleton Head Printable – on our landing page
  • Scissors
  • School Glue or Glue Stick
  • Brown Paper Bag
  • Black Craft Paint
  • Foam Paint Brush
  • White Unused Q-Tips {around 5-10}

Having these basic items on hand will provide a solid foundation for your skeleton craft. Most of these materials are likely already in your home or can be easily found at any craft store.

Directions:

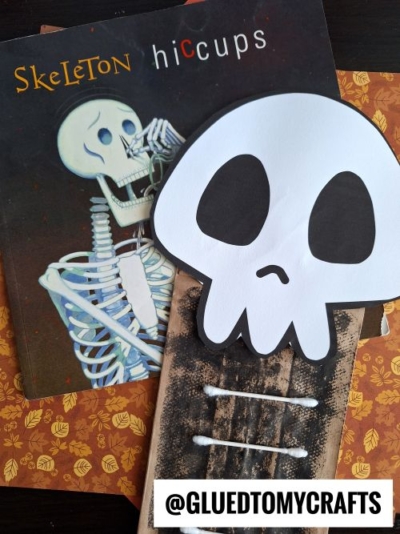
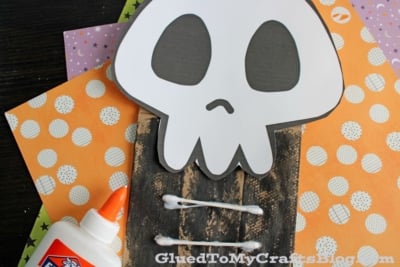
  • First things first – download and print out the provided “skull head” printable, on a single sheet of white cardstock paper. You only need ONE print per skeleton craft. If desired, color in the printable but we left ours blank for the example images.
  • Use scissors to trim out the head shape. Discard excess paper.
  • Next up – lay your brown paper bag on a flat surface with the flap of the bag facing upwards.
  • Paint the larger portion of the paper bag completely black.
  • When ready to start bring your skeleton to life, glue on the head cutout to the flap of the painted bag.
  • Finally, the last step is to glue on the q-tips for the skeleton’s “ribs.” You can add as many as you want for this step.
  • And that’s it! Let it dry completely in an undisturbed area.
  • When done decorating your lunch sack, display your awesome brown paper bag mummy craft piece proudly for all to see or use it as a puppet!

RELATED —> Paper Plate Skeleton Pirate

A paper bag skeleton craft featuring a large skull cutout, cotton swab bones, and a black-painted paper bag. Supplies like glue, scissors, and colored paper are scattered around.

Recreating our “paper bag skeleton” craft idea is a fantastic way to celebrate Halloween with your kids. It’s simple, fun, and provides numerous benefits for their development.

Plus, it’s a great way to spend quality time together and create lasting memories. We hope this guide inspires you to get crafty and enjoy the Halloween spirit. Happy crafting, my friends!

stacey-signature-2023

A paper bag skeleton craft featuring a large skull cutout, cotton swab bones, and a black-painted paper bag. Supplies like glue, scissors, and colored paper are scattered around. Text reads PAPER BAG SKELETON.
PRINT

Paper Bag Skeleton Craft Idea

Craft a fun and spooky paper bag skeleton with your kids. Easy-to-follow instructions and common materials make this a perfect Halloween craft.

Here’s your checklist of supplies to bring this craft to life:

  • Cardstock Paper white
  • Skeleton Head Printable - on our landing page
  • Craft Paint
  • ` Brown Paper Bag
  • Unused Q-Tips
  • Scissors
  • School Glue
  • Foam Paint Brush
  • Halloween Book Recommendations - link to our Amazon shop

Prepare your creative haven by laying down a protective cover before the crafting magic begins!

Directions:

  • First things first - download and print out the provided "skull head" printable, on a single sheet of white cardstock paper. You only need ONE print per skeleton craft. If desired, color in the printable but we left ours blank for the example images.
  • Use scissors to trim out the head shape. Discard excess paper.
  • Next up - lay your brown paper bag on a flat surface with the flap of the bag facing upwards.
  • Paint the larger portion of the paper bag completely black.
  • When ready to start bring your skeleton to life, glue on the head cutout to the flap of the painted bag.
  • Finally, the last step is to glue on the q-tips for the skeleton's "ribs." You can add as many as you want for this step.
  • And that's it! Let it dry completely in an undisturbed area.
  • When done decorating your lunch sack, display your awesome brown paper bag mummy craft piece proudly for all to see or use it as a puppet!
    Paper Bag Skeleton Craft Idea
MINI-HEARTS-page-separator-logo-gluedtomycrafts

click-here-to-head-to-our-landing-page-gluedtomycrafts

NEED HELP DOWNLOADING OUR FREE PRINTABLES? PLEASE REFER TO OUR FAQ PAGE

CLICK HERE TO PRINT THE DIRECTIONS FOR THIS CRAFT

If you've enjoyed our content or have any thoughts to share, we'd love to hear from you! Mention @gluedtomycrafts or tag #gluedtomycrafts on Instagram!

Craft Activity Safety Guidelines:

Always Ensure Adult Supervision - Young children should be supervised at all times when engaging in craft activities. This is essential to keep them safe and ensure materials are used correctly. Use Age-Appropriate Supplies - Choose craft supplies that are suitable for your child’s age. Check labels for recommendations and avoid items with small parts or sharp edges for younger children. Modify as Needed - Feel free to adapt materials or steps to meet your child's abilities and safety needs. For example, substitute scissors with safety scissors if necessary. Keep an Eye on Allergies - Be mindful of potential allergens in craft materials like glue, paint, or certain fabrics. Opt for non-toxic and hypoallergenic options whenever possible. Organize and Secure Supplies - Keep all craft tools and materials organized. Store sharp objects, small parts, and potentially hazardous items out of reach when not in use. Following these guidelines will ensure that crafts remain fun, creative, and, most importantly, safe for everyone involved!


OUR PRIVACY POLICY

OUR COPYRIGHT POLICY

  • Email
  • Facebook
  • Instagram
  • Pinterest
  • Twitter
  • YouTube

LOOKING FOR SOMETHING?

EXPLORE OUR SITE:

TRENDING TODAY:

  • A pink hand-shaped bookmark with red heart stickers and star confetti surrounds a round note that reads a heartfelt message about love and reading. The image is from GluedToMyCraftsBlog.com. Handprint Bookmark Keepsake: A Gift That Holds Your Spot
  • A colorful craft project featuring a yellow felt moon, sparkly stars, and heart shapes, with glue and a heartfelt message. Torn Paper Love You To The Moon and Back Card Craft Idea For Kids
  • A handmade card with a rocket drawing, hearts, and messages of love. Felt hearts and an envelope are around it. Handprint Rocket Keepsake - I Love You Because
  • A vibrant Valentine's Day craft showcasing a torn-paper bumblebee with googly eyes on a white sheet, accompanied by the text "MY VALENTINE!" The scene is decorated with felt hearts, heart-shaped gems, and patterned papers, with a glue bottle and crafting supplies adding to the creative atmosphere. Torn Paper Bee My Valentine Card Craft Idea For Valentine's Day
  • Flat lay of a torn paper dandelion craft featuring a white sheet with a black dandelion outline. Torn yellow, pink, and purple paper pieces are glued to the dandelion head, simulating seeds. Surrounding the craft are Elmer's glue, felt hearts, paper flowers, and patterned scrapbook paper. The text 'MAKING WISHES, ONE PIECE OF PAPER AT A TIME.' and 'GluedToMyCraftsBlog.com' are printed on the white sheet. Torn Paper Dandelion Craft: Making Wishes, One Piece at a Time
  • A flat lay of handmade Valentine’s Day cards and decorations, including paper flowers, felt hearts, an envelope, and printed cards with romantic poems, arranged on a gray and pink background. Capture Memories With These 6 Handprint Flower Poems
  • A colorful handprint craft made from purple paper with glitter edges sits on a multicolored polka dot background. A round tag with a poem is attached below, tied with red and white string. Flowers are visible in the corner. Easy Handprint Flower Craft with Poem – Perfect Spring DIY for Kids
  • A purple paper butterfly made from handprint cutouts is decorated with glitter and a smiling face. A round poem about sending love is in the center. The background is colorful and the GluedToMyCraftsBlog.com watermark is visible. Handprint & Popsicle Stick Butterfly Poem Keepsake
  • A craft project with yellow crepe paper fries in a red-striped paper container, a label reading Youre UN-FRY-GETTABLE!, red heart decorations, Elmers glue, and a roll of yellow crepe paper on a purple background. Torn Crepe Paper Fries Craft Idea For Kids
  • A spring-themed craft featuring pink and purple paper flowers, small decorative bees, and a “Spring has sprung, so let’s get our creativity blooming!” sign on a blue background—perfect for pairing with Spring Printables. Crepe Paper & Fingerprint Daisy Spring Paint Brush Craft

© 2012–2026 Glued To My Crafts
All activities should be supervised by an adult at all times. Please refer to our safety guidelines for more information.


Please note that all the content of the website, including printables, are for classroom and personal use only. This means that any digital item you download from our site can be used for non-commercial use only. We kindly request that you do not reproduce or sell our creations. We appreciate your understanding and cooperation in respecting our content and intellectual property rights.

Accessibility Adjustments

Powered by OneTap

How long do you want to hide the toolbar?
Hide Toolbar Duration
Select your accessibility profile
Vision Impaired Mode
Enhances website's visuals
Seizure Safe Profile
Clear flashes & reduces color
ADHD Friendly Mode
Focused browsing, distraction-free
Blindness Mode
Reduces distractions, improves focus
Epilepsy Safe Mode
Dims colors and stops blinking
Content Modules
Font Size

Default

Line Height

Default

Color Modules
Orientation Modules