Make your own fall tree frame ornaments with popsicle sticks. Easy and fun DIY craft for the whole family.


Autumn brings a special kind of magic with its rich tapestry of colors, cooler weather, and festive activities. It’s the perfect season for families to gather and create lasting memories together.
Today’s post will guide you through a delightful craft project that combines the beauty of fall with the joy of creativity. Plus it’s a great picture frame craft to bring out year after year!
Get ready to make some Popsicle Stick Fall Tree Frame Ornaments with simple materials such as craft sticks and inexpensive leaf stickers from your local craft store. It’s a fun and easy activity for kids that results in cherished keepsakes.

It’s a magical time of year! Perfect for cozy sweaters, pumpkin spice everything, and of course, crafting! If you’re looking for an engaging and fun activity to do with your kids, recreating our “autumn tree photo frame ornament” tutorial is the perfect project!
Craft Supplies:
To get started on your Popsicle Stick Fall Tree Frame Ornaments, gather the following materials:
- Jumbo Popsicle Sticks – 3 per craft
- School Glue or Hot Glue Gun
- Craft Scissors
- Foam Leaf Stickers {I got mine at Hobby Lobby or grab them via our affiliate link}
- 4×6 Printed Picture
- Brown Cardstock Paper
- Twine or Magnets
Gather these supplies, and you’ll be ready to dive into a fun and creative crafting session that the whole family will enjoy!
Directions:
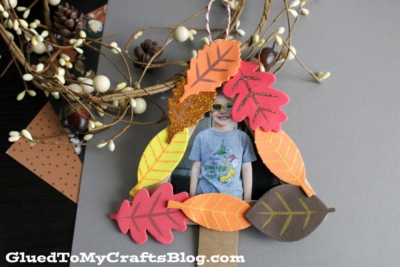
- First assemble the base of the leaf covered tree by gluing THREE popsicle sticks together to look like a triangle.
- Set aside to let it dry.
- Repeat for each piece you want to make today.
- Now grab your scissors, printed picture and brown cardstock paper.
- Cut out a small brown rectangle for the tree stump.
- Go ahead and glue it to the bottom of your popsicle stick piece.
- Next grab your printed picture.
- Trim it down to fit inside the popsicle stick piece.
- Glue it to the back of your piece.
- To finish off the Craft Stick Fall Tree Photo Frame – add your various leaf stickers {and other embellishments} around the edge of the popsicle stick design. Make sure you don’t cover up the face in your picture.
- Once done, glue some string to the back for easy hanging or add magnets for displaying on the fridge.
Book Pairings:
Here are a few suggestions for books that complement our craft idea. You can purchase them via our affiliate links on Amazon.
- Sweep by Louise Greig
- The Leaf Thief by Alice Hemming
- Fletcher and the Falling Leaves by Julia Rawlinson
- Pete the Cat Falling for Autumn by James Dean
- We’re Going on a Leaf Hunt by Steve Metzger
RELATED —> Pumpkin Hug Keepsake

Thank you for joining us on this crafting adventure. Remember, the most important part of any project is the time spent together. Enjoy every moment, and happy crafting!
Crafting with kids can be more than just a fun activity—it builds memories, teaches valuable skills, and celebrates the beauty of the changing seasons. We hope this guide inspires you to create your own beautiful leaf covered tree frame ornaments and cherish the moments spent crafting with your loved ones.

Popsicle Stick Fall Tree Frame Ornaments
Make your own fall tree frame ornaments with popsicle sticks. Easy and fun DIY craft for the whole family.
Here’s your checklist of supplies to bring this craft to life:
- 3 Jumbo Popsicle Sticks
- Foam Leaf Stickers
- Printed Picture
- Cardstock Paper
Prepare your creative haven by laying down a protective cover before the crafting magic begins!
Directions:
- First assemble the base of the leaf covered tree by gluing THREE popsicle sticks together to look like a triangle.
- Set aside to let it dry.
- Repeat for each piece you want to make today.
- Now grab your scissors, printed picture and brown cardstock paper.
- Cut out a small brown rectangle for the tree stump.
- Go ahead and glue it to the bottom of your popsicle stick piece.
- Next grab your printed picture.
- Trim it down to fit inside the popsicle stick piece.
- Glue it to the back of your piece.
- To finish off the Craft Stick Fall Tree Photo Frame - add your various leaf stickers {and other embellishments} around the edge of the popsicle stick design. Make sure you don't cover up the face in your picture.
- Once done, glue some string to the back for easy hanging or add magnets for displaying on the fridge.


NEED HELP DOWNLOADING OUR FREE PRINTABLES? PLEASE REFER TO OUR FAQ PAGE
If you've enjoyed our content or have any thoughts to share, we'd love to hear from you! Mention @gluedtomycrafts or tag #gluedtomycrafts on Instagram!