Craft a spooky Halloween snow globe using a simple paper plate. Get creative and follow our instructions to make a unique decoration.


Halloween is just around the corner, and what better way to get into the spooky spirit than with a fun and engaging craft project for kids? This year, we’re bringing you a unique idea that’s perfect for little hands and big imaginations—a Haunted Paper Plate Halloween Snow Globe!
Not only is this craft a great way to keep the kids entertained, but it also offers a creative outlet that encourages fine motor skills and artistic expression.
In this post, we’ll guide you through everything you need to know about making your own Haunted Snow Globe with just a paper plate and cardstock paper!

Unlike many Halloween crafts, the Paper Plate Witch Snow Globe combines creativity with a touch of magic. It’s unique and stands out from the usual pumpkin carving and costume making.
Craft Supplies:
- Large Paper Plate
- Purple Craft Paint
- Foam Paint Brush
- Witch Hat Printable – on our landing page
- White Cardstock Paper {two sheets!}
- Black Cardstock Paper
- Black Sharpie Marker
- Green Tissue Paper
- Crayons, Markers or Coloring Pencils
- Scissors
- School Glue
- Stapler
- Star Stickers
Directions:
- First things first – paint your paper plate completely purple. This will set the scene for the snow globe.
- Once done, set it aside for now.
- Next up, grab the “witch hat” printable and color it in however you like.
- When done, trim it out and discard excess paper.
- Now for the remaining cardstock paper pieces. Out of the white, trace/cut out a handprint design. Use the marker to decorate it to look like five ghosts.
- Out of the black, cut out a snow globe “stand” for on the bottom.
- You are now ready to assemble! Grab your painted paper plate and staple on the base of the snow globe.
- Follow that up by securing the hat cutout to the top. You will want to leave enough room in the center for your remaining cutouts.
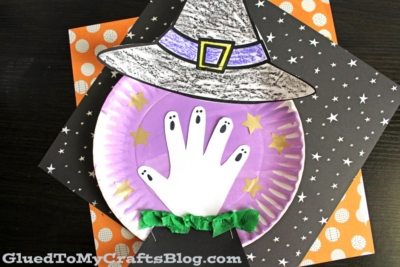
- To finish off the Witch Hat Snow Globe craft, glue your handprint cutout to the center, as well as a few torn pieces of green tissue paper.
- Add star stickers to “set the bewitching scene.”
- Then display the finished Halloween ghost snow globe proudly for all to see!
RELATED —> Pom Pom Painted Pumpkin Patch

Recreating our “haunted paper plate Halloween snow globe” tutorial is a delightful and engaging activity for kids and parents alike. It’s more than just a craft; it’s an opportunity to bond, create memories, and celebrate the spooky season together.
On that note, don’t forget to share any creative spinoffs of this craft with us! There’s nothing quite like getting into the spirit of celebration by creating imaginative works of art with your loved ones.
So grab your family and get excited about taking part in some spooky artful fun!
RELATED —>Witch Moon Craft Idea

Haunted Paper Plate Halloween Snow Globe
Craft a spooky Halloween snow globe using a simple paper plate. Get creative and follow our instructions to make a unique decoration.
Here’s your checklist of supplies to bring this craft to life:
Prepare your creative haven by laying down a protective cover before the crafting magic begins!
Directions:
- First things first - paint your paper plate completely purple. This will set the scene for the snow globe.
- Once done, set it aside for now.
- Next up, grab the "witch hat" printable and color it in however you like.
- When done, trim it out and discard excess paper.
- Now for the remaining cardstock paper pieces. Out of the white, trace/cut out a handprint design. Use the marker to decorate it to look like five ghosts.
- Out of the black, cut out a snow globe "stand" for on the bottom.
- You are now ready to assemble! Grab your painted paper plate and staple on the base of the snow globe.
- Follow that up by securing the hat cutout to the top. You will want to leave enough room in the center for your remaining cutouts.
- To finish off the Witch Hat Snow Globe craft, glue your handprint cutout to the center, as well as a few torn pieces of green tissue paper.
- Add star stickers to "set the bewitching scene."
- Then display the finished Halloween ghost snow globe proudly for all to see!

NEED HELP DOWNLOADING OUR FREE PRINTABLES? PLEASE REFER TO OUR FAQ PAGE
If you've enjoyed our content or have any thoughts to share, we'd love to hear from you! Mention @gluedtomycrafts or tag #gluedtomycrafts on Instagram!