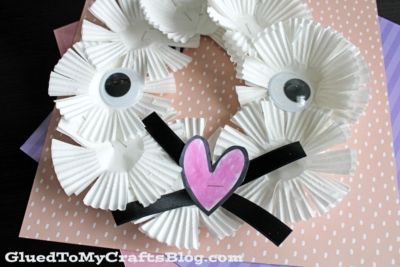
This delightful Paper Plate & Cupcake Liner Easter Bunny Wreath is a perfect craft idea for kids to help ring in the holiday.


Easter is a time of joy and celebration… and CRAFTS!
Crafting is another fantastic way to get into the holiday spirit, and what better way to decorate your home and keep little hands busy than with a whimsical Easter Bunny Wreath made from simple materials like paper plates and cupcake liners.
In this post, we’ll hop into a step-by-step guide to creating this adorable craft that’s perfect for kids and adults alike! We also have a few printable for you to enjoy as well!

This delightful Paper Plate & Cupcake Liner Easter Bunny Wreath is a perfect craft idea for kids to help ring in the holiday. Not only is it simple and fun, but it also yields an adorable decorative item that can brighten up any space.
Craft Supplies:
- Large Paper Plate
- White Cardstock Paper
- Bunny Printable – on our landing page
- Crayons or Markers
- Large White Cupcake Liners {about 16}
- Scissors
- Stapler
- Thin, Black Craft Ribbon
- Large Googly Eyes
Directions:
- First things first – cut out the center of your paper plate, leaving a simple ring shape for the white bunny wreath.
- Discard the center of the paper plate you just cut out.
- Now for the various bunny elements in the craft – go ahead and print out our provided printable on a single sheet of white cardstock paper. You only need one print per craft.
- Next use crayons {or markers} to color in the pieces on the printable.
- When done, trim out each design and discard excess paper.
- Now grab your large, white cupcake liners, stapler and scissors.
- For each “flower” on the wreath, you are going to want TWO large cupcake liners.
- Flatten each set out with your hands and stack them on top of each other.
- Use the stapler to secure them together in the center.
- Next use the scissors to cut a simple fringe around the edge.
- Use your fingers to “fluff” it up a little.
- Now use your stapler again to staple the flower pieces, in place, on the paper plate rim until it’s nice and full.
- Next cut off two long pieces of black ribbon for the whiskers.
- Finally, add the two ears and nose {with the whiskers} on the decorate paper plate piece. Start with the ears on top and the nose towards the bottom.
- At this point in time you can also add the googly eyes {or other embellishments} to bring the theme to life.
- Once the plate looks how you want it to look, staple on a ribbon loop to the back of the piece complete the bunny Easter wreath craft.
- Then display your beautiful, one of a kind bunny wreath in your home or on the front door proudly for ALL to see!
RELATED —> Handprint Bunny Keepsake

Remember that crafting is about having fun and making memories, so don’t stress about perfection. Each wreath will have its own unique charm, especially with little ones at the helm. Make sure to take photos of your kids with their creations – these are the moments you’ll cherish as they grow up!
BTW – we’d also love to see your finished Easter Bunny Wreaths! Share your pictures by tagging us on Facebook. We can’t wait to hear from you. Happy Easter crafting, my friends!!

Paper Plate Easter Bunny Wreath Craft
This delightful Paper Plate & Cupcake Liner Easter Bunny Wreath is a perfect craft idea for kids to help ring in the holiday.
Here’s your checklist of supplies to bring this craft to life:
Prepare your creative haven by laying down a protective cover before the crafting magic begins!
Directions:
- First things first - cut out the center of your paper plate, leaving a simple ring shape for the white bunny wreath.
- Discard the center of the paper plate you just cut out.
- Now for the various bunny elements in the craft - go ahead and print out our provided printable on a single sheet of white cardstock paper. You only need one print per craft.
- Next use crayons {or markers} to color in the pieces on the printable.
- When done, trim out each design and discard excess paper.
- Now grab your large, white cupcake liners, stapler and scissors.
- For each "flower" on the wreath, you are going to want TWO large cupcake liners.
- Flatten each set out with your hands and stack them on top of each other.
- Use the stapler to secure them together in the center.
- Next use the scissors to cut a simple fringe around the edge.
- Use your fingers to "fluff" it up a little.
- Now use your stapler again to staple the flower pieces, in place, on the paper plate rim until it's nice and full.
- Next cut off two long pieces of black ribbon for the whiskers.
- Finally, add the two ears and nose {with the whiskers} on the decorate paper plate piece. Start with the ears on top and the nose towards the bottom.
- At this point in time you can also add the googly eyes {or other embellishments} to bring the theme to life.
- Once the plate looks how you want it to look, staple on a ribbon loop to the back of the piece complete the bunny Easter wreath craft.
- Then display your beautiful, one of a kind bunny wreath in your home or on the front door proudly for ALL to see!


NEED MORE HELP DOWNLOADING OUR FREE PRINTABLES? PLEASE REFER TO OUR FAQ PAGE
If you've enjoyed our content or have any thoughts to share, we'd love to hear from you! Mention @gluedtomycrafts or tag #gluedtomycrafts on Instagram!