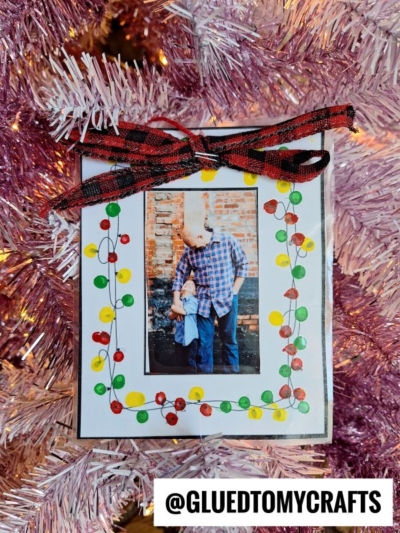
This festive ornament decoration is not only beautiful but also extremely simple to make--you don't even need any special tools or supplies!

Are you looking for a way to make your holiday décor extra special this year? If so, look no further than this Q-Tip painted Christmas lights picture frame ornament tutorial from us!

Not only is it incredibly easy to craft with young kids but it’s also designed so that you can customize the colors and design to coordinate perfectly with your own seasonal decorations.
So if you’re looking for a fun craft project that is both budget friendly and guaranteed to impress, try out our Q-Tip painted Christmas lights picture frame ornament!

In just minutes and with minimal supplies, you can turn an ordinary cardstock paper into an eye-catching ornament that will be the envy of all your guests.
Craft Supplies:
- Picture Frame Printables – on our landing page
- Cardstock Paper
- Clean, Unused Q-Tips
- Small Paper Plate
- Craft Paint
- Scissors
- Clear Contact Paper
- Single Hole Punch
- Ribbon or String
- Printed Picture
- Embellishments
Directions:
- First things first – download EITHER picture frame printable listed above in the supply list. I decided to share a small and large version depending on your needs.
- Print out the provided file on a single sheet of white cardstock paper {or colored paper instead!}
- Now grab your qtips, craft paint and small paper plate.
- Squirt a small amount of each color on the paper plate.
- Dip one q-tip into one color and then on the printable, right on top of one of the light designs. Repeat till all the “lights” are filled in.
- When done with the paint, set aside to let it dry completely.
- Once dry, use scissors to trim it out. Go ahead and also cut out the rectangle design in the middle as well.
- Next up – cut two equal sized piece of contact paper.
- Peel the backing off of one piece of contact paper and lay it down, sticky side up, on your work surface.
- Trim down your picture so it fits inside the picture frame. Lay it on the contact paper.
- Then lay the picture frame cutout on top of the contact paper, facing towards you.
- Now peel the backing off the second piece of contact paper and lay it on top of the first.
- Use your hand to make sure everything is sealed together and that no bubbles exist.
- When ready, use scissors to trim off the excess contact paper from around the edges.
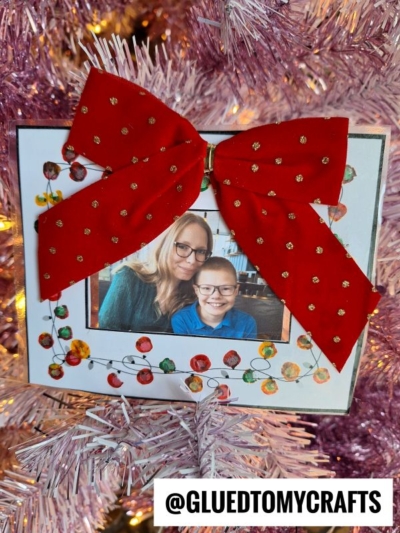
- For the final touch, add embellishments for a customized look.
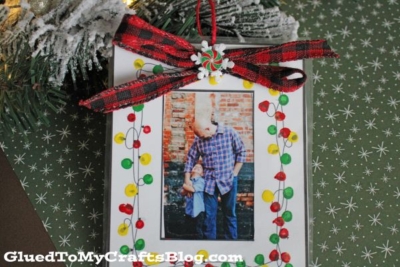
- Then hold punch a hole on top and string some string through it for easy hanging.
- Then display/gift away proudly your child’s beautiful holiday inspired photo ornament piece!
RELATED —> Reindeer Covered In Thumbprint Lights
Now that you know how to make your own Christmas lights photo ornament with just a few simple supplies, why not encourage the kids in your life to create their own masterpiece and give them as a gift this holiday season?
On that note, I sure hope we inspired you today! Happy crafting, my friends!

Q-Tip Painted Christmas Lights Picture Frame Ornament
This festive ornament decoration is not only beautiful but also extremely simple to make--you don't even need any special tools or supplies!
Here’s your checklist of supplies to bring this craft to life:
- Cardstock Paper
- Christmas Lights Photo Printables - Landing Page
- Unused Q-Tips
- Small Paper Plate
- Craft Paint
- Clear Contact Paper
- Ribbon or String
- Printed Picture
- Embellishments
Prepare your creative haven by laying down a protective cover before the crafting magic begins!
Directions:
- First things first - download EITHER picture frame printable from our original tutorial.
- Print out the provided file on a single sheet of white cardstock paper {or colored paper instead!}
- Now grab your qtips, craft paint and small paper plate.
- Squirt a small amount of each color on the paper plate.
- Dip one q-tip into one color and then on the printable, right on top of one of the light designs. Repeat till all the "lights" are filled in.
- When done with the paint, set aside to let it dry completely.
- Once dry, use scissors to trim it out. Go ahead and also cut out the rectangle design in the middle as well.
- Next up - cut two equal sized piece of contact paper.
- Peel the backing off of one piece of contact paper and lay it down, sticky side up, on your work surface.
- Trim down your picture so it fits inside the picture frame. Lay it on the contact paper.
- Then lay the picture frame cutout on top of the contact paper, facing towards you.
- Now peel the backing off the second piece of contact paper and lay it on top of the first.
- Use your hand to make sure everything is sealed together and that no bubbles exist.
- When ready, use scissors to trim off the excess contact paper from around the edges.
- For the final touch, add embellishments for a customized look.
- Then hold punch a hole on top and string some string through it for easy hanging.
- Then display/gift away proudly your child's beautiful holiday inspired photo ornament piece!


NEED HELP DOWNLOADING OUR FREE PRINTABLES? PLEASE REFER TO OUR FAQ PAGE
If you've enjoyed our content or have any thoughts to share, we'd love to hear from you! Mention @gluedtomycrafts or tag #gluedtomycrafts on Instagram!