Glued To My Crafts

Join thousands of others who have gotten GLUED to our craft tutorials!

  • Home
  • About Us
  • Safety Guidelines
  • Seasonal Crafts
    • New Years
    • Valentine’s Day
    • St. Patrick’s Day
    • Spring
    • Easter
    • Mother’s Day
    • Summer
    • Father’s Day
    • Patriotic
    • Halloween
    • Thanksgiving
    • Fall
    • Winter
    • Christmas
    • Snowmen
    • Story Time
  • Monthly Themes
    • January Craft Ideas
    • February Craft Ideas
    • March Craft Ideas
    • April Craft Ideas
    • May Craft Ideas
    • June Craft Ideas
    • July Craft Ideas
    • August Craft Ideas
    • September Crafts
    • October Crafts
    • November Crafts
    • December Crafts
  • Amazon Storefront
  • Privacy Policy

Christmas Stocking Photo Ornament Craft

When engaging in craft activities, it is important for young children to have adult supervision at ALL times. It is also recommended to use supplies that are suitable for your child's age. Feel free to modify materials or steps to meet your specific requirements. Please refer to our safety guidelines for more information.

As an Amazon Associate I earn from qualifying purchases. This post may contain affiliate links. Glued To My Crafts is independent and not affiliated with or endorsed by the publishers of the books featured on our website. For more information, please see our disclosure policy.

UPDATE FOR 2026 - To reduce storage costs and download fees, we recently made some changes to our website. The password for all our files this year is GLUEDTOMYCRAFTS2026. No sign-up is required to download our free printables! You can enjoy our printables without creating an account or paying for Box.com. Simply follow the download instructions on our FAQ PAGE.

Get festive this holiday season and let your little ones get creative with our DIY tree photo ornament craft idea! Get the step-by-step instructions now!
SKIP THE FLUFF AND PRINT THE DIRECTIONS
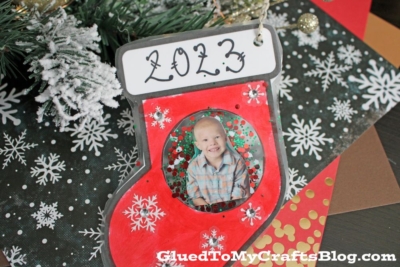
A handmade stocking photo ornament with 2023 on top, featuring your child’s picture in the center. The red stocking is decorated with snowflakes and displayed on festive wrapping paper. Text reads FREE PRINTABLE!!!.

Have your kids make a lasting memory this holiday season! Create a one-of-a-kind DIY Christmas stocking photo ornament with our easy step-by-step tutorial!

A handmade stocking photo ornament with 2023 on top, featuring your child’s picture in the center. The red stocking is decorated with snowflakes and displayed on festive wrapping paper. Text reads FREE PRINTABLE!!!.

Craft time! Get the kids in on the fun this holiday season with this festive and easy Christmas stocking photo ornament craft idea. Let the little ones show off their creativity and create lasting memories of special moments!

Craft Supplies:

  • Stocking Printable – on our landing page
  • White Cardstock Paper
  • Crayons, Markers or Coloring Pencils
  • Scissors
  • Clear Contact Paper
  • Loose Craft Glitter
  • Single Hole Punch
  • Ribbon or String
  • Printed Picture
  • Embellishments

Directions:

  1. First things first – download the free Christmas stocking printable listed above in the supply list.
  2. Print out the provided file on a single sheet of white cardstock paper {or any colored paper instead!}
  3. Go ahead and color in ONE of the stocking designs however you like.
  4. Use scissors to trim it out. Go ahead and also cut out the circle design in the middle as well.
  5. Next up – cut two equal sized piece of contact paper.
  6. Peel the backing off of one piece of contact paper and lay it down, sticky side up, on your work surface.
  7. Lay the present cutout on top of the contact paper, facing towards you.
  8. Trim down your picture so it fits inside the ornament. Lay it inside the design.
  9. If desired, sprinkle some loose craft glitter now on top, to fill in blank spots and add some sparkle.
  10. Now peel the backing off the second piece of contact paper and lay it on top of the first.
  11. Use your hand to make sure everything is sealed together and that no bubbles exist.
  12. When ready, use scissors to trim off the excess contact paper from around the edges.
  13. For the final touch, add embellishments for a customized look.
  14. Then hold punch a hole on top and string some string through it for easy hanging.
  15. Then display/gift away proudly your child’s beautiful holiday stocking photo ornament piece!

RELATED —> Christmas Wreath Photo Ornament

A handmade stocking photo ornament with 2023 on top, featuring your child’s picture in the center. The red stocking is decorated with snowflakes and displayed on festive wrapping paper.

The heartwarming experience of working together as a team to craft a special Christmas tree decoration is truly magical. So, gather your loved ones and get ready to embark on this enjoyable project. Happy crafting, my friends!

stacey-signature-2023

A handmade stocking photo ornament with 2023 on top, featuring your child’s picture in the center. The red stocking is decorated with snowflakes and displayed on festive wrapping paper. Text reads FREE PRINTABLE!!!.
PRINT

Christmas Stocking Photo Ornament

Get festive this holiday season and let your little ones get creative with our DIY tree photo ornament craft idea! Get the step-by-step instructions now!

Here’s your checklist of supplies to bring this craft to life:

  • White Cardstock Paper
  • Christmas Ornament Printable
  • Clear Contact Paper
  • Loose Craft Glitter
  • Ribbon or String
  • Printed Picture
  • Embellishments
  • Crayons, Markers or Coloring Pencils
  • Scissors
  • Single Hole Paper Punch
  • Christmas Book Recommendations - link to our Amazon shop

Prepare your creative haven by laying down a protective cover before the crafting magic begins!

Directions: 
Prevent your screen from going dark

  • First things first - download the free stocking printable listed above in the supply list.
  • Print out the provided file on a single sheet of white cardstock paper {or any colored paper instead!}
  • Go ahead and color in one of the stocking designs for now.
  • Use scissors to trim it out. Go ahead and also cut out the circle design in the middle as well.
  • Next up - cut two equal sized piece of contact paper.
  • Peel the backing off of one piece of contact paper and lay it down, sticky side up, on your work surface.
  • Lay the stocking cutout on top of the contact paper, facing towards you.
  • Trim down your picture so it fits inside the ornament. Lay it inside the design.
  • If desired, sprinkle some loose craft glitter now on top, to fill in blank spots and add some sparkle.
  • Now peel the backing off the second piece of contact paper and lay it on top of the first.
  • Use your hand to make sure everything is sealed together and that no bubbles exist.
  • When ready, use scissors to trim off the excess contact paper from around the edges.
  • For the final touch, add embellishments for a customized look.
  • Then hold punch a hole on top and string some string through it for easy hanging.
  • Then display/gift away proudly your child's beautiful holiday inspired stocking photo ornament piece!
    A handmade stocking photo ornament with 2023 on top, featuring your child’s picture in the center. The red stocking is decorated with snowflakes and displayed on festive wrapping paper.
MINI-HEARTS-page-separator-logo-gluedtomycrafts

click-here-to-head-to-our-landing-page-gluedtomycrafts

NEED HELP DOWNLOADING OUR FREE PRINTABLES? PLEASE REFER TO OUR FAQ PAGE

CLICK HERE TO PRINT THE DIRECTIONS FOR THIS CRAFT

If you've enjoyed our content or have any thoughts to share, we'd love to hear from you! Mention @gluedtomycrafts or tag #gluedtomycrafts on Instagram!


OUR PRIVACY POLICY

OUR COPYRIGHT POLICY

  • Email
  • Facebook
  • Instagram
  • Pinterest
  • Twitter
  • YouTube

Love our crafts?

Follow us on Google

Click & check the box to see us more in your search results!

LOOKING FOR SOMETHING?

EXPLORE OUR SITE:

© 2012–2026 Glued To My Crafts
All activities should be supervised by an adult at all times. Please refer to our safety guidelines for more information.


Please note that all the content of the website, including printables, are for classroom and personal use only. This means that any digital item you download from our site can be used for non-commercial use only. We kindly request that you do not reproduce or sell our creations. We appreciate your understanding and cooperation in respecting our content and intellectual property rights.

Accessibility Adjustments

Powered by OneTap

How long do you want to hide the toolbar?
Hide Toolbar Duration
Select your accessibility profile
Vision Impaired Mode
Enhances website's visuals
Seizure Safe Profile
Clear flashes & reduces color
ADHD Friendly Mode
Focused browsing, distraction-free
Blindness Mode
Reduces distractions, improves focus
Epilepsy Safe Mode
Dims colors and stops blinking
Content Modules
Font Size

Default

Line Height

Default

Color Modules
Orientation Modules