Get into the spooky spirit of Halloween with these creative craft ideas for making your own witch cauldron art! Perfect for kids and adults alike.

Looking for something different to craft up this Halloween with the kids? Try creating your own witch cauldron art with these easy step-by-step instructions!

Get the kids involved this spooky season and make some creative art with these easy steps. Invite your little witches and wizards to enjoy a fun and frightful activity!
With simple supplies and easy-to-follow instructions, you’ll be sure to create some mesmerizing paper plate bubbling cauldrons within minutes!

With just a few supplies and some imagination, you can create witch cauldron art piece that will look like it came straight from the pages of a fairytale. Learn how to make your own witchy designs this Halloween!
Craft Supplies:
- Small White Paper Plate – 1 per craft
- Black Craft Paint
- Foam Paint Brush
- Black Cardstock Paper
- Green Pom Poms
- Jumbo Popsicle Sticks – 2 per craft
- Markers
- Low-Temp Hot Glue Gun
- Scissors
Directions:
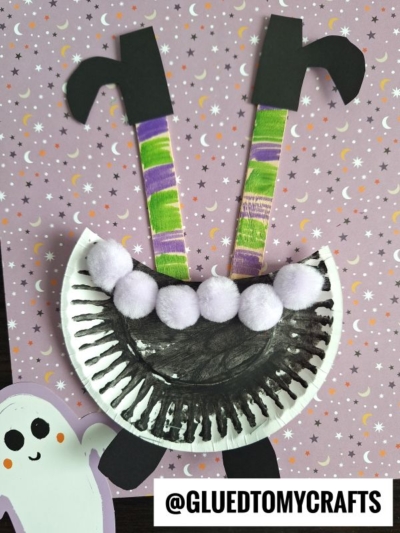
- First things first – making your paper plate look like a witch’s cauldron. Simply cut off a small sliver on one side of the paper plate. You just want it flat on one side and it will look more like a bowl shape.
- Discard the excess paper plate piece you just cut off.
- Next go ahead and paint your paper plate piece completely black.
- Set it aside to let it dry completely.
- Now grab your pieces for the witch legs {the wood craft sticks, markers and cardstock paper.}
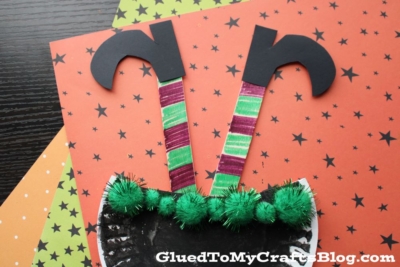
- First, use the markers to make a striped design on both wood craft sticks.
- Out of the black cardstock paper, cut out two legs for the bottom of the cauldron and two boots for the witch’s legs.
- Finally – the assembling of your witch cauldron. Hot glue the decorated popsicle sticks to the back of the paper plate, while adding the pom poms to the rim of the cauldron.
- Go ahead and also glue on the cauldron legs and of course, the boots for the witch.
- Follow that up with any other embellishments you see fit to complete your witch cauldron artwork.
- Then display it proudly for all to see!
- Don’t forget to snap a few pictures of your creation, to share with us on Facebook! #gluedtomycrafts
Book Suggestions:
Here are some recommended books that beautifully complement our craft idea. You can conveniently purchase them through our affiliate links on Amazon.
- Room on the Broom by Julia Donaldson
- The Little Witch Who Lost Her Broom! by Elaine Bickell
- The Witch’s Cat and The Broomstick Blunder by Kirstie Watson
- Ten Flying Brooms by Ilanit Oliver
- How to Catch a Witch by Alice Walstead
- There’s a Witch in Your Book by Tom Fletcher
- It’s Raining Bats & Frogs by Rebecca Colby
RELATED —> Handprint Halloween Cauldron
Sparkle here, spooky there – it’s time to make your home more crafty this Halloween season!!! Stay on Glued To My Crafts for even more SPELL-BINDING tutorials!
Check out our Witch’s Magic Ball, Pumpkin Monster and Ghost Keepsake craft posts!
All of which are perfect to pair with today’s witch cauldron art project idea – hint hint!

Popsicle Stick & Paper Plate Witch Cauldron Art for Halloween
Get into the spooky spirit of Halloween with these creative craft ideas for making your own witch cauldron art! Perfect for kids and adults alike.
Here’s your checklist of supplies to bring this craft to life:
Prepare your creative haven by laying down a protective cover before the crafting magic begins!
Directions:
- First things first - making your paper plate look like a witch's cauldron. Simply cut off a small sliver on one side of the paper plate. You just want it flat on one side and it will look more like a bowl shape.
- Discard the excess paper plate piece you just cut off.
- Next go ahead and paint your paper plate piece completely black.
- Set it aside to let it dry completely.
- Now grab your pieces for the witch legs {the wood craft sticks, markers and cardstock paper.}
- First, use the markers to make a striped design on both wood craft sticks.
- Out of the black cardstock paper, cut out two legs for the bottom of the cauldron and two boots for the witch's legs.
- Finally - the assembling of your witch cauldron. Hot glue the decorated popsicle sticks to the back of the paper plate, while adding the pom poms to the rim of the cauldron.
- Go ahead and also glue on the cauldron legs and of course, the boots for the witch.
- Follow that up with any other embellishments you see fit to complete your witch cauldron artwork.
- Then display it proudly for all to see!

CLICK HERE TO PRINT THE DIRECTIONS FOR THIS CRAFT
If you've enjoyed our content or have any thoughts to share, we'd love to hear from you! Mention @gluedtomycrafts or tag #gluedtomycrafts on Instagram!