DIY your holidays with our simple craft idea! We are bringing him to life with just a few easy supplies & steps!


This year, get your kid craft on and make your own Tulle & Paper Plate Santa Gnome craft idea!
It’s a super easy art project idea that is perfect for getting into the holiday spirit. All you need are a few simple supplies and some easy steps, and you’ll have your very own Santa to display during the holidays.
So round up the kids and get crafting! They’ll love bringing this festive character to life. Merry Christmas!

Bring the magic of Christmas to life with this easy paper plate Santa gnome craft for kids! He’s perfect for decorating your home or classroom.
Craft Supplies:
- Large Paper Plate
- Skin-toned Craft Paint
- Paint Brush
- Single Hole Punch
- White Tulle
- Santa Hat Printable – on our landing page
- Red Cardstock Paper
- Brown Cardstock Paper
- Scissors
- School Glue
- Stapler
- Cotton Balls or White Pom Poms
Directions:
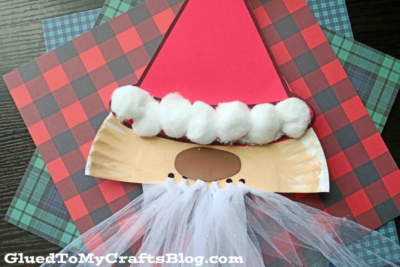
- First things first – cut your large paper plate in half. Straight up the center to create TWO equal sized pieces.
- Reverse one half of it for today’s craft and save the other for a rainy day.
- Next up – completely paint your paper plate with the skin tone colored craft paint.
- When done, set aside to let it dry completely.
- Now is the perfect time to cut out the Santa hat from your printed printable.
- Discard excess paper.
- At this point in time you should also cut out a large oval shape for his nose from the brown.
- Set aside all your pieces till later.
- Next, grab your painted paper plate piece and the hole punch.
- Using your hole punch, punch SIX holes in the paper plate piece. You want them in the center of the paper plate, but on the side that is a completely straight. Be sure to leave a small space between each hole as you go. This is where the beard will be for your gnome.
- Now grab your white tulle and scissors.
- Cut SIX 12″ inch strips for your craft.
- One by one, thread and tie them off, through the holes you just punched in the paper plate.
- To finish the Paper Plate and Tulle Beard Santa Gnome craft – simply staple/glue on the hat piece & nose, while adding some cotton balls to the rim of his red cardstock hat.
- Go ahead and add any other embellishments you see fit.
- Then display proudly for all to see!
- Don’t forget to snap a few pictures to share on our Facebook wall, so we can see your tulle beard Santa too!
RELATED —> Popsicle Stick Santa

And that’s a wrap on this tutorial!
By chance, do you love our holiday themed paper plate and tulle Santa idea as much as we do?!
Then be sure to check out our other version of a Santa using a paper plate as well! #gluedtomycrafts

Paper Plate Santa Gnome Craft
DIY your holidays with our simple craft idea! We are bringing him to life with just a few easy supplies & steps!
Here’s your checklist of supplies to bring this craft to life:
- 1 Large Paper Plate
- Christmas Printable - Landing Page
- Craft Paint skin-tone
- White Tulle
- Cardstock Paper red and brown
- White Cotton Balls
- School Glue
Prepare your creative haven by laying down a protective cover before the crafting magic begins!
Directions:
- First things first - cut your large paper plate in half. Straight up the center to create TWO equal sized pieces.
- Reverse one half of it for today's craft and save the other for a rainy day.
- Next up - completely paint your paper plate with the skin tone colored craft paint.
- When done, set aside to let it dry completely.
- Now is the perfect time to cut out the Santa hat from your printed printable.
- Discard excess paper.
- At this point in time you should also cut out a large oval shape for his nose from the brown.
- Set aside all your pieces till later.
- Next, grab your painted paper plate piece and the hole punch.
- Using your hole punch, punch SIX holes in the paper plate piece. You want them in the center of the paper plate, but on the side that is a completely straight. Be sure to leave a small space between each hole as you go. This is where the beard will be for your gnome.
- Now grab your white tulle and scissors.
- Cut SIX 12" inch strips for your craft.
- One by one, thread and tie them off, through the holes you just punched in the paper plate.
- To finish the Paper Plate and Tulle Beard Santa Gnome craft - simply staple/glue on the hat piece & nose, while adding some cotton balls to the rim of his red cardstock hat.
- Go ahead and add any other embellishments you see fit.
- Then display proudly for all to see!


NEED HELP DOWNLOADING OUR FREE PRINTABLES? PLEASE REFER TO OUR FAQ PAGE
If you've enjoyed our content or have any thoughts to share, we'd love to hear from you! Mention @gluedtomycrafts or tag #gluedtomycrafts on Instagram!