
Who needs a campfire to enjoy the ooey-gooey goodness of s’mores? Get ready for a super sweet and mess-free crafting session that brings your favorite campfire treat to life. This Torn Crepe Paper S’mores Craft is a fantastic way to spend a creative afternoon with your kids. It’s simple, fun, and uses materials you likely already have in your craft bin. Let’s get making!
This project is perfect for developing fine motor skills as little hands tear, scrunch, and glue. The best part? There’s no right or wrong way to do it, so every s’more creation will be unique!

This craft uses basic materials you likely already have at home, making it an accessible and budget-friendly activity. Kids will love tearing colorful crepe paper to create the layers of graham crackers, chocolate, and marshmallows, while also developing their fine motor skills. It’s a hands-on project that’s perfect for rainy days, playdates, or as part of a camping-themed party.
Gather Your S’mores Supplies
Before you start, let’s gather all the simple materials you’ll need for this tasty-looking craft. Having everything ready to go makes the process smooth and keeps the creative energy flowing.
Materials List:
- White Crepe Paper
- Brown Cardstock Paper (two shades, light and dark, work best)
- Black Puffy Paint or a Black Marker
- School Glue
- Scissors
- Googly Eyes (optional, for a cute character)
Craft Instructions
Now for the fun part! Follow these simple steps to build your paper s’more. We’ve broken it down to make it easy for even the youngest crafters to follow along.
Step 1: Make the Fluffy Marshmallow
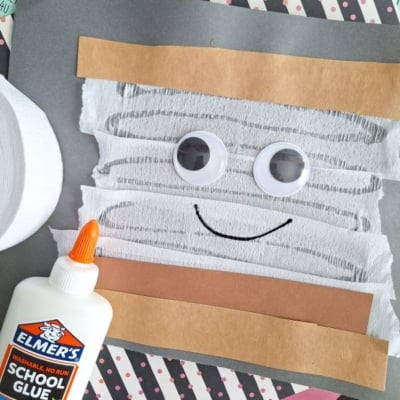
To start, let’s make the fluffy marshmallow layer. Give your child the white crepe paper and let them tear it into small, uneven pieces – this is part of the fun! The different sizes and shapes will give your marshmallow a realistic, melted look. Once you have a nice pile, spread school glue in the center of the area where your marshmallow will go, and press the torn crepe paper pieces onto the glue, piling them up for a soft, puffy effect.
Step 2: Create the Graham Cracker Base
Start by making the “graham cracker” base for your s’more. Take your light brown cardstock and cut out a large square or rectangle – this forms the bottom layer. Next, grab your dark brown cardstock and cut a slightly smaller square or rectangle, then glue it centered on top of the lighter piece. This stacked look gives your s’more a realistic, crispy graham cracker foundation that’s ready for the marshmallow and chocolate layers.
Step 3: Bring Your S’more to Life
This step is optional but adds a huge dose of personality. If you have googly eyes, stick two of them onto the white crepe paper marshmallow. Then, using your puffy paint or a black marker, draw a simple smile underneath the eyes. Suddenly, your s’more craft has a friendly face!
Step 4: Your Masterpiece Is Complete!
There you have it – a delightful and adorable Torn Crepe Paper S’more! Let your creation dry completely before displaying it.
RELATED —> Fingerprint S’mores Craft Idea For Kids

This craft is not just an activity; it’s a chance to make memories. Encourage your kids to get creative. Maybe their s’more has rainbow sprinkles made from colored paper bits, or perhaps it has three eyes instead of two. The possibilities are endless.
Hang these cute crafts on the fridge, use them to decorate for a camp-themed party, or even turn them into greeting cards. We hope you have a blast bringing this sweet treat to life. Happy crafting – and don’t forget to share your s’mores masterpieces by tagging us on your social media accounts!

Torn Crepe Paper S'mores Craft Idea for Kids
Here’s your checklist of supplies to bring this craft to life:
- White Crepe Paper
- Brown Cardstock Paper (two shades, light and dark, work best)
- Black Puffy Paint or a Black Marker
- Googly Eyes
- School Glue
Prepare your creative haven by laying down a protective cover before the crafting magic begins!
Directions:
- To start, let's make the fluffy marshmallow layer. Give your child the white crepe paper and let them tear it into small, uneven pieces - this is part of the fun! The different sizes and shapes will give your marshmallow a realistic, melted look. Once you have a nice pile, spread school glue in the center of the area where your marshmallow will go, and press the torn crepe paper pieces onto the glue, piling them up for a soft, puffy effect.
- Start by making the "graham cracker" base for your s'more. Take your light brown cardstock and cut out a large square or rectangle - this forms the bottom layer. Next, grab your dark brown cardstock and cut a slightly smaller square or rectangle, then glue it centered on top of the lighter piece. This stacked look gives your s'more a realistic, crispy graham cracker foundation that's ready for the marshmallow and chocolate layers.
- This step is optional but adds a huge dose of personality. If you have googly eyes, stick two of them onto the white crepe paper marshmallow. Then, using your puffy paint or a black marker, draw a simple smile underneath the eyes. Suddenly, your s'more craft has a friendly face!
- There you have it - a delightful and adorable Torn Crepe Paper S'more! Let your creation dry completely before displaying it.
CLICK HERE TO PRINT THE DIRECTIONS FOR THIS CRAFT