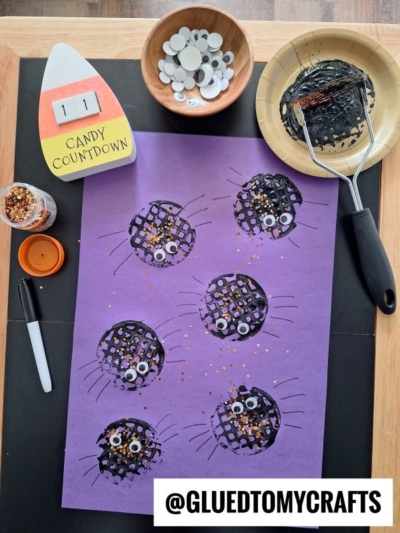
Are you looking for a Halloween craft that is equal parts spooky and silly? You have come to the right place. Sometimes the best art supplies are hiding right in your kitchen drawers. Today, we are raiding the utensil holder to create a texture-filled Potato Masher Stamped Spider craft.
Supplies You Will Need
One of the best parts of this craft is how simple the supply list is. You likely have most of these items on hand already.
- Potato Masher: Look for the metal kind with a wavy or grid pattern on the bottom. Round mashers work best for this.
- Cardstock Paper: We used purple cardstock to make the black paint pop, but orange or lime green works great too.
- Black Craft Paint: Washable tempera or acrylic paint is ideal.
- Paper Plate: To use as your paint palette.
- Loose Glitter: We used a mix of orange, gold, and silver for a festive touch.
- Wiggle Eyes: Small, medium, or large – mix them up for silly expressions!
- School Glue: For attaching the eyes (unless they are self-adhesive).
- Black Marker: A permanent marker or thick black crayon works well for drawing legs.
- Table Cover: A plastic tablecloth or newspaper to protect your workspace.
Step-by-Step Instructions
This craft involves a bit of drying time, so it’s a good idea to do the stamping first, take a snack break, and come back for the finishing touches.
1. Prepare Your Stamping Station
Start by covering your workspace. Squirt a generous amount of black craft paint onto your paper plate. You want a puddle roughly the size of your potato masher’s base. Spreading it out slightly helps ensure even coverage.
2. Dip and Stamp
Have your child take the potato masher and dip it into the black paint. Press it down firmly on the plate first to make sure the entire bottom surface is coated.
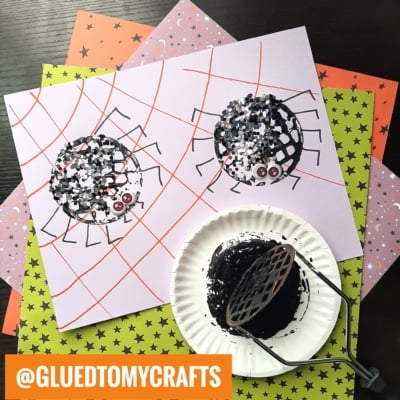
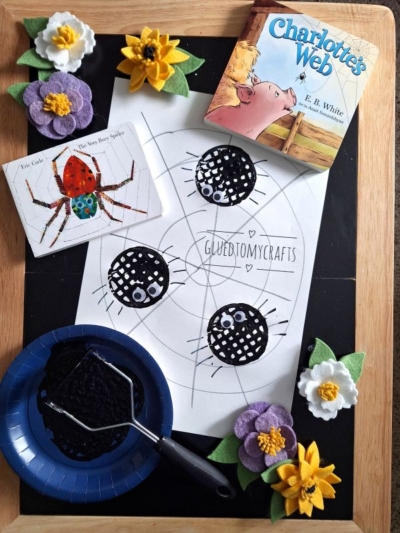
Next, press the masher down onto the center of your colored cardstock. Rock it very gently side-to-side to ensure the paint transfers, then lift it straight up. Repeat this process all over the paper to create as many “spider bodies” as you want.
3. Add Some Sparkle
While the black paint is still wet, this is your chance to add some Halloween magic. Pinch a small amount of loose glitter and sprinkle it over the wet stamped circles. The wet paint acts as glue, holding the glitter in place.
Tip: Do this step immediately after stamping each spider so the paint doesn’t dry before you can add the glitter.
4. Let It Dry
Set the paper aside to dry completely. Since the paint might be thick in some areas due to the stamping texture, give it plenty of time. This usually takes about an hour depending on how heavy-handed the stamping was.
5. Bring Them to Life
Once the black paint is dry to the touch, it is time to turn those textured blobs into spiders! Use your glue to attach two (or more!) wiggle eyes to the center of each stamped circle.
6. Draw the Legs
Finally, take your black marker and draw the legs. Spiders have eight legs, so draw four lines coming out of the left side and four lines coming out of the right side of each body. You can make them long and spindly or short and fuzzy – it’s up to the artist!
7. Finally – Display Your Artwork For All To See!
RELATED —> Recycled Egg Carton Spider Craft
Halloween crafts don’t need to be complicated to be memorable. This Potato Masher Stamped Black Spider Craft proves that simple techniques often produce the most charming results. The combination of the unique stamped texture, the sparkle of the glitter, and those goofy wiggle eyes makes for a keepsake you will want to display on the fridge all October long.
If you give this craft a try, we would love to see how it turns out! Snap a picture of your spooky spiders and share it with us on social media. Happy crafting!

Potato Masher Stamped Spider Craft Idea
Here’s your checklist of supplies to bring this craft to life:
- Cardstock Paper
- Craft Paint
- Wiggle Eyes
- Loose Craft Glitter
- Embellishments
Prepare your creative haven by laying down a protective cover before the crafting magic begins!
Directions:
- Start by covering your workspace. Squirt a generous amount of black craft paint onto your paper plate. You want a puddle roughly the size of your potato masher's base. Spreading it out slightly helps ensure even coverage.
- Have your child take the potato masher and dip it into the black paint. Press it down firmly on the plate first to make sure the entire bottom surface is coated.
- Next, press the masher down onto the center of your colored cardstock. Rock it very gently side-to-side to ensure the paint transfers, then lift it straight up. Repeat this process all over the paper to create as many "spider bodies" as you want.
- While the black paint is still wet, this is your chance to add some Halloween magic. Pinch a small amount of loose glitter and sprinkle it over the wet stamped circles. The wet paint acts as glue, holding the glitter in place.
- Set the paper aside to dry completely. Since the paint might be thick in some areas due to the stamping texture, give it plenty of time. This usually takes about an hour depending on how heavy-handed the stamping was.
- Once the black paint is dry to the touch, it is time to turn those textured blobs into spiders! Use your glue to attach two (or more!) wiggle eyes to the center of each stamped circle.
- Finally, take your black marker and draw the legs. Spiders have eight legs, so draw four lines coming out of the left side and four lines coming out of the right side of each body. You can make them long and spindly or short and fuzzy - it’s up to the artist!
CLICK HERE TO PRINT THE DIRECTIONS FOR THIS CRAFT