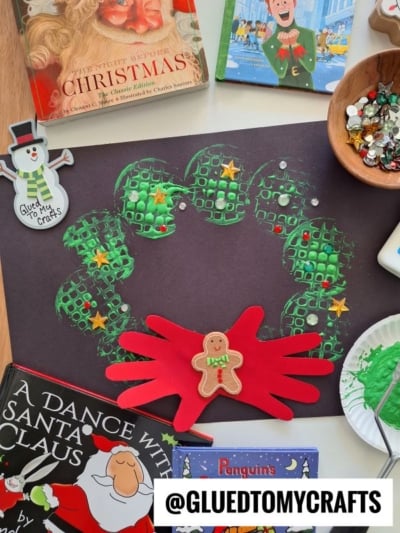
Some of the best holiday crafts start in the kitchen drawer. This potato masher wreath turns an everyday tool into a festive stamp, and kids love it. The masher leaves a fun grid pattern that looks like layers of evergreen branches. Add a bright red handprint bow, sparkly “lights,” and a sweet gingerbread man, and you get a wreath that’s full of holiday cheer.
The craft is simple, a little messy in the best way, and quick enough to finish in one afternoon. It works for a cozy day at home, a classroom holiday party, or a library story time. Read a favorite Christmas book while the paint dries, and you’ve got a full holiday activity.
Craft Supplies:
Gather everything before you start so the fun keeps flowing:
- Black construction paper (one sheet per child)
- Green acrylic paint
- A potato masher (the kind with a grid or waffle-style head works best)
- Red cardstock paper
- Sequins and gems
- White glue
- A paper plate
- A pencil and scissors (for the handprint bow)
Helpful extras: a smock or old T-shirt, a plastic tablecloth, and baby wipes for quick cleanups.
Directions:
Step 1: Spread the Green Paint
Squeeze a generous puddle of green acrylic paint onto the paper plate.
Step 2: Stamp the Wreath
Lay the black construction paper flat on the table. Have your child press the potato masher into the paint, then stamp it firmly onto the paper. Keep stamping in a circle to form the wreath shape.
Overlapping the stamps is great. It makes the wreath look full and lush, like real pine branches. Dip the masher back into the paint every one or two stamps.
Tip: For younger kids, lightly trace a circle with a pencil first, using a dinner plate as a guide. This gives them a path to follow.
Step 3: Let It Dry
Set the painted wreath aside to dry completely. Acrylic paint usually dries in 20 to 30 minutes, depending on how thick it is.
Step 4: Trace and Cut the Handprint Bow
Place your child’s hand flat on the red cardstock with the fingers slightly spread. Trace around it with a pencil. Then flip the hand over (or use the other hand) and trace a second handprint.
Cut out both handprints. Older kids can do the cutting themselves. Grown-ups can help little ones with the tricky spots between the fingers.
Step 5: Glue the Bow at the Bottom
Arrange the two handprints at the bottom center of the wreath. Point the fingers outward in opposite directions, with the thumbs touching in the middle. This creates the shape of a big, cheerful bow.
Add a few dots of white glue to the back of each handprint and press them down gently.
Step 6: Decorate With Sequins and Gems
Now comes the sparkle! Dot small spots of white glue around the green wreath. Then let your child place sequins and gems on each dot.
Let the glue dry fully before you hang or display the wreath.
RELATED —> Handprint Santa Wreath Craft Idea


This potato masher wreath proves that holiday magic can come from the simplest things. With a little paint, a handprint, and plenty of sparkle, your kids will create a decoration they’ll be proud to show off all season long.
Grab your potato masher and set up your craft table. Then let the festive fun begin! Once your wreaths are done, hang them on the fridge, tape them to the classroom door, or tuck them into a holiday card for someone special. Be sure to snap a photo and share your little artist’s creation. We’d love to see how your wreaths turn out! Happy crafting, my friends!