Create a beautiful Torn Paper Christmas Wreath with this easy, step-by-step tutorial for all ages. Includes a free printable template to get started!
Get ready to add a personal touch to your holiday decor with a craft that’s as fun to make as it is beautiful to display. This Torn Paper Christmas Wreath is the perfect project for a cozy afternoon, whether you’re crafting solo or with the whole family. It requires just a few simple materials and a bit of festive spirit. Best of all, we’re including a free printable template to make it completely foolproof!
This tutorial will guide you through creating a charming and unique holiday wreath ornament within minutes. We’ll cover everything from the materials you’ll need to step-by-step instructions.
It’s an easy, budget-friendly way to make holiday memories and a beautiful decoration you’ll be proud to hang up!
Craft Supplies:
Before you start, collect these simple materials. Most of these items are probably already in your craft bin.
- Green Construction Paper
- White Cardstock Paper
- Red Cardstock Paper
- Christmas Wreath Printable – from our landing page
- School Glue
- Pencil
- Scissors
- Embellishments
Directions:
Follow these easy steps to create your own unique torn paper holiday wreath ornament.
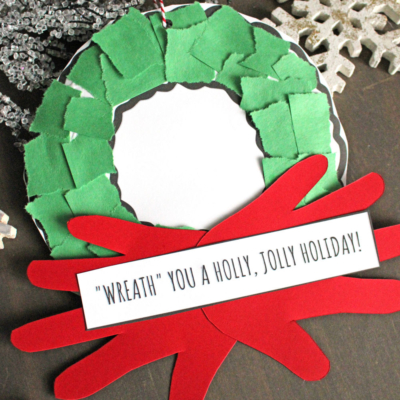
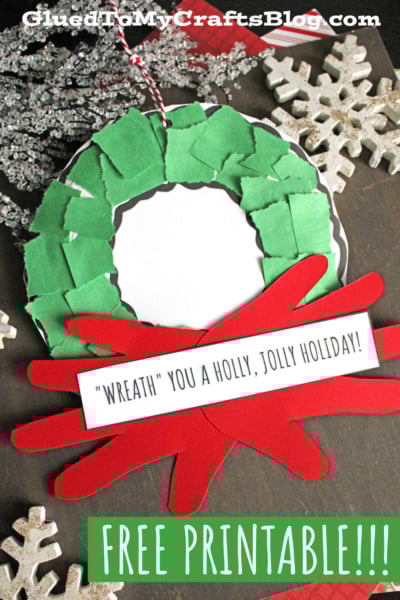
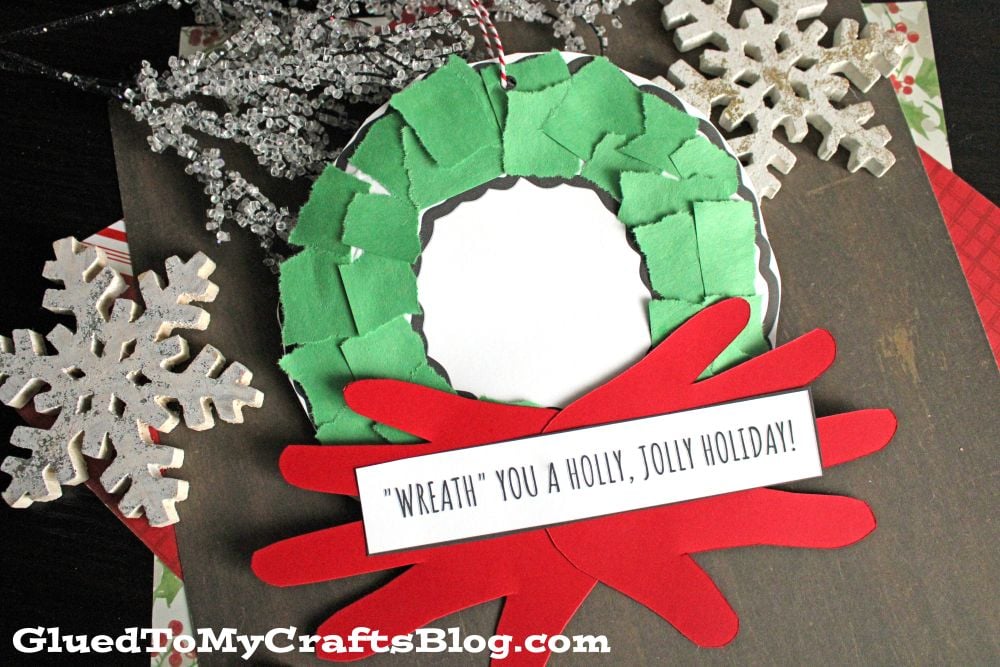
- First, download and print our free wreath template. Once printed, carefully cut out the wreath shape. If you’re using regular paper, you might want to glue it onto a piece of cardboard (like from a cereal box) and then cut it out. This creates a sturdier base that will hold up better once decorated. Go ahead and also cut out the phrase box and discard excess paper.
- This is where the magic happens. Take your sheet of green construction paper and start tearing it into small pieces. Don’t aim for perfection! The beauty of a torn paper craft is in the varied shapes and ragged edges. Make pieces of different sizes, from about the size of a dime to the size of a quarter. Create a big pile of your green paper “confetti.”
- Grab your school glue and apply a generous layer of glue to a small section of your wreath template. It’s best to work in sections so the glue doesn’t dry out before you add the paper.
- Start placing your torn green paper pieces onto the glued area. Overlap them slightly to cover all the white space. Continue applying glue and adding paper pieces, section by section, until the entire wreath base is covered in a lush, textured layer of green. Feel free to mix your different shades of green randomly for a more natural look.
- Once your green wreath is complete and the glue has had a moment to set, it’s time to add the handprint “bow.” Simply trace/cut out TWO handprint cutouts from the red cardstock paper.
- Go ahead and glue those two pieces, along with the wording to the bottom of the wreath design.
- The final step is to add a single hole punch to the top of the decorated piece and add some string. Go ahead and also add any other embellishments you see fit.
- Allow your piece to dry completely before displaying and/or gifting away!
Add a Personal Touch: The opening in the center of your wreath is just the right size for a child’s photo – what a sweet way to make your creation extra special!
RELATED —> Snowman Wreath Craft Idea

This Torn Paper Green Christmas Wreath Ornament is more than just a craft; it’s an opportunity to create festive memories and beautiful, handmade decorations. We hope you have a wonderful time making it!
Ready to start? Download your free wreath template and let the holiday crafting begin! We would absolutely love to see your finished creations. Share a photo of your wreath on social media and tag us so we can admire your holly, jolly artwork! Happy crafting, my friends!

Torn Paper Christmas Wreath Craft Idea For Kids
Create a beautiful Torn Paper Christmas Wreath with this easy, step-by-step tutorial for all ages. Includes a free printable template to get started!
Here’s your checklist of supplies to bring this craft to life:
- School Glue
Prepare your creative haven by laying down a protective cover before the crafting magic begins!
Directions:
- First, download and print our free wreath template. Once printed, carefully cut out the wreath shape. If you're using regular paper, you might want to glue it onto a piece of cardboard (like from a cereal box) and then cut it out. This creates a sturdier base that will hold up better once decorated. Go ahead and also cut out the phrase box and discard excess paper.
- This is where the magic happens. Take your sheet of green construction paper and start tearing it into small pieces. Don't aim for perfection! The beauty of a torn paper craft is in the varied shapes and ragged edges. Make pieces of different sizes, from about the size of a dime to the size of a quarter. Create a big pile of your green paper "confetti."
- Grab your school glue and apply a generous layer of glue to a small section of your wreath template. It's best to work in sections so the glue doesn’t dry out before you add the paper.
- Start placing your torn green paper pieces onto the glued area. Overlap them slightly to cover all the white space. Continue applying glue and adding paper pieces, section by section, until the entire wreath base is covered in a lush, textured layer of green. Feel free to mix your different shades of green randomly for a more natural look.
- Once your green wreath is complete and the glue has had a moment to set, it’s time to add the handprint "bow." Simply trace/cut out TWO handprint cutouts from the red cardstock paper.
- Go ahead and glue those two pieces, along with the wording to the bottom of the wreath design.
- The final step is to add a single hole punch to the top of the decorated piece and add some string. Go ahead and also add any other embellishments you see fit.
- Allow your piece to dry completely before displaying and/or gifting away!


NEED HELP DOWNLOADING OUR FREE PRINTABLES? PLEASE REFER TO OUR FAQ PAGE
If you've enjoyed our content or have any thoughts to share, we'd love to hear from you! Mention @gluedtomycrafts or tag #gluedtomycrafts on Instagram!