
Spring is finally on the horizon! As the weather warms up and flowers start to bloom, it’s the perfect time to bring some of that new life indoors with a fun art project. Nothing says “Spring” quite like fluffy yellow baby chicks.
This Potato Masher Baby Chick craft is a fantastic way to celebrate the season. It’s incredibly simple, making it perfect for toddlers and preschoolers who are just learning to control their hand movements. The unique texture created by a common kitchen utensil adds a sensory element that kids love, turning a simple stamping activity into a memorable creative session.
Plus, it’s messy enough to be fun but contained enough to keep cleanup easy! Let’s hop right into how you can recreate these adorable little birds with your little ones.
Materials Needed
You likely have most of these supplies in your kitchen or craft drawer already. Here is what you will need to get started:
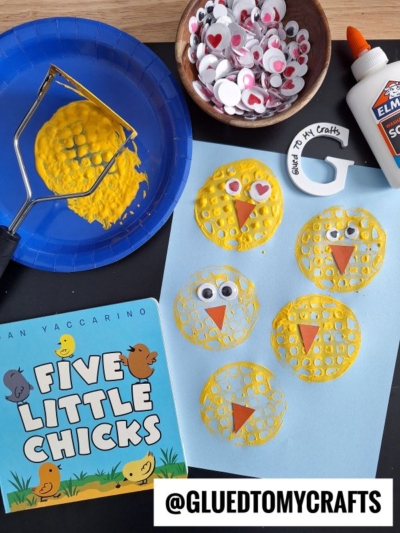
- Potato Masher: Look for one with a grid or wave pattern at the bottom. Metal mashers work great, but plastic ones are fine too.
- Yellow Washable Paint: Bright, sunny yellow works best.
- White Cardstock or Construction Paper: Thicker paper holds up better to the paint.
- Orange Cardstock: For the beaks.
- Googly Eyes: Self-adhesive ones are easiest, but any kind will do.
- School Glue: A standard bottle or glue stick.
- Paper Plate: To use as a paint palette.
- Scissors: For cutting out the beaks (adult supervision required).
Step-by-Step Instructions
1. Prepare Your Paint Station
Squeeze a generous amount of yellow washable paint onto a paper plate. You want a puddle wide enough to fit the head of your potato masher. Spread it around slightly so it’s an even layer—this ensures a good stamp without big globs of paint.
2. Mash and Stamp!
This is the fun part! Have your child dip the bottom of the potato masher into the yellow paint. Make sure the bottom is fully coated. Then, have them press it firmly down onto the white paper. Lift it straight up to reveal a textured yellow circle.
Repeat this process to make as many chicks as you want! If you are making a scene, you can stamp them in a row or scattered all over the page.
3. Let It Dry
Set the paper aside for a bit. Because the paint might be thick in some areas due to the stamping texture, it may take a little longer to dry than a brush painting. This is a great time to clean off the potato masher with warm soapy water.
4. Cut Out the Beaks
While the paint is drying, take your orange cardstock and cut out small triangles. These will serve as the beaks for your chicks. You can make them all the same size or vary them to give each chick a different personality.
5. Bring the Chicks to Life
Once the yellow paint is completely dry to the touch, it’s time to decorate. Glue a pair of googly eyes onto the center of each yellow stamped circle. Then, glue an orange triangle beak just below the eyes.
Tip: For extra fun, try using different sizes of googly eyes to make silly expressions!
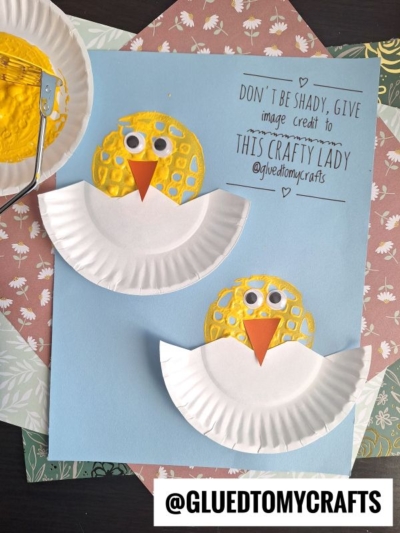
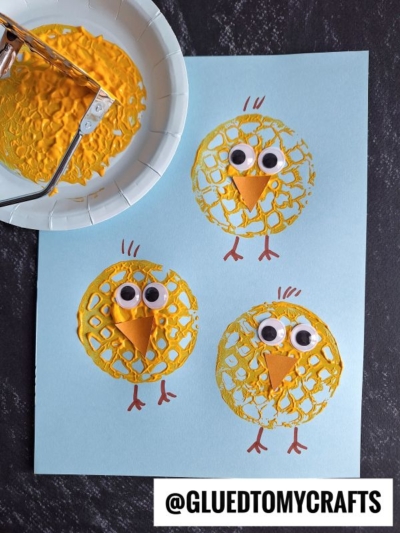
6. Add Final Touches (Optional)
If you want to get fancy, you can use markers to draw little stick legs at the bottom of the chicks or add some green grass along the bottom of the paper.
RELATED —> 60+ Craft Ideas For Kids To Make This Easter Season

There’s something truly special about seeing little hands create something new – especially when it’s as bright and cheerful as a flock of baby chicks. Crafts like this potato masher project invite everyone to get a bit messy, use their imagination, and make art that’s uniquely theirs.
Don’t forget to proudly display your finished baby chicks or share a picture of your creations with friends, family, or fellow crafters online. You might just inspire someone else to add a little more creativity and joy to their own springtime! Happy crafting, my friends!

Potato Masher Stamped Baby Yellow Chick Craft Idea
Here’s your checklist of supplies to bring this craft to life:
- Cardstock Paper
- Craft Paint
- Wiggle Eyes
- Embellishments
Prepare your creative haven by laying down a protective cover before the crafting magic begins!
Directions:
- Squeeze a generous amount of yellow washable paint onto a paper plate. You want a puddle wide enough to fit the head of your potato masher. Spread it around slightly so it’s an even layer—this ensures a good stamp without big globs of paint.
- This is the fun part! Have your child dip the bottom of the potato masher into the yellow paint. Make sure the bottom is fully coated. Then, have them press it firmly down onto the white paper. Lift it straight up to reveal a textured yellow circle.
- Repeat this process to make as many chicks as you want! If you are making a scene, you can stamp them in a row or scattered all over the page.
- Set the paper aside for a bit. Because the paint might be thick in some areas due to the stamping texture, it may take a little longer to dry than a brush painting. This is a great time to clean off the potato masher with warm soapy water.
- While the paint is drying, take your orange cardstock and cut out small triangles. These will serve as the beaks for your chicks. You can make them all the same size or vary them to give each chick a different personality.
- Once the yellow paint is completely dry to the touch, it’s time to decorate. Glue a pair of googly eyes onto the center of each yellow stamped circle. Then, glue an orange triangle beak just below the eyes.
- Tip: For extra fun, try using different sizes of googly eyes to make silly expressions!
- If you want to get fancy, you can use markers to draw little stick legs at the bottom of the chicks or add some green grass along the bottom of the paper.
CLICK HERE TO PRINT THE DIRECTIONS FOR THIS CRAFT