Crisp air, cozy sweaters, and the smell of cinnamon can only mean one thing. Autumn has officially arrived. As the leaves begin to change colors and the weather cools down, spending time indoors becomes a wonderful opportunity to bond with your little ones. Crafting together is a fantastic way to celebrate the season while building wonderful childhood memories.
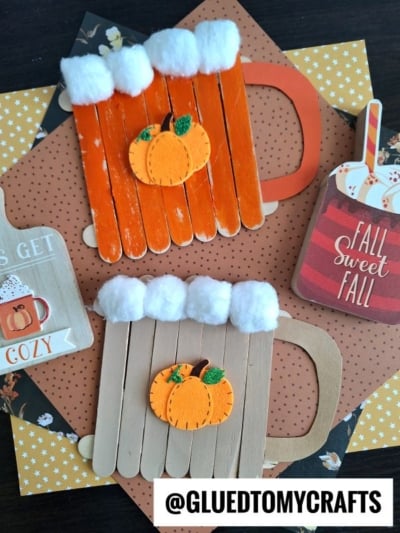
If you want a fun, inexpensive, and adorable activity, you are in the right place. We are going to show you how to create a charming popsicle stick pumpkin spice mug craft. This project perfectly captures the essence of a chilly autumn morning. Kids will love building their own little mugs of “fall hot cocoa” or “pumpkin spice latte” using simple craft supplies you likely already have around the house.
Materials You Will Need:
Before you sit down at the crafting table, take a few minutes to gather your supplies. Having everything within reach will help the activity flow smoothly. Here is what you need to create one pumpkin spice mug:
- Jumbo Popsicle Sticks – 9 per craft
- School Glue or Hot Glue Gun
- Orange Craft Paint
- Paint Brush
- Small Paper Plate
- Scissors
- Orange Cardstock Paper
- White Cotton Balls
- Large Felt Pumpkin Stickers
- Small Leaf Stickers
Step-by-Step Instructions
Now it is time for the fun part. Follow these simple directions to bring your cozy autumn mugs to life.
Step 1: Build the Mug Base
First, you need to create a sturdy foundation for your craft. Grab your jumbo popsicle sticks and your bottle of liquid school glue.
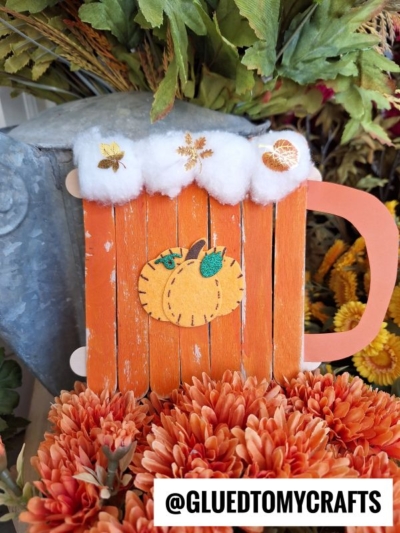
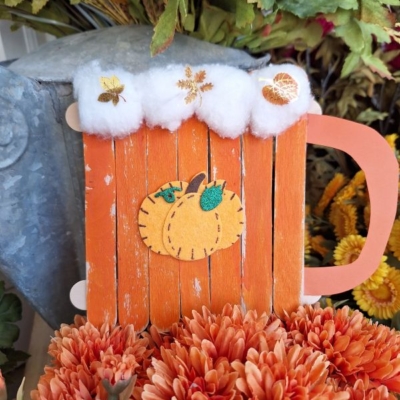
Lay seven popsicle sticks flat on the table, right next to each other, so they look like a wooden fence. Next, grab two more popsicle sticks. Apply a generous line of glue along these two sticks. Lay them horizontally across the back of your “fence” to secure the eight vertical sticks in place. Press down firmly. Set the wooden shape aside in a safe spot and let it dry completely.
Step 2: Paint the Popsicle Sticks
When the glue is completely dry, you are ready for paint. Bring your paper plate palette over to your workspace.
Grab your foam paint brush and paint the front of your craft stick mug shape however you like. A nice, bright shade of orange perfectly captures the pumpkin spice theme. Encourage your child to paint using smooth, up-and-down strokes. When done with this step, set the painted wood shape aside to allow the paint to dry entirely.
Step 3: Add the Mug Handle
Every good coffee mug needs a sturdy handle. Grab your choice of orange or tan cardstock paper and your scissors.
Cut out a simple “C” shape that will go on the side of the mug. Make sure the handle is proportional to the size of your painted popsicle stick base. Apply a line of glue to the ends of the paper “C” shape. Press the glued ends onto the back right side of your painted popsicle sticks.
Step 4: Top It With Fluffy Foam
No pumpkin spice latte is complete without a massive dollop of whipped cream on top. Take your liquid glue and draw a thick line across the top front edge of the painted popsicle sticks.
Take your white cotton balls and press them firmly into the glue line. Line them up side by side so they look like a fluffy, overflowing marshmallow or whipped cream topping.
Step 5: Decorate with Fall Flair
To finish off your pumpkin spice mug craft, have the children add their final embellishments. Peel the backing off a felt pumpkin sticker and place it right in the center of the orange popsicle sticks.
Next, grab your smaller metallic leaf or star stickers. Carefully place a few of these directly onto the white cotton balls. Allow everything to dry completely in an undisturbed location before moving the crafts.
RELATED —> Paper Plate Pumpkin Spice Latte Cup Craft
We hope you thoroughly enjoy making this sweet popsicle stick pumpkin spice mug craft with your kids this fall. It provides a wonderful way to slow down, get creative, and celebrate the cozy months ahead. The creative process is just as important as the finished product, so remember to embrace the messy hands and the proud smiles.
Display your beautiful autumn mugs proudly when you are done. Pin them to your inspiration boards, hang them on your classroom doors, or give them as sweet handmade gifts to grandparents. Happy crafting, and stay cozy out there!

Popsicle Stick Pumpkin Spice Mug Craft For Kids
Here’s your checklist of supplies to bring this craft to life:
- 9 Jumbo Popsicle Sticks
- Craft Paint
- Cardstock Paper
- Embellishments
- School Glue
- 1 Scissors
Prepare your creative haven by laying down a protective cover before the crafting magic begins!
Directions:
- First, you need to create a sturdy foundation for your craft. Grab your jumbo popsicle sticks and your bottle of liquid school glue.
- Lay seven popsicle sticks flat on the table, right next to each other, so they look like a wooden fence. Next, grab two more popsicle sticks. Apply a generous line of glue along these two sticks. Lay them horizontally across the back of your "fence" to secure the eight vertical sticks in place. Press down firmly. Set the wooden shape aside in a safe spot and let it dry completely.
- When the glue is completely dry, you are ready for paint. Bring your paper plate palette over to your workspace.
- Grab your foam paint brush and paint the front of your craft stick mug shape however you like. A nice, bright shade of orange perfectly captures the pumpkin spice theme. Encourage your child to paint using smooth, up-and-down strokes. When done with this step, set the painted wood shape aside to allow the paint to dry entirely.
- Every good coffee mug needs a sturdy handle. Grab your choice of orange or tan cardstock paper and your scissors.
- Cut out a simple "C" shape that will go on the side of the mug. Make sure the handle is proportional to the size of your painted popsicle stick base. Apply a line of glue to the ends of the paper "C" shape. Press the glued ends onto the back right side of your painted popsicle sticks.
- No pumpkin spice latte is complete without a massive dollop of whipped cream on top. Take your liquid glue and draw a thick line across the top front edge of the painted popsicle sticks.
- Take your white cotton balls and press them firmly into the glue line. Line them up side by side so they look like a fluffy, overflowing marshmallow or whipped cream topping.
- To finish off your pumpkin spice mug craft, have the children add their final embellishments. Peel the backing off a felt pumpkin sticker and place it right in the center of the orange popsicle sticks.
- Next, grab your smaller metallic leaf or star stickers. Carefully place a few of these directly onto the white cotton balls. Allow everything to dry completely in an undisturbed location before moving the crafts.
CLICK HERE TO PRINT THE DIRECTIONS FOR THIS CRAFT