
The holiday season offers the perfect excuse to gather around the table and get creative with your kids. If you want a simple, budget-friendly activity that brings instant holiday cheer, we have a wonderful project for you. This paper bag gingerbread man craft turns basic craft supplies into an adorable, festive character within minutes!
Materials You Need
Before you start, clear off your table and gather your supplies. Having everything within reach makes the crafting process much smoother for little ones. You will need:
- Brown paper lunch bags: The standard brown bag serves as the perfect baked gingerbread color.
- Tulip Puffy Paint (White): This dimensional fabric paint is the secret ingredient! It creates raised, realistic-looking icing lines that dry 3D.
- Large googly eyes: These give your gingerbread man a fun, expressive face.
- Rhinestones or sequins: Pick out some colorful gems (like red and green) to use as candy buttons. A small red rhinestone also makes a cute nose.
- Black marker: You need this to draw a happy, sweet smile.
- Craft glue: A strong liquid school glue works best for attaching the heavy rhinestones and plastic eyes.
Step-by-Step Instructions
Follow these easy steps to bring your paper bag gingerbread man to life. We recommend putting down a piece of scrap paper or a plastic mat, just in case the glue gets a little messy.
Step 1: Prepare the Gingerbread Head
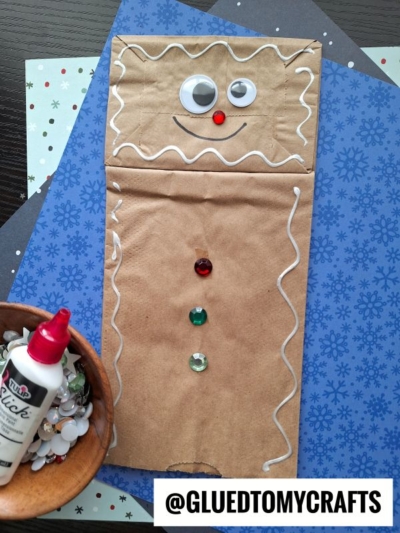
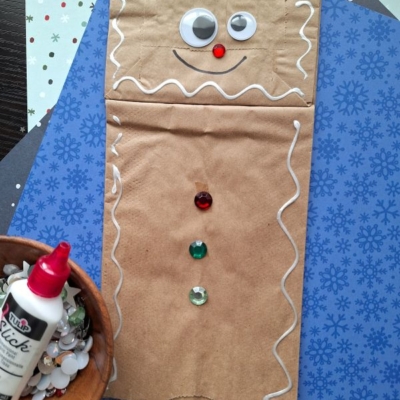
Lay your brown paper bag flat on the table. Make sure the folded bottom flap of the bag points upward and faces you. This square flap will act as the gingerbread man’s head, while the long bottom section becomes the body.
Step 2: Create a Friendly Face
Grab your craft glue and attach two large googly eyes near the top center of the head flap. Just below the eyes, glue down a small red rhinestone to serve as a cute little nose. Finally, take your black marker and draw a simple, curved line under the nose to give your gingerbread man a big, cheerful smile.
Step 3: Add the Candy Buttons
Every gingerbread cookie needs a few colorful buttons! Have your child pick out three medium-sized rhinestones. Squeeze three small dots of glue down the center of the bag’s body section. Press the rhinestones firmly into the glue. Classic Christmas colors like red and green look fantastic, but let your kids choose whichever colors they love most.
Step 4: Draw the Frosting
Now it is time for the best part. Take your white Tulip Puffy Paint and carefully draw a wavy, zig-zag line along the top and bottom edges of the head flap. Then, draw long, wavy vertical lines down the left and right sides of the main body section. Squeezing the bottle gently creates thick, raised lines that look exactly like royal icing.
Step 5: Let It Dry
Because you used liquid glue and thick dimensional paint, your craft will need some time to set. Lay the paper bag flat in a safe spot and allow it to dry completely. This usually takes a few hours, so it is a great time to take a break and drink some hot cocoa!
RELATED —> Gingerbread Man Photo Ornament

Making holiday crafts with your family creates lasting memories and gives you wonderful handmade decorations to display around your home. This paper bag gingerbread man is simple, festive, and incredibly fun for kids to put together.
Grab a pack of paper bags, break out the puffy paint, and host your very own paper-crafting bake-off today! Once they dry, slip them on your hands and put on a festive puppet show for the whole family to enjoy. Happy crafting, my friends!

Paper Bag Gingerbread Man Craft Idea
Here’s your checklist of supplies to bring this craft to life:
- Brown Paper Bag
- Tulip Puffy Paint
- Wiggle Eyes
- Embellishments
- School Glue
Prepare your creative haven by laying down a protective cover before the crafting magic begins!
Directions:
- Lay your brown paper bag flat on the table. Make sure the folded bottom flap of the bag points upward and faces you. This square flap will act as the gingerbread man's head, while the long bottom section becomes the body.
- Grab your craft glue and attach two large googly eyes near the top center of the head flap. Just below the eyes, glue down a small red rhinestone to serve as a cute little nose. Finally, take your black marker and draw a simple, curved line under the nose to give your gingerbread man a big, cheerful smile.
- Every gingerbread cookie needs a few colorful buttons! Have your child pick out three medium-sized rhinestones. Squeeze three small dots of glue down the center of the bag's body section. Press the rhinestones firmly into the glue. Classic Christmas colors like red and green look fantastic, but let your kids choose whichever colors they love most.
- Now it is time for the best part. Take your white Tulip Puffy Paint and carefully draw a wavy, zig-zag line along the top and bottom edges of the head flap. Then, draw long, wavy vertical lines down the left and right sides of the main body section. Squeezing the bottle gently creates thick, raised lines that look exactly like royal icing.
- Because you used liquid glue and thick dimensional paint, your craft will need some time to set. Lay the paper bag flat in a safe spot and allow it to dry completely. This usually takes a few hours, so it is a great time to take a break and drink some hot cocoa!
CLICK HERE TO PRINT THE DIRECTIONS FOR THIS CRAFT