
Get ready for some festive fun this St. Patrick’s Day with an easy and delightful craft that kids of all ages will love. We’re combining the magic of leprechauns and the charm of gnomes into one adorable project: the Fork Painted Leprechaun Gnome! This DIY leprechaun craft uses a simple household item – a fork – to create a wonderfully textured beard, making it a unique and engaging activity.
This tutorial will guide you through creating your very own lucky leprechaun gnome. It’s the perfect St. Patrick’s Day craft for kids to make at home or in the classroom. Let’s gather our supplies and get ready to paint a little magic.
Materials for Your Leprechaun Gnome Craft:
Before you start, gather these simple materials. This list is straightforward, making your prep time quick and easy.
- Craft Paper/Cardstock: You will need a few different colors.
-
- Gray or any neutral color for the gnome’s body base.
- Green patterned paper (like plaid or shamrocks) for the hat.
- Light brown or tan for the nose.
- Orange Craft Paint: A bright, bold orange works best for the leprechaun beard. Washable, non-toxic paint is ideal for younger children.
- A Plastic Fork: This is your special painting tool!
- Scissors: For cutting out the paper shapes.
- Glue: A glue stick or school glue will work perfectly.
- A Paper Plate or Paint Tray: To hold your orange paint.
Step-by-Step Instructions:
Follow these simple steps to bring your fork-painted leprechaun gnome to life. This process is designed to be easy for little hands to follow with some adult supervision.
Step 1: Prepare Your Crafting Space
Lay down some newspaper or a craft mat to protect your surface. Squeeze a generous dollop of orange paint onto your paper plate. This will be your paint palette.
Step 2: Cut Out the Gnome Shapes
First, you’ll need to prepare the different parts of your gnome from the craft paper.
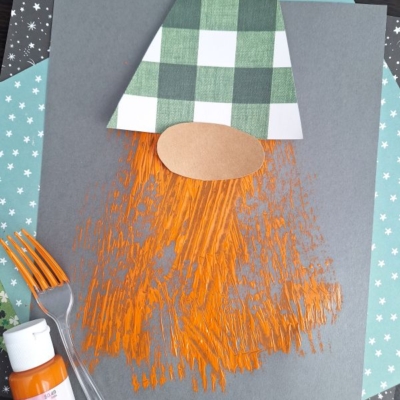
- Hat: From your green patterned paper, cut out a tall, slender triangle. This will be the leprechaun gnome’s hat.
- Nose: Using the light brown or tan paper, cut out a small oval shape. This will serve as the gnome’s nose.
- Body: Take your gray or neutral-colored cardstock. This sheet will be the base on which you assemble your gnome. You don’t need to cut it into a specific shape yet; a standard rectangular piece will do.
Step 3: The Fun Part – Fork Painting!
Now it’s time for the signature element of this DIY leprechaun craft. Dip the tines of your plastic fork into the orange paint on the paper plate. Make sure the back of the fork tines are well-coated.
Starting at the lower section of your gray cardstock (the gnome’s body), press the paint-covered fork onto the paper and pull it downwards in a sweeping motion. This action creates textured lines that look just like a bushy beard. Repeat this process, working your way up toward where the nose will go, and across the paper to create a full, vibrant orange beard. Encourage kids to experiment with different angles and strokes to give their gnome’s beard a unique look.
Step 4: Glue the Hat and Nose
Position the green triangle hat at the top of your gray cardstock and glue it down. Next, take the brown oval nose and glue it so it slightly overlaps the bottom edge of the hat. This placement makes it look like the hat is pulled down snugly over the gnome’s face.
Step 5: Let It Dry
Once you are happy with your gnome’s magnificent orange beard, set the craft aside to dry completely. Acrylic paint usually dries fairly quickly, but it’s best to give it at least an hour to avoid smudges.
Step 6: Finishing Touches
After the paint is completely dry, you can add some final touches if you wish. You can trim the gray cardstock around the gnome’s shape for a cleaner look or leave it as is to frame your creation. Your Fork Painted Leprechaun Gnome is now complete!
RELATED —> Popsicle Stick Leprechaun Hat Craft Idea

This fork painting St. Patrick’s Day craft idea is more than just a way to pass the time; it’s an opportunity to create lasting memories with your children. The unique technique and adorable result make it a standout project for the month of March!
We encourage you to try this easy craft for children and see what charming leprechaun gnomes you can create. Display them on the fridge, hang them as a festive garland, or give them as handmade St. Patrick’s Day cards to friends and family. Happy crafting!
RELATED —> Handprint Gnome Leprechaun Keepsake

Fork Painted Leprechaun Gnome Craft for Kids
Here’s your checklist of supplies to bring this craft to life:
- Cardstock Paper
- Craft Paint
- Embellishments
- School Glue
Prepare your creative haven by laying down a protective cover before the crafting magic begins!
Directions:
- Lay down some newspaper or a craft mat to protect your surface. Squeeze a generous dollop of orange paint onto your paper plate. This will be your paint palette.
- First, you'll need to prepare the different parts of your gnome from the craft paper.
- Hat: From your green patterned paper, cut out a tall, slender triangle. This will be the leprechaun gnome's hat.
- Nose: Using the light brown or tan paper, cut out a small oval shape. This will serve as the gnome's nose.
- Body: Take your gray or neutral-colored cardstock. This sheet will be the base on which you assemble your gnome. You don't need to cut it into a specific shape yet; a standard rectangular piece will do.
- Now it's time for the signature element of this DIY leprechaun craft. Dip the tines of your plastic fork into the orange paint on the paper plate. Make sure the back of the fork tines are well-coated.
- Starting at the lower section of your gray cardstock (the gnome's body), press the paint-covered fork onto the paper and pull it downwards in a sweeping motion. This action creates textured lines that look just like a bushy beard. Repeat this process, working your way up toward where the nose will go, and across the paper to create a full, vibrant orange beard. Encourage kids to experiment with different angles and strokes to give their gnome's beard a unique look.
- Position the green triangle hat at the top of your gray cardstock and glue it down. Next, take the brown oval nose and glue it so it slightly overlaps the bottom edge of the hat. This placement makes it look like the hat is pulled down snugly over the gnome's face.
- Once you are happy with your gnome's magnificent orange beard, set the craft aside to dry completely. Acrylic paint usually dries fairly quickly, but it's best to give it at least an hour to avoid smudges.
- After the paint is completely dry, you can add some final touches if you wish. You can trim the gray cardstock around the gnome's shape for a cleaner look or leave it as is to frame your creation. Your Fork Painted Leprechaun Gnome is now complete!
Grab our favorite books via our Amazon affiliate link! In our Amazon storefront you will find books, toys and craft supplies we absolutely love using for our Glued To My Crafts tutorials!