Are you looking for a festive project that lights up your holiday crafting session? These Air Dry Clay and Mosaic Tile Ornaments are the perfect solution. They sparkle beautifully against Christmas tree lights, and the process is simple enough for little hands yet satisfyingly creative for adults.
This craft relies on the “press-in” method, meaning you don’t need messy glue to attach the tiles. You simply arrange them while the clay is soft. It is a relaxing, low-stress activity that results in a high-end look. Let’s get creating!

What You’ll Need
- White Air Dry Clay: A standard tub from the craft store works perfectly.
- Mosaic Tiles: Look for small, colorful plastic or resin triangles. Translucent ones look best as they catch the light.
- Star Cookie Cutter: Metal cutters tend to give a cleaner edge.
- Rolling Pin: A small fondant roller or even a sturdy smooth cup.
- Paper Straw: To create the hanging hole.
- Twine or Ribbon: For hanging the finished ornament.
- A work surface: A silicone mat or a plastic tray to protect your table.
Step-by-Step Instructions
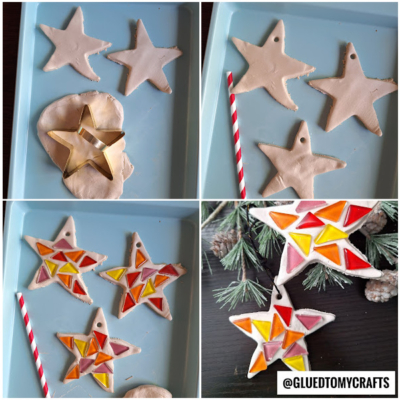
1. Prepare Your Clay
Grab a chunk of clay from the container. Knead it in your hands for a minute to warm it up and make it pliable. Place it on your work surface and use your rolling pin to flatten it. You want a slab that is about a quarter-inch thick. If it is too thin, the ornament might crack; too thick, and it will take days to dry.
2. Cut Your Shapes
Press your star cookie cutter firmly into the rolled-out clay. Give it a little wiggle to ensure it cuts all the way through, then lift the cutter. Gently peel away the excess clay from around the star. If the edges of your star look a bit rough, you can smooth them down lightly with your finger.
3. Make the Hanging Hole
Before you start decorating, you need to make a spot for the string. Take your paper straw and press it into the top point of the star. Twist the straw slightly and pull it out. This creates a perfect, clean hole for hanging later. Do this now while the clay is still wet!
4. Create the Mosaic Design
This is the fun part! Take your mosaic tiles and gently press them into the soft clay star. You can arrange them in a specific pattern or go for a random, confetti-style look.
Pro Tip: Press the tiles down firmly so they are flush with the surface of the clay. As the clay dries, it shrinks slightly, which will help lock the tiles in place. If you don’t press them deep enough, they might pop out when dry.
5. Let It Dry
Move your ornaments to a safe spot to dry. A wire cooling rack is great for air circulation, but a sheet of parchment paper works too. Air dry clay usually takes 24 to 48 hours to fully harden, depending on the humidity in your home. Be patient! The clay will turn from a light grey to a bright white when it is fully dry.
6. String and Hang
Once the ornaments are solid and white, cut a piece of twine or festive ribbon. Thread it through the hole you made with the straw and tie a loop.
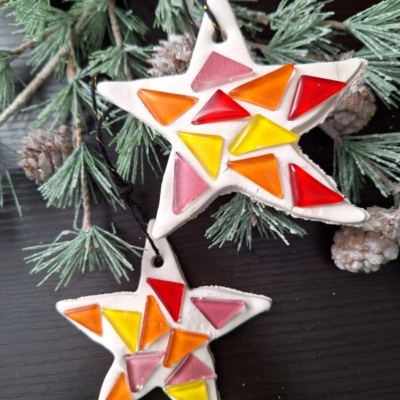
Your custom mosaic ornaments are now ready to hang! These make wonderful keepsakes for family members or charming tags for holiday gifts. Enjoy the sparkle!
RELATED —> Handprint Clay Ornament Craft Ideas

Your custom mosaic ornaments are now ready to hang! Take a step back and enjoy the shimmer and color you’ve added to your holiday decor – all with your own hands. Whether you’re giving them as gifts or keeping them for yourself, each ornament tells a story and adds a personal touch to the season. Don’t forget to share your beautiful creations with friends and family, or post a photo online to inspire others. Happy crafting and happy holidays!

DIY Mosaic Star Ornaments with Air Dry Clay
Here’s your checklist of supplies to bring this craft to life:
- White Air Dry Clay: A standard tub from the craft store works perfectly.
- Mosaic Tiles: Look for small , colorful plastic or resin triangles. Translucent ones look best as they catch the light.
- Twine or Ribbon: For hanging the finished ornament.
- Star Cookie Cutter: Metal cutters tend to give a cleaner edge.
- Rolling Pin: A small fondant roller or even a sturdy smooth cup.
- Paper Straw: To create the hanging hole.
- A work surface: A silicone mat or a plastic tray to protect your table.
Prepare your creative haven by laying down a protective cover before the crafting magic begins!
Directions:
- Grab a chunk of clay from the container. Knead it in your hands for a minute to warm it up and make it pliable. Place it on your work surface and use your rolling pin to flatten it. You want a slab that is about a quarter-inch thick. If it is too thin, the ornament might crack; too thick, and it will take days to dry.
- Press your star cookie cutter firmly into the rolled-out clay. Give it a little wiggle to ensure it cuts all the way through, then lift the cutter. Gently peel away the excess clay from around the star. If the edges of your star look a bit rough, you can smooth them down lightly with your finger.
- Before you start decorating, you need to make a spot for the string. Take your paper straw and press it into the top point of the star. Twist the straw slightly and pull it out. This creates a perfect, clean hole for hanging later. Do this now while the clay is still wet!
- This is the fun part! Take your mosaic tiles and gently press them into the soft clay star. You can arrange them in a specific pattern or go for a random, confetti-style look.
- Pro Tip: Press the tiles down firmly so they are flush with the surface of the clay. As the clay dries, it shrinks slightly, which will help lock the tiles in place. If you don't press them deep enough, they might pop out when dry.
- Move your ornaments to a safe spot to dry. A wire cooling rack is great for air circulation, but a sheet of parchment paper works too. Air dry clay usually takes 24 to 48 hours to fully harden, depending on the humidity in your home. Be patient! The clay will turn from a light grey to a bright white when it is fully dry.
- Once the ornaments are solid and white, cut a piece of twine or festive ribbon. Thread it through the hole you made with the straw and tie a loop.
- Your custom mosaic ornaments are now ready to hang! These make wonderful keepsakes for family members or charming tags for holiday gifts. Enjoy the sparkle!
CLICK HERE TO PRINT THE DIRECTIONS FOR THIS CRAFT