Finding engaging and colorful activities for young children often feels like a balancing act. You want a project that sparks their creativity and holds their attention, but you also need something that requires minimal preparation. This vibrant sunshine and rainbow craft delivers exactly that perfectly balanced experience.
We will show you how to transform basic household supplies into a cheerful, textured masterpiece. This tutorial covers everything you need to know to create a smiling sun with fluffy clouds and flowing rainbow streamers!
Materials You Will Need
You probably already have most of these supplies tucked away in a craft closet or kitchen cabinet. If you are missing anything, a quick trip to a local craft store or dollar store will easily complete your list.
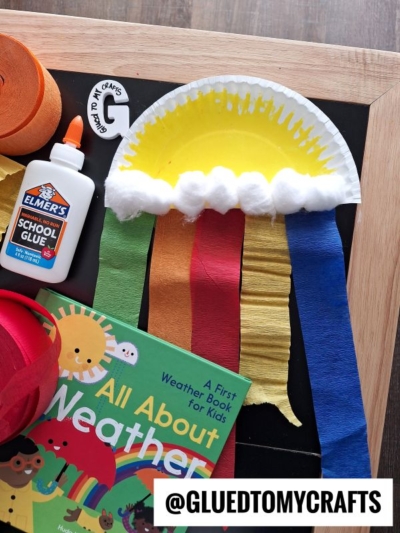
- Paper plates: A standard yellow or white paper plate serves as the base for the sun. You will cut this in half, meaning one plate provides enough material for two crafts.
- Yellow paint or markers: if using white paper plates, you will need to paint it first.
- White cotton balls: These create the thick, fluffy cloud base at the bottom of the sun.
- Crepe paper streamers: Gather rolls of crepe paper in classic rainbow colors like red, orange, yellow, green, blue, and purple.
- Large googly eyes: Two large googly eyes give the sun a fun, animated personality.
- Black marker: You will use this to draw a happy smile on the sun’s face.
- Liquid school glue: A standard washable liquid glue works best for securing the cotton balls and streamers.
- Scissors: You need these to cut the paper plate and the crepe paper strips.
Step-by-Step Instructions
This craft comes together quickly and allows children to take the lead on almost every step. Clear a workspace, lay down some newspaper to protect your table, and gather your supplies.
Step 1: Prepare the Sun Base
Start by taking a standard paper plate and cutting it directly in half down the center. You only need one half to create your sun. If using a white paper plate, let kids paint the entire piece yellow. Allow the plate to dry completely before moving on to the next step to prevent the colors from smudging.
Step 2: Add the Cheerful Face
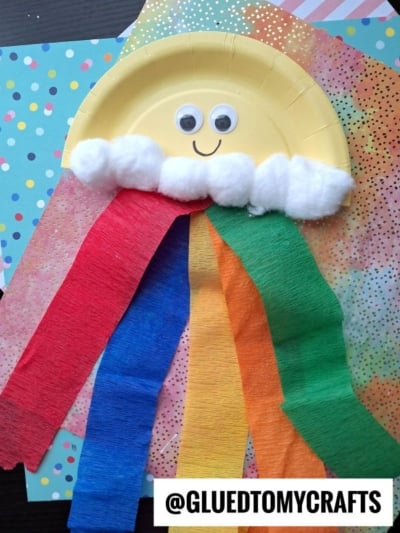
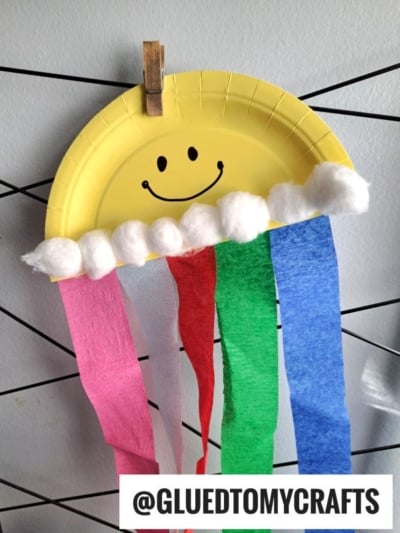
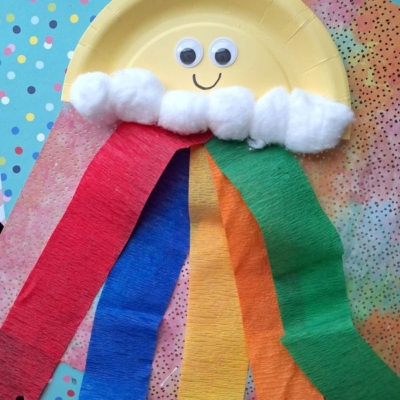
Once the yellow base is dry, it is time to give your sunshine a personality. Help your child squeeze two small dots of liquid glue near the top curve of the plate. Press the large googly eyes firmly into the glue. Take your black marker and draw a wide, cheerful smile right below the eyes.
Step 3: Create the Fluffy Cloud Base
Now you will add that wonderful, soft texture to the craft. Apply a thick line of liquid glue straight across the flat bottom edge of the paper plate half. Have your child take the white cotton balls and press them firmly into the glue line. They should arrange the cotton balls side-by-side until the entire bottom edge looks like a thick, fluffy cloud.
Step 4: Cut the Rainbow Streamers
While the cloud base dries slightly, unroll your bright crepe paper. Cut one strip of each color, making them roughly twelve to eighteen inches long. You can make them longer if you want a more dramatic rainbow effect, or keep them shorter for easier handling.
Step 5: Attach the Vibrant Rainbow
Flip the paper plate over so the back side faces up. Apply a line of glue along the flat bottom edge, directly behind where the cotton balls sit on the front. Take your colorful crepe paper strips and press the top of each strip into the glue. Arrange them in rainbow order from left to right, creating a beautiful, flowing curtain of color.
Step 6: Let It Dry
Liquid glue requires patience. Set the finished craft aside in a safe, flat area. Leave it undisturbed for a few hours to ensure the heavy cotton balls and the long streamers are fully secured to the plate.
RELATED —> Fork Painted Sunshine Craft Idea For Kids
This sunshine and rainbow craft is the perfect blend of creativity, learning, and fun. With just a few simple supplies, kids can create something vibrant and joyful that will brighten any space. Enjoy the smiles, laughter, and sense of accomplishment as your little ones craft their own piece of sunshine! Happy crafting, my friends!

Crepe Paper & Paper Plate Sunshine Craft Idea
Here’s your checklist of supplies to bring this craft to life:
- School Glue
Prepare your creative haven by laying down a protective cover before the crafting magic begins!
Directions:
- Start by taking a standard paper plate and cutting it directly in half down the center. You only need one half to create your sun. If using a white paper plate, let kids paint the entire piece yellow. Allow the plate to dry completely before moving on to the next step to prevent the colors from smudging.
- Once the yellow base is dry, it is time to give your sunshine a personality. Help your child squeeze two small dots of liquid glue near the top curve of the plate. Press the large googly eyes firmly into the glue. Take your black marker and draw a wide, cheerful smile right below the eyes.
- Now you will add that wonderful, soft texture to the craft. Apply a thick line of liquid glue straight across the flat bottom edge of the paper plate half. Have your child take the white cotton balls and press them firmly into the glue line. They should arrange the cotton balls side-by-side until the entire bottom edge looks like a thick, fluffy cloud.
- While the cloud base dries slightly, unroll your bright crepe paper. Cut one strip of each color, making them roughly twelve to eighteen inches long. You can make them longer if you want a more dramatic rainbow effect, or keep them shorter for easier handling.
- Flip the paper plate over so the back side faces up. Apply a line of glue along the flat bottom edge, directly behind where the cotton balls sit on the front. Take your colorful crepe paper strips and press the top of each strip into the glue. Arrange them in rainbow order from left to right, creating a beautiful, flowing curtain of color.
- Liquid glue requires patience. Set the finished craft aside in a safe, flat area. Leave it undisturbed for a few hours to ensure the heavy cotton balls and the long streamers are fully secured to the plate.
CLICK HERE TO PRINT THE DIRECTIONS FOR THIS CRAFT