Bring holiday cheer to your home with this adorable 3D reindeer craft! Perfect for kids and adults alike, this project uses simple materials to create a festive decoration or keepsake.
Materials Needed
- Brown cardstock or construction paper
- Black cardstock (for antlers)
- White marker or paint pen
- Googly eyes
- Small red gift bow (or red pom-pom)
- Scissors
- Glue stick or craft glue
- Optional: Snowflake decorations, glitter, or embellishments
Instructions
-
Prepare the Reindeer Head
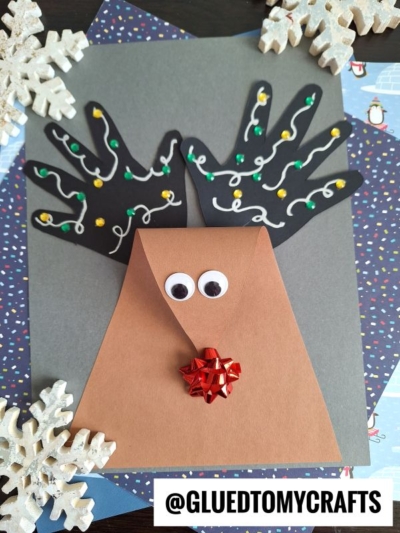
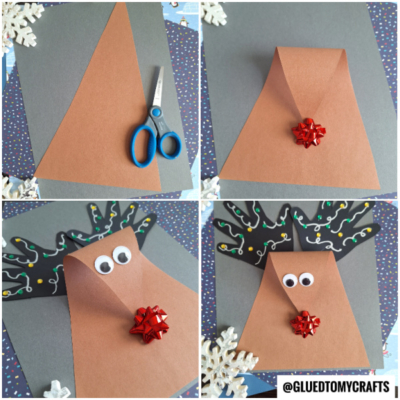
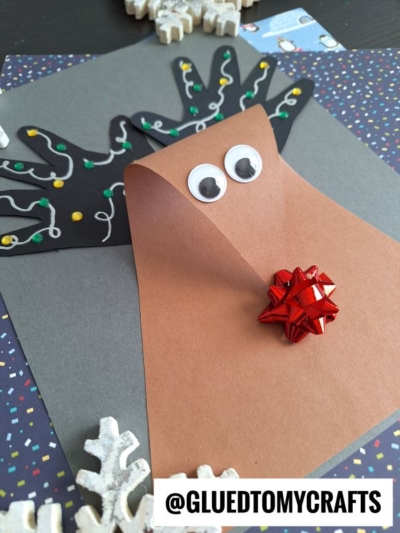
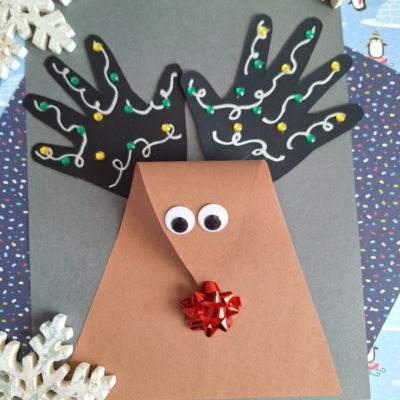
- Take a piece of brown cardstock and cut it into a large triangular shape. This will form the reindeer’s head.
- Now take the pointed tip of the triangle shape and slightly fold it over, to the center of the cutout and secure the fold with some glue to keep the shape intact.
- Stick a small red bow in the center, to create the reindeer’s nose.
-
Add the Reindeer’s Features
- Attach two googly eyes to the upper part of the folded triangle.
-
Create the Handprint Antlers
- Trace your hands (or your child’s hands) onto black cardstock and cut out the shapes.
- Use a white marker or paint pen to draw squiggly lines on the handprints, mimicking Christmas light strings.
- Add small green and yellow circular embellishments along the lines to represent the lights.
-
Assemble the Reindeer
- Glue the handprint antlers to the back of the reindeer head, positioning them so the fingers point upward and outward.
-
Create the Background
- Use a dark gray or festive patterned paper as the base for your craft.
- Arrange and glue the reindeer onto the background. Add snowflake decorations or other embellishments around the edges for a wintery touch.
-
Display Your Craft
- Let the glue dry completely, then display your 3D reindeer on a shelf, hang it on the wall, or use it as part of a holiday card!
RELATED —> Paint Splat Reindeer Craft Idea For Kids
And there you have it! Your 3D Reindeer Craft with Handprint Antlers is complete and ready to spread holiday cheer. Whether you display it proudly or gift it to someone special, this festive craft is sure to bring smiles all around. Happy crafting! 🎄✨

3D Reindeer Craft with Handprint Antlers
Create a fun 3D Reindeer Craft with simple materials like cardstock, googly eyes, and a small red bow for the nose.
Here’s your checklist of supplies to bring this craft to life:
- Cardstock Paper
- Wiggle Eyes
- Small Gift Bow
- School Glue
- Pen/Pencil
Prepare your creative haven by laying down a protective cover before the crafting magic begins!
Directions:
- Take a piece of brown cardstock and cut it into a large triangular shape. This will form the reindeer's head.
- Now take the pointed tip of the triangle shape and slightly fold it over, to the center of the cutout and secure the fold with some glue to keep the shape intact.
- Stick a small red bow in the center, to create the reindeer's nose.
- Attach two googly eyes to the upper part of the folded triangle.
- Trace your hands (or your child’s hands) onto black cardstock and cut out the shapes.
- Use a white marker or paint pen to draw squiggly lines on the handprints, mimicking Christmas light strings.
- Add small green and yellow circular embellishments along the lines to represent the lights.
- Glue the handprint antlers to the back of the reindeer head, positioning them so the fingers point upward and outward.
- Use a dark gray or festive patterned paper as the base for your craft.
- Arrange and glue the reindeer onto the background. Add snowflake decorations or other embellishments around the edges for a wintery touch.
- Let the glue dry completely, then display your 3D reindeer on a shelf, hang it on the wall, or use it as part of a holiday card!
CLICK HERE TO PRINT THE DIRECTIONS FOR THIS CRAFT
If you've enjoyed our content or have any thoughts to share, we'd love to hear from you! Mention @gluedtomycrafts or tag #gluedtomycrafts on Instagram!