Make a sponge-painted flag craft for the 4th of July with kids and family using simple supplies, easy steps, and patriotic fun.

Celebrate the red, white, and blue with a simple art project that kids can proudly wave, display, or gift. This sponge painted flag craft is a fun 4th of July activity for home, summer camp, classroom parties, or holiday playdates. It uses basic supplies, and the sponge-painting technique gives each flag a textured, handmade look.
This craft is meaningful because it gives kids a hands-on way to connect with the holiday. While they paint, cut, glue, and create, you can talk about Independence Day, the American flag, family traditions, parades, fireworks, and what it means to celebrate together.
Craft Supplies:
You only need a few basic craft supplies to make this sponge painted flag craft. Many of these items may already be in your craft bin or classroom cabinet.
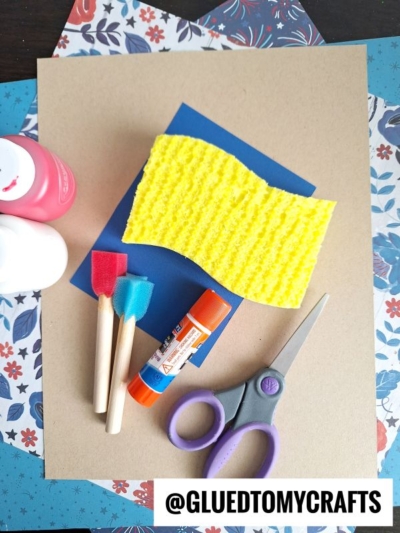
- Tan or light-colored cardstock
- Red craft paint
- White craft paint
- Blue cardstock or construction paper
- Kitchen sponge
- Jumbo popsicle stick
- Glue stick or school glue
- Scissors
- Paintbrush or foam brush
- Paper plate or paint tray
- Newspaper, paper towels, or a washable tablecloth for the work surface
RELATED —> Sponge Painted Birthday Cake Card
Directions:
- Start by covering your table with newspaper, scrap paper, or a washable tablecloth. Sponge painting can get a little messy, especially when kids are excited.
- Place red and white paint on a paper plate or paint tray. You only need a small amount of each color. It is easier to add more paint later than to clean up too much paint at the start.
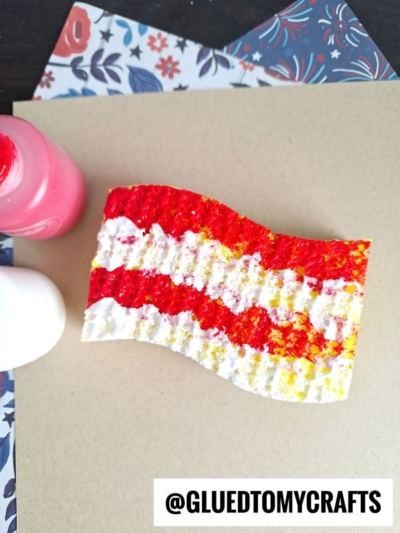
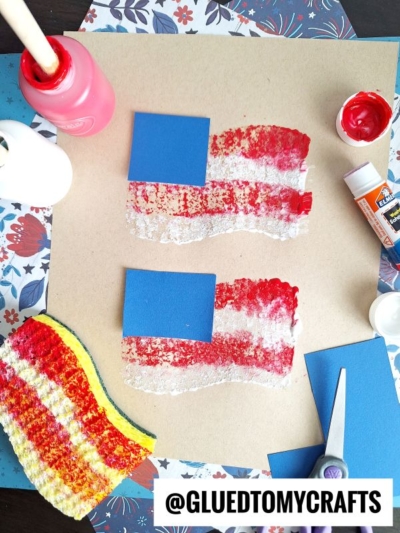
- Now it is time to create the sponge-painting tool. Use a paintbrush or foam brush to paint red and white stripes directly onto the sponge. Make the stripes horizontal, alternating between red and white. Try not to overload the sponge with paint. A light layer works best because it gives the flag a textured look. Too much paint can make the colors smear together.
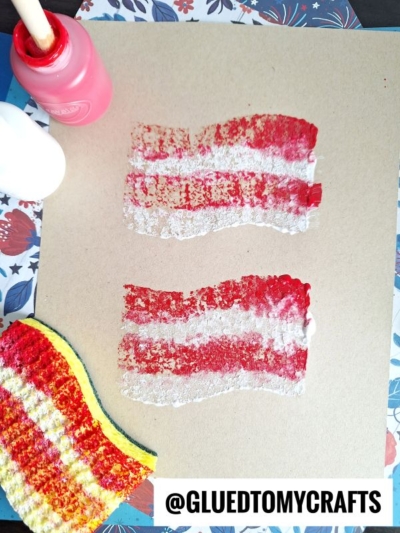
- Press the painted side of the sponge onto the cardstock flag shape. Lift it straight up to reveal the stripes.
- You can stamp the sponge once for a bold print or press it a few times to fill in the flag. Kids can also dab the sponge gently across the paper to add more texture.
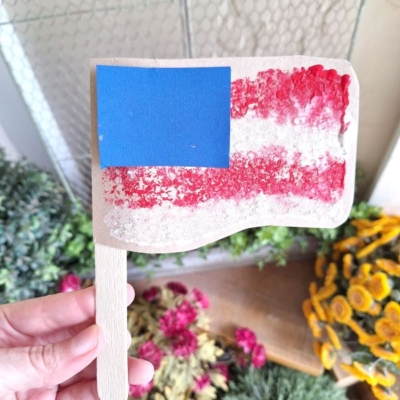
- Next up – cut a small rectangle or square from blue cardstock. This will become the blue section of the flag.
- Glue the blue piece to the upper left corner of the painted flag. Press it down gently so it sticks well.
- If you want to add stars, use star stickers, a white paint pen, or small dots of white paint. Younger kids can use stickers because they are quick and easy. Older kids may enjoy drawing or painting their own stars.
- Once the painted flag is dry, turn it over and glue a wooden craft stick to the back. Place the stick along the left side so it looks like a flagpole.
- Use a generous line of glue, then press the stick firmly in place. Let it dry flat for the best hold.
- If you want the flag to be extra sturdy, tape the stick to the back after gluing. This is helpful if kids plan to wave their flags during a parade, backyard celebration, or classroom activity.
- Allow the finished flag to dry completely. Drying time depends on how much paint and glue were used.
- Once dry, kids can hold their flags, place them in a jar, add them to a centerpiece, or display them on a bulletin board. You can also write each child’s name and the year on the back as a sweet keepsake.
RELATED —> Pom Pom Stamped Flag Keepsake Craft Idea
This sponge painted flag craft is a joyful way to celebrate the 4th of July with kids. It is simple, colorful, and full of hands-on fun, making it perfect for parents, teachers, and DIY craft lovers.
With just a sponge, paint, paper, and a little glue, children can create a patriotic keepsake that feels festive and personal. Whether you display the flags at home, wave them during a backyard parade, or hang them in the classroom, this craft brings creativity and holiday spirit together in the sweetest way. On that note, happy crafting!

Sponge Painted Flag Craft for 4th of July
Make a sponge-painted flag craft for the 4th of July with kids and family using simple supplies, easy steps, and patriotic fun.
Here’s your checklist of supplies to bring this craft to life:
- Tan or light-colored cardstock
- Red craft paint
- White craft paint
- Blue cardstock or construction paper
- Jumbo popsicle stick
- Kitchen Sponge
- Paintbrush or foam brush
- Paper plate or paint tray
- Newspaper, paper towels, or a washable tablecloth for the work surface
Prepare your creative haven by laying down a protective cover before the crafting magic begins!
Directions:
- Start by covering your table with newspaper, scrap paper, or a washable tablecloth. Sponge painting can get a little messy, especially when kids are excited.
- Place red and white paint on a paper plate or paint tray. You only need a small amount of each color. It is easier to add more paint later than to clean up too much paint at the start.
- Now it is time to create the sponge-painting tool. Use a paintbrush or foam brush to paint red and white stripes directly onto the sponge. Make the stripes horizontal, alternating between red and white. Try not to overload the sponge with paint. A light layer works best because it gives the flag a textured look. Too much paint can make the colors smear together.
- Press the painted side of the sponge onto the cardstock flag shape. Lift it straight up to reveal the stripes.
- You can stamp the sponge once for a bold print or press it a few times to fill in the flag. Kids can also dab the sponge gently across the paper to add more texture.
- Next up - cut a small rectangle or square from blue cardstock. This will become the blue section of the flag.
- Glue the blue piece to the upper left corner of the painted flag. Press it down gently so it sticks well.
- If you want to add stars, use star stickers, a white paint pen, or small dots of white paint. Younger kids can use stickers because they are quick and easy. Older kids may enjoy drawing or painting their own stars.
- Once the painted flag is dry, turn it over and glue a wooden craft stick to the back. Place the stick along the left side so it looks like a flagpole.
- Use a generous line of glue, then press the stick firmly in place. Let it dry flat for the best hold.
- If you want the flag to be extra sturdy, tape the stick to the back after gluing. This is helpful if kids plan to wave their flags during a parade, backyard celebration, or classroom activity.
- Allow the finished flag to dry completely. Drying time depends on how much paint and glue were used.
- Once dry, kids can hold their flags, place them in a jar, add them to a centerpiece, or display them on a bulletin board. You can also write each child’s name and the year on the back as a sweet keepsake.
CLICK HERE TO PRINT THE DIRECTIONS FOR THIS CRAFT
If you've enjoyed our content or have any thoughts to share, we'd love to hear from you! Mention @gluedtomycrafts or tag #gluedtomycrafts on Instagram!