Make a fun paper plate ladybug with simple supplies. Create a lovely craft that kids will enjoy making together!

This paper plate and yarn ladybug craft is the perfect project! It’s simple, budget-friendly, and a great way to spark your child’s imagination. Whether you’re crafting at home or in a classroom, this adorable red and black ladybug craft will bring smiles all around. Let’s get started!
Craft Supplies:
- Red paper plate {makes two ladybugs}
- Black cardstock or construction paper
- Black dot stickers
- Black yarn
- Googly eyes (two different sizes for extra fun!)
- Single-hole paper punch
- Glue stick or craft glue
- Scissors
Directions:
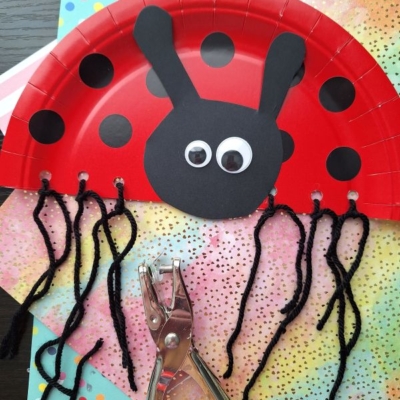
- Prepare the Ladybug Body – Take a red paper plate and cut it in half. This will form the body and wings of your ladybug.
- Add the Spots – Take several small black dot stickers and place them, random spots, on the red paper plate piece, to create the ladybug’s signature spots.
- Create the Head – Cut a small oval or circle from the black cardstock for the ladybug’s head. Glue the head to the dot covered paper plate.
- Give it Life – Attach two googly eyes to the head for a playful look. You can use different-sized eyes for extra character!
- Add the Antennas – Cut two thin strips of black cardstock for antennae and glue them to the top of the head.
- Punch Holes for Legs – Use the single-hole paper punch to create holes along the straight edge of the paper plate.
- Thread the Yarn – Cut pieces of black yarn and thread them through the holes. Tie knots to secure the yarn, letting the ends dangle to represent the ladybug’s legs.
- Display – Once your ladybug is complete, display it proudly on the fridge or a bulletin board.
RELATED —> Cupcake Liner Ladybugs Craft Idea
This craft is not only a fun activity but also a wonderful way to encourage creativity and fine motor skills in kids. Display your ladybug proudly or use it as part of a story time activity inspired by “The Grouchy Ladybug” by Eric Carle. Happy crafting!

Paper Plate and Craft Yarn Ladybug Craft Idea for Kids
Make a fun paper plate ladybug with simple supplies. Create a lovely craft that kids will enjoy making together!
Here’s your checklist of supplies to bring this craft to life:
- Cardstock Paper
- Large Paper Plate
- Craft Yarn
- Embellishments
- School Glue
Prepare your creative haven by laying down a protective cover before the crafting magic begins!
Directions:
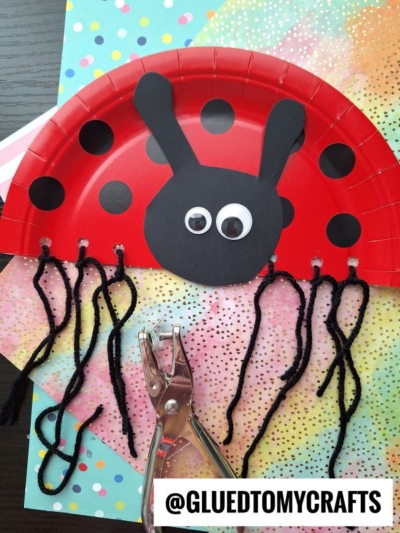
- Prepare the Ladybug Body - Take a red paper plate and cut it in half. This will form the body and wings of your ladybug.
- Add the Spots - Take several small black dot stickers and place them, random spots, on the red paper plate piece, to create the ladybug's signature spots.
- Create the Head - Cut a small oval or circle from the black cardstock for the ladybug's head. Glue the head to the dot covered paper plate.
- Give it Life - Attach two googly eyes to the head for a playful look. You can use different-sized eyes for extra character!
- Add the Antennas - Cut two thin strips of black cardstock for antennae and glue them to the top of the head.
- Punch Holes for Legs - Use the single-hole paper punch to create holes along the straight edge of the paper plate.
- Thread the Yarn - Cut pieces of black yarn and thread them through the holes. Tie knots to secure the yarn, letting the ends dangle to represent the ladybug's legs.
- Display - Once your ladybug is complete, display it proudly on the fridge or a bulletin board.
CLICK HERE TO PRINT THE DIRECTIONS FOR THIS CRAFT
If you've enjoyed our content or have any thoughts to share, we'd love to hear from you! Mention @gluedtomycrafts or tag #gluedtomycrafts on Instagram!