Celebrate Dr. Seuss and inspire a little environmental awareness with this simple, hands-on craft. The Lorax is a classic character who speaks for the trees, and bringing him to life is a wonderful way to spark creativity at home or in the classroom.
This paint splat technique adds an element of surprise that kids absolutely love, making the process just as fun as the final product.
Craft Supplies:
- Sturdy paper plates – one per craft
- Orange washable kids’ paint
- Yellow construction paper
- Large googly eyes – two per craft
- Scissors
- School glue
Directions:
The paint splat technique is unpredictable by nature. Let the kids experiment with different amounts of paint to see how the splat changes!
1. Create the Paint Splat
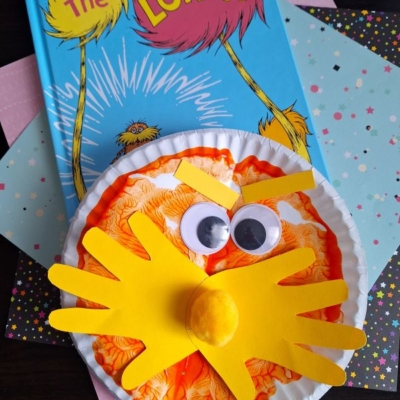
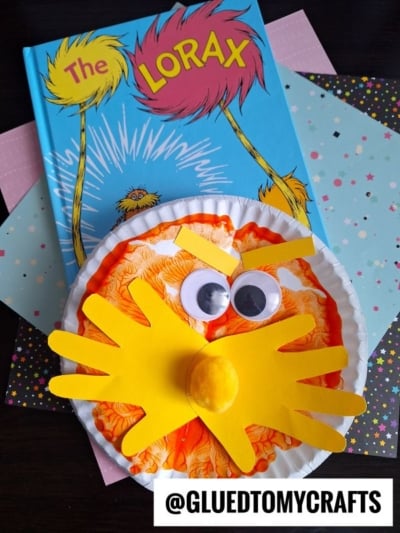
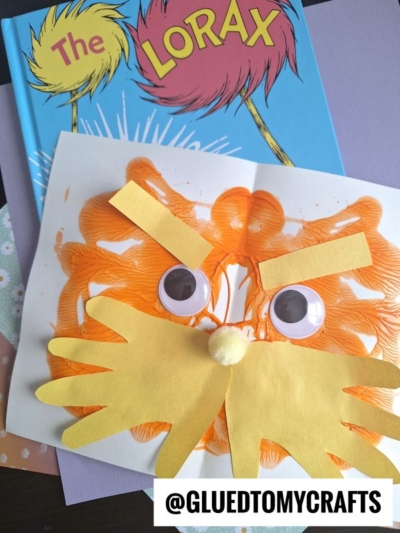
Fold your paper plate in half to create a sharp crease, then open it back up flat. Squeeze a few generous drops of orange paint right in the center of the plate. Fold the plate back in half along your crease. Have the kids press and squish the paint around inside the folded plate. Pull the plate open to reveal a fantastic orange paint splat. This serves as the fluffy body of your Lorax. Set it aside to dry completely.
2. Cut Out the Features
While the orange paint dries, grab your yellow construction paper. Cut out two bushy eyebrows and two handprint cutouts, for his mustache.
3. Assemble the Character
Once the orange paint is completely dry, it is time to build your Lorax. Glue the big yellow “handprint” mustache near the bottom center of the plate. Attach the two bushy eyebrows near the top. Stick the large googly eyes right below the eyebrows.
4. Add the Final Details
Glue a large pom pom in the center of everything, to really bring him to life. Add any other embellishments you see fit. Allow to dry completely before displaying proudly for all to see.
Pair this craft with a reading of the original book. It gives the children a deeper connection to the character they just built and opens up a great conversation about taking care of nature.
RELATED —> Potato Masher Lorax Craft Tutorial
We hope you had fun creating your own Paper Plate Lorax! Remember, there’s no right or wrong way to make your Lorax – let your imagination guide you. Hang your finished creations up to brighten the room, or gift them to someone who loves Dr. Seuss.
We’d love to see your colorful Lorax crafts, so feel free to tag us on your various social media sites. Happy crafting!

Paper Plate & Paint Splat Lorax Craft Idea
Here’s your checklist of supplies to bring this craft to life:
Prepare your creative haven by laying down a protective cover before the crafting magic begins!
Directions:
- Fold your paper plate in half to create a sharp crease, then open it back up flat. Squeeze a few generous drops of orange paint right in the center of the plate.
- Fold the plate back in half along your crease. Have the kids press and squish the paint around inside the folded plate. Pull the plate open to reveal a fantastic orange paint splat. This serves as the fluffy body of your Lorax. Set it aside to dry completely.
- While the orange paint dries, grab your yellow construction paper. Cut out two bushy eyebrows and two handprint cutouts, for his mustache.
- Once the orange paint is completely dry, it is time to build your Lorax. Glue the big yellow "handprint" mustache near the bottom center of the plate.
- Attach the two bushy eyebrows near the top. Stick the large googly eyes right below the eyebrows.
- Glue a large pom pom in the center of everything, to really bring him to life. Add any other embellishments you see fit.
- Allow to dry completely before displaying proudly for all to see.
CLICK HERE TO PRINT THE DIRECTIONS FOR THIS CRAFT