Glued To My Crafts

Join thousands of others who have gotten GLUED to our craft tutorials!

  • Home
  • About Us
  • Safety Guidelines
  • Seasonal Crafts
    • New Years
    • Valentine’s Day
    • St. Patrick’s Day
    • Spring
    • Easter
    • Mother’s Day
    • Summer
    • Father’s Day
    • Patriotic
    • Halloween
    • Thanksgiving
    • Fall
    • Winter
    • Christmas
    • Snowmen
    • Story Time
  • Monthly Themes
    • January Craft Ideas
    • February Craft Ideas
    • March Craft Ideas
    • April Craft Ideas
    • May Craft Ideas
    • June Craft Ideas
    • July Craft Ideas
    • August Craft Ideas
    • September Crafts
    • October Crafts
    • November Crafts
    • December Crafts
  • Amazon Storefront
  • Privacy Policy

Paper Plate & Heart Doily Bee Craft Idea

When engaging in craft activities, it is important for young children to have adult supervision at ALL times. It is also recommended to use supplies that are suitable for your child's age. Feel free to modify materials or steps to meet your specific requirements. Please refer to our safety guidelines for more information.

As an Amazon Associate I earn from qualifying purchases. This post may contain affiliate links. Glued To My Crafts is independent and not affiliated with or endorsed by the publishers of the books featured on our website. For more information, please see our disclosure policy.

UPDATE FOR 2026 - To reduce storage costs and download fees, we recently made some changes to our website. The password for all our files this year is GLUEDTOMYCRAFTS2026. No sign-up is required to download our free printables! You can enjoy our printables without creating an account or paying for Box.com. Simply follow the download instructions on our FAQ PAGE.

A bee craft made from a painted paper plate with yellow and black stripes, a heart-shaped doily for wings, and a googly eye—perfect for valentine's day craft ideas for kids. Displayed on a textured background. @GLUEDTOMYCRAFTS is written at the bottom.

Buzz, buzz! If you’re looking for a cheerful craft that fills an afternoon with giggles and glue, this paper plate bee is the one. It’s bright, it’s friendly, and it comes together with supplies you probably already have tucked away in a craft drawer.

This project works wonders for little hands. Kids get to paint, snip, and stick their way to an adorable bumblebee, all while practicing fine motor skills and a little bit of patience. Teachers love it for spring lessons about pollinators, and parents love it because cleanup is quick. Best of all, every bee turns out a little different, so there’s no “wrong” way to make one.

Craft Supplies:

Gather these materials before you start. Everything is budget-friendly and easy to find:

  • 1 paper plate
  • Yellow paint
  • Black paint
  • Black construction paper
  • 2 white heart-shaped paper doilies
  • 2 googly eyes
  • Elmer’s school glue
  • Scissors
  • Black marker

Directions:

Step 1: Cut the Plate in Half

Take your paper plate and cut it straight down the middle. You’ll only need one half for the bee’s body. Set the other half aside for a future project, or make a second bee so siblings can craft together.

Step 2: Paint the Stripes

Now for the fun part. Paint the flat half of the plate bright yellow and let it dry. Once it’s no longer wet, add three or four black stripes across the body using your black paint. Don’t worry about keeping them perfectly straight, wobbly stripes give your bee loads of personality. Let everything dry completely before moving on.

Step 3: Cut Out the Head, Antennae, and Stinger

Grab your black construction paper and scissors. Cut out:

  • A half circle shape for the head
  • Two thin strips with little bulbs on top for the antennae
  • A small triangle for the stinger

If you’re crafting with younger kids, cut these shapes ahead of time so they can jump straight to gluing.

Step 4: Attach the Wings

Take your two white heart-shaped doilies and glue them along the top curved edge of the plate. Overlap them slightly so they look like delicate, fluttering wings. The lacy pattern adds a pretty, finished touch that really makes the bee pop.

Step 5: Add the Head and Details

Glue the black head to one end of the body. Then attach the antennae behind the head so they stick up nicely. Add the stinger to the opposite end, pointing outward.

Step 6: Bring on the Googly Eyes

Glue two googly eyes onto the head. This is always a kid favorite, the bee instantly comes to life! Use your black marker to draw a happy little smile beneath the eyes. Now your bee has a face and a friendly attitude.

When done decorating, allow it to dry completely before you display it proudly for all to see!

RELATED —> Wooden Spoon Bee Craft Idea For Kids
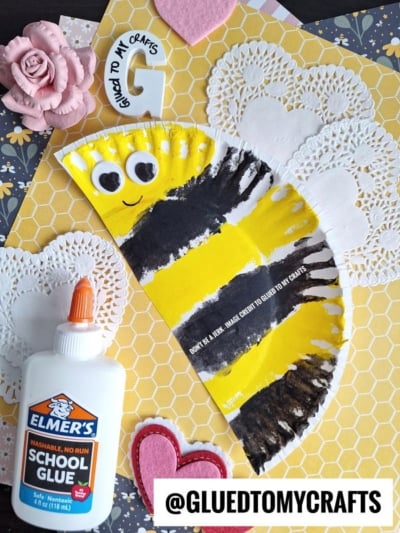
A bee craft made from a half paper plate with black and yellow stripes, googly eyes, and a smile, on a honeycomb-patterned background with heart and rose decorations, Elmers glue, and paper doilies nearby.

There you have it, a happy little bee made from a humble paper plate. This craft is proof that the simplest supplies can create the biggest smiles.

So grab your plates, roll up those sleeves, and let your kids’ imaginations take flight. When you’re done, snap a photo of your finished bees and share them, we’d love to see the whole buzzing bunch! Happy crafting, my friends!

A blue text on a white background, perfect for creating a charming the places you'll go keepsake.


OUR PRIVACY POLICY

OUR COPYRIGHT POLICY

  • Email
  • Facebook
  • Instagram
  • Pinterest
  • Twitter
  • YouTube

Love our crafts?

Follow us on Google

Click & check the box to see us more in your search results!

LOOKING FOR SOMETHING?

EXPLORE OUR SITE:

© 2012–2026 Glued To My Crafts
All activities should be supervised by an adult at all times. Please refer to our safety guidelines for more information.


Please note that all the content of the website, including printables, are for classroom and personal use only. This means that any digital item you download from our site can be used for non-commercial use only. We kindly request that you do not reproduce or sell our creations. We appreciate your understanding and cooperation in respecting our content and intellectual property rights.

Accessibility Adjustments

Powered by OneTap

How long do you want to hide the toolbar?
Hide Toolbar Duration
Select your accessibility profile
Vision Impaired Mode
Enhances website's visuals
Seizure Safe Profile
Clear flashes & reduces color
ADHD Friendly Mode
Focused browsing, distraction-free
Blindness Mode
Reduces distractions, improves focus
Epilepsy Safe Mode
Dims colors and stops blinking
Content Modules
Font Size

Default

Line Height

Default

Color Modules
Orientation Modules