Create an adorable paper plate dolphin with your kids. Easy step-by-step guide, perfect for toddlers, preschoolers, and school-aged children.

Children love engaging in creative activities that spark their imaginations, and crafting is a wonderful way for them to explore their artistic side while learning new skills. If your kids are fascinated by ocean animals, this paper plate dolphin craft is the perfect project for them! It’s easy, fun, and uses materials you likely already have at home.
Craft Supplies:
Creating this dolphin craft is simple and requires minimal supplies. You probably already have most of these items at home! Here’s your supply list:
- {1} Large, White Paper Plate
- Dolphin Printable – from our landing page
- White Cardstock Paper
- Craft Scissors
- Blue Craft Paint
- Small Piece of Bubble Wrap
- Markers/Crayons
- School Glue
- Embellishments/Ocean Themed Stickers
Directions:
Now it’s time for the fun to begin. Follow these simple steps to create your dolphin masterpiece:
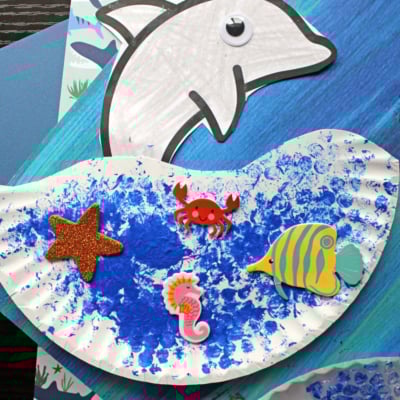
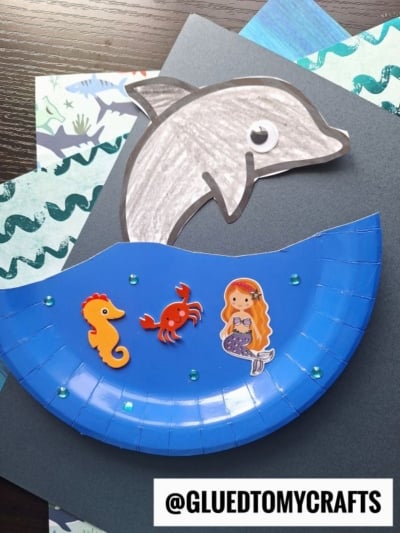
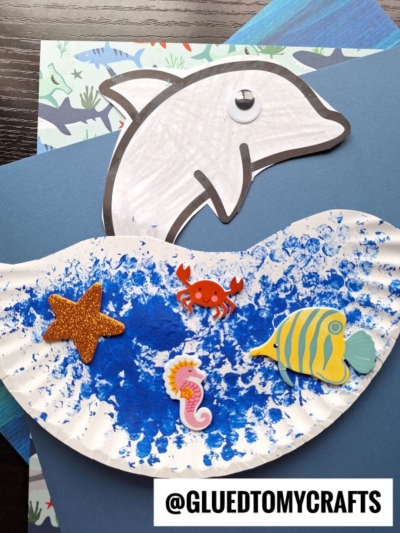
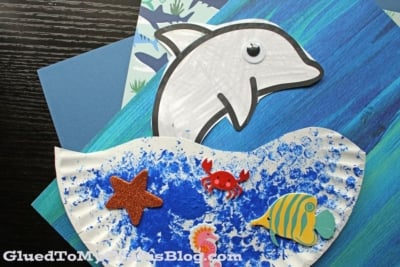
- Start by cutting an “ocean wave” shape from your paper plate. Simply cut the plate in half, creating a slightly curved edge for the wave effect.
- Set one half aside for your craft and use the other half as a palette for your paint in the next step.
- Next, grab a small piece of bubble wrap and use it to “stamp” blue craft paint all over the curved paper plate piece. This will create a fun, bubbly ocean texture.
- Allow the paint to dry completely.
- While the paint dries, take your dolphin printout and color in one of the dolphin designs using markers or crayons.
- Carefully cut out the colored dolphin using scissors.
- Once the paper plate is dry, glue your dolphin cut-out to the back of the painted wave piece. For an extra touch, decorate the craft with ocean-themed stickers.
- Add any final custom details to make it uniquely yours, then display your bubble wrap-stamped dolphin craft proudly for everyone to see!
RELATED —> Torn Paper Mermaid Tail
Recreating our” paper plate dolphin” tutorial is more than just an arts and crafts project; it’s a chance to connect with the young ones in your life. The joy of making something with their own hands, the laughter shared over spilled glue, and the pride of placing a finished dolphin on display are all moments to be treasured.
If you try this craft, we’d love to see it! Share your photos and creative variations, and inspire others to join in the fun. You can find us on Instagram and Facebook for easy tagging. On that note, happy crafting!!!

Paper Plate Dolphin Craft Idea For Kids
Create an adorable paper plate dolphin with your kids. Easy step-by-step guide, perfect for toddlers, preschoolers, and school-aged children.
Here’s your checklist of supplies to bring this craft to life:
- 1 Large Paper Plate
- Craft Paint blue
- Bubble Wrap
- SUMMER PRINTABLE - LANDING PAGE
- Embellishments
Prepare your creative haven by laying down a protective cover before the crafting magic begins!
Directions:
- Start by cutting an "ocean wave" shape from your paper plate. Simply cut the plate in half, creating a slightly curved edge for the wave effect.
- Set one half aside for your craft and use the other half as a palette for your paint in the next step.
- Next, grab a small piece of bubble wrap and use it to "stamp" blue craft paint all over the curved paper plate piece. This will create a fun, bubbly ocean texture.
- Allow the paint to dry completely.
- While the paint dries, take your dolphin printout and color in one of the dolphin designs using markers or crayons.
- Carefully cut out the colored dolphin using scissors.
- Once the paper plate is dry, glue your dolphin cut-out to the back of the painted wave piece. For an extra touch, decorate the craft with ocean-themed stickers.
- Add any final custom details to make it uniquely yours, then display your bubble wrap-stamped dolphin craft proudly for everyone to see!


NEED MORE HELP DOWNLOADING OUR FREE PRINTABLES? PLEASE REFER TO OUR FAQ PAGE
If you've enjoyed our content or have any thoughts to share, we'd love to hear from you! Mention @gluedtomycrafts or tag #gluedtomycrafts on Instagram!