
Say goodbye to the school year in the most colorful and creative way possible! 🎨✨ Our Paint Splat Waving Goodbye Craft is the perfect activity to celebrate the end of an amazing year.
With vibrant paint splats, glittery touches, and a personalized handprint wave, this craft is a fun and meaningful way for kids to bid farewell to their classmates and teachers. Whether you’re looking to preserve cherished memories or simply enjoy one last creative project before summer, this activity is sure to leave a lasting impression.
Let’s make those goodbyes as bright and unique as the year itself! 🌟👋

This easy and colorful activity is not just an art project but a wonderful way for children to bid farewell to their classmates and teachers in style.
Follow these simple steps to create the Paint Splat Waving Goodbye art project idea. It’s messy in all the best ways!
Craft Supplies:
Before you set up your workspace, make sure you have all the materials you need. Here’s a handy list to get you prepared:
PASSWORD FOR FREE FILE – GLUEDTOMYCRAFTS2026
- Free Goodbye Printable – on box.com
- White Cardstock Paper
- Skin Tone Colored Cardstock Paper
- Choice of Colored Cardstock Paper
- Scissors
- Glue Stick or School Glue
- Two or Three Colors of Puffy Paint
- Loose Gold Craft Glitter
- Embellishments
Directions:
Before you start, cover your table with a disposable tablecloth or some old newspaper. Paint splat crafts can get a little messy (in the best way possible), so it’s best to prepare in advance to keep clean-up stress-free.
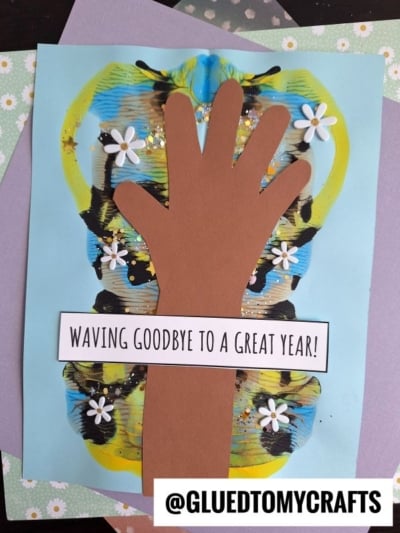
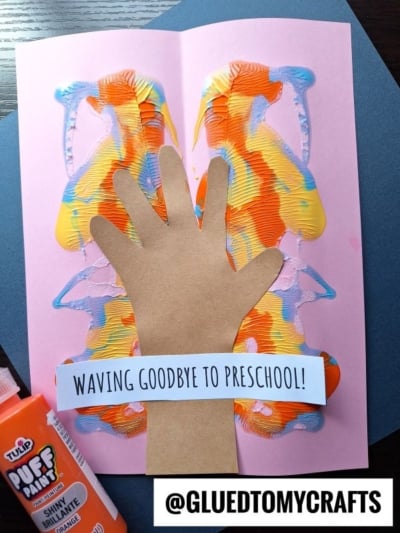
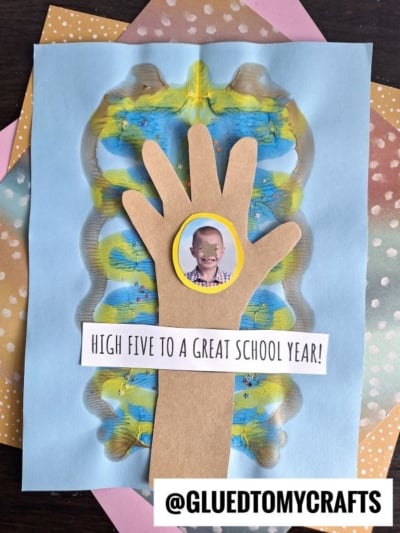
- First things first – download and print the FREE template provided above. Each sheet includes FIVE phrases to pick from. Go ahead and trim out one of the rectangle shapes.
- Now grab your choice of colored cardstock paper {the background} along with your various colors of puffy paint.
- Fold the cardstock in half, then open it back up. This crease will act as a guideline when creating your design and ensure symmetry.
- Add blobs of paint to one half of the cardstock. There’s no need to be precise here; the more irregular and vibrant, the better!
- When ready, carefully fold the cardstock back along the crease, sandwiching the paint inside. Be sure to rub it gently so the paint really “smushes” inside.
- Open it back up to reveal the paint splat design. Add loose craft glitter on top of the wet design.
- Now comes the fun part! Making the “goodbye wave.” Simply trace/trim out a handprint design from your skin tone colored paper.
- Next, attach your handprint cutout AND the phrase to the center of the paint splat design.
- For the finishing touches, add stickers, glitter, or rhinestones to make your artwork stand out and shine.
- Once complete, proudly display your end of school year artwork for everyone to enjoy!
RELATED —> End of School Year Keepsake Ideas
The last day of school is more than just the start of summer. It’s a time to honor growth, friendship, and achievement. With the Paint Splat Waving Goodbye Craft, kids can say their goodbyes in a way that’s as vibrant and unique as they are.
Whether your goal is to preserve classroom memories or simply enjoy one more fun activity before saying goodbye, this craft is sure to leave a lasting impression. What’s even better? When children revisit their creations months later, they’ll be reminded of the fun, laughter, and lessons learned during the school year.
On my final note, I hope you give this unique craft idea a try today! Happy crafting, my friends!
