Glued To My Crafts

Join thousands of others who have gotten GLUED to our craft tutorials!

  • Home
  • Privacy Policy
  • Craft Safety Guidelines
  • Seasonal Themes
    • New Years
    • Valentine’s Day
    • St. Patrick’s Day
    • Spring
    • Easter
    • Mother’s Day
    • Summer
    • Father’s Day
    • Patriotic
    • Halloween
    • Thanksgiving
    • Fall
    • Winter
    • Christmas
    • Snowmen
    • Story Time
  • Favorite Craft Materials
    • Cupcake Liners
    • Torn Paper Crafts
    • Paper Plates
    • Popsicle Sticks
    • Sidewalk Chalk
    • Clothespin Crafts
    • Tulip Puffy Paint
    • Paper Bags
    • Craft Foam Hearts
    • Puffy Paint
  • About Us
  • Monthly Themes
    • January Craft Ideas
    • February Craft Ideas
    • March Craft Ideas
    • April Craft Ideas
    • May Craft Ideas
    • June Craft Ideas
    • July Craft Ideas
    • August Craft Ideas
    • September Crafts
    • October Crafts
    • November Crafts
    • December Crafts

Paper Plate Bunny Photo Frame Craft Idea

When engaging in craft activities, it is important for young children to have adult supervision at ALL times. It is also recommended to use supplies that are suitable for your child's age. Feel free to modify materials or steps to meet your specific requirements. Please refer to our safety guidelines for more information.

As an Amazon Associate I earn from qualifying purchases. This post may contain affiliate links. For more information, please see our disclosure policy.

UPDATE FOR 2026 - To reduce storage costs and download fees, we recently made some changes to our website. The password for all our files this year is GLUEDTOMYCRAFTS2026. No sign-up is required to download our free printables! You can enjoy our printables without creating an account or paying for Box.com. Simply follow the download instructions on our FAQ PAGE.

Craft a delightful paper plate bunny picture frame using simple materials. Get creative and celebrate the season with this fun project!
SKIP THE FLUFF AND PRINT THE DIRECTIONS
A paper plate bunny frame craft made with cotton balls around a photo and two white paper ears with pink centers on top, all displayed on colorful patterned paper.

A paper plate bunny frame craft made with cotton balls around a photo and two white paper ears with pink centers on top, all displayed on colorful patterned paper.

Are you looking for a cute and easy craft project to brighten up your home—or keep your little ones engaged this spring season? This cotton ball bunny photo frame is a simple DIY craft that’s not only adorable but also perfect for capturing seasonal memories!

Using just a handful of affordable materials, including a simple paper plate, you can create a custom bunny-themed photo frame that’s perfect for Easter, spring decor, or just for fun!

A paper plate bunny frame craft made with cotton balls around a photo and two white paper ears with pink centers on top, all displayed on colorful patterned paper.

Discover how to make a charming cotton ball bunny photo frame using a simple paper plate. It’s the perfect DIY activity for Easter or to add a touch of spring to your decor!

Craft Supplies:

Before we jump into the steps, here’s everything you’ll need to create this cotton ball bunny frame craft.

  • Small White Paper Plate
  • Scissors
  • White Cotton Balls
  • School Glue
  • White Cardstock Paper
  • Printed Picture
  • optional material – ribbon/hot glue gun for hanging

Directions:

Now, let’s hop into the crafting process!

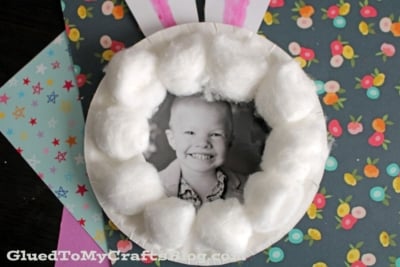
  • First things first – cut out a circle shape out of the center of your small paper plate {don’t cut the rim though!} to create an opening for your picture.
  • Discard the excess paper you just cut out.
  • Next up – glue several white cotton balls, around the rim of the remaining paper plate. Really fill in all the blank areas to make it nice and fluffy.
  • Set aside to let it dry a bit.
  • Grab your white cardstock paper.
  • Cut out TWO long bunny ears.
  • At this point in time you should also go ahead and trim down the printed picture to be placed inside the paper plate frame.
  • Now we are ready to glue the bunny ears and picture to the back of the cotton ball covered paper plate.
  • If desired – add other embellishments or hot glue a piece of ribbon to the back for easy hanging.
  • Allow your finished paper plate white bunny photo frame to dry completely.
  • When the bunny frame is ready, display it proudly! Place it on a shelf, hang it in your child’s room, or use it as part of your Easter decorations. You can even make multiples to give as gifts for grandparents, teachers, or friends. These little DIY gifts are sure to bring a smile to anyone’s face!

RELATED —> Popsicle Stick Easter Frame

A children's book titled How to Catch the Easter Bunny with a yellow cover, purple and blue text, and an illustration of a white rabbit with a basket running—plus fun craft stick bunny inspiration! Authors: Adam Wallace and Andy Elkerton.

AFFILIATE LINK – PAIR OUR CRAFT IDEA WITH THIS BOOK RECOMMENDATION

Whether you’re crafting with your kids, operating a classroom project, or simply looking for a relaxed Sunday afternoon activity, this photo frame is sure to deliver smiles.

On that note, we hope you enjoy making this adorable cotton ball bunny photo frame! It’s a simple, affordable way to add a touch of DIY charm to your home or gift-giving lineup.

Feel inspired? Share your creations with us by tagging #GluedToMyCrafts on social media. We’d love to see your finished bunny creations! Happy crafting, my friends!

stacey-signature-2023

A paper plate bunny frame craft made with cotton balls around a photo and two white paper ears with pink centers on top, all displayed on colorful patterned paper.
PRINT

Paper Plate Bunny Photo Frame Craft Idea

Craft a delightful paper plate bunny picture frame using simple materials. Get creative and celebrate the season with this fun project!

Here’s your checklist of supplies to bring this craft to life:

  • Small Paper Plate
  • White Cotton Balls
  • White Cardstock Paper
  • Printed Picture
  • Scissors
  • School Glue

Prepare your creative haven by laying down a protective cover before the crafting magic begins!

Directions:

  • First things first - cut out a circle shape out of the center of your small paper plate {don't cut the rim though!} to create an opening for your picture.
  • Discard the excess paper you just cut out.
  • Next up - glue several white cotton balls, around the rim of the remaining paper plate. Really fill in all the blank areas to make it nice and fluffy.
  • Set aside to let it dry a bit.
  • Grab your white cardstock paper.
  • Cut out TWO long bunny ears.
  • At this point in time you should also go ahead and trim down the printed picture to be placed inside the paper plate frame.
  • Now we are ready to glue the bunny ears and picture to the back of the cotton ball covered paper plate.
  • If desired - add other embellishments or hot glue a piece of ribbon to the back for easy hanging.
  • Allow your finished paper plate white bunny photo frame to dry completely.
  • When the bunny frame is ready, display it proudly! Place it on a shelf, hang it in your child’s room, or use it as part of your Easter decorations. You can even make multiples to give as gifts for grandparents, teachers, or friends. These little DIY gifts are sure to bring a smile to anyone’s face!
    A paper plate bunny frame craft made with cotton balls around a photo and two white paper ears with pink centers on top, all displayed on colorful patterned paper.
MINI-HEARTS-page-separator-logo-gluedtomycrafts


CLICK HERE TO PRINT THE DIRECTIONS FOR THIS CRAFT

If you've enjoyed our content or have any thoughts to share, we'd love to hear from you! Mention @gluedtomycrafts or tag #gluedtomycrafts on Instagram!

Craft Activity Safety Guidelines:

Always Ensure Adult Supervision - Young children should be supervised at all times when engaging in craft activities. This is essential to keep them safe and ensure materials are used correctly. Use Age-Appropriate Supplies - Choose craft supplies that are suitable for your child’s age. Check labels for recommendations and avoid items with small parts or sharp edges for younger children. Modify as Needed - Feel free to adapt materials or steps to meet your child's abilities and safety needs. For example, substitute scissors with safety scissors if necessary. Keep an Eye on Allergies - Be mindful of potential allergens in craft materials like glue, paint, or certain fabrics. Opt for non-toxic and hypoallergenic options whenever possible. Organize and Secure Supplies - Keep all craft tools and materials organized. Store sharp objects, small parts, and potentially hazardous items out of reach when not in use. Following these guidelines will ensure that crafts remain fun, creative, and, most importantly, safe for everyone involved!


OUR PRIVACY POLICY

OUR COPYRIGHT POLICY

  • Email
  • Facebook
  • Instagram
  • Pinterest
  • Twitter
  • YouTube

LOOKING FOR SOMETHING?

EXPLORE OUR SITE:

TRENDING TODAY:

  • A pink hand-shaped bookmark with red heart stickers and star confetti surrounds a round note that reads a heartfelt message about love and reading. The image is from GluedToMyCraftsBlog.com. Handprint Bookmark Keepsake: A Gift That Holds Your Spot
  • A handmade Valentine’s Day craft featuring a red rose made of torn paper, two green handprint leaves, a glue bottle, heart decorations, and a message: “LOOK WHAT I MADE - A ROSE THAT WON’T FADE! WISHING YOU LOVE THIS VALENTINE’S DAY!”. Torn Paper Rose Card Craft Tutorial for Valentine’s Day
  • A colorful craft project featuring a yellow felt moon, sparkly stars, and heart shapes, with glue and a heartfelt message. Torn Paper Love You To The Moon and Back Card Craft Idea For Kids
  • A colorful paper craft featuring a red and pink painted paper plate with yellow circles in the center, green handprint cutouts as leaves, surrounded by craft supplies, heart decorations, and paint bottles. Paint Splat Valentine's Day Flower Craft Idea
  • A handmade card with a rocket drawing, hearts, and messages of love. Felt hearts and an envelope are around it. Handprint Rocket Keepsake - I Love You Because
  • A vibrant Valentine's Day craft showcasing a torn-paper bumblebee with googly eyes on a white sheet, accompanied by the text "MY VALENTINE!" The scene is decorated with felt hearts, heart-shaped gems, and patterned papers, with a glue bottle and crafting supplies adding to the creative atmosphere. Torn Paper Bee My Valentine Card Craft Idea For Valentine's Day
  • A blue paper bird with a googly eye is colored and glued on a white sheet that says, Chirp, chirp, hooray—Spring is here to stay! with colorful foam flowers and ladybugs along the brown paper ground. Easy Torn Paper Bird Nest Craft for Kids: Fun Spring Activity Idea
  • Flat lay of a torn paper dandelion craft featuring a white sheet with a black dandelion outline. Torn yellow, pink, and purple paper pieces are glued to the dandelion head, simulating seeds. Surrounding the craft are Elmer's glue, felt hearts, paper flowers, and patterned scrapbook paper. The text 'MAKING WISHES, ONE PIECE OF PAPER AT A TIME.' and 'GluedToMyCraftsBlog.com' are printed on the white sheet. Torn Paper Dandelion Craft: Making Wishes, One Piece at a Time
  • A flat lay of handmade Valentine’s Day cards and decorations, including paper flowers, felt hearts, an envelope, and printed cards with romantic poems, arranged on a gray and pink background. Capture Memories With These 6 Handprint Flower Poems
  • A playful torn paper cactus craft with hearts and flowers. Includes glue and felt hearts. Torn Paper Cactus Card: A Sweet Mother's Day Craft

© 2012–2026 Glued To My Crafts
All activities should be supervised by an adult at all times. Please refer to our safety guidelines for more information.


Please note that all the content of the website, including printables, are for classroom and personal use only. This means that any digital item you download from our site can be used for non-commercial use only. We kindly request that you do not reproduce or sell our creations. We appreciate your understanding and cooperation in respecting our content and intellectual property rights.

Accessibility Adjustments

Powered by OneTap

How long do you want to hide the toolbar?
Hide Toolbar Duration
Select your accessibility profile
Vision Impaired Mode
Enhances website's visuals
Seizure Safe Profile
Clear flashes & reduces color
ADHD Friendly Mode
Focused browsing, distraction-free
Blindness Mode
Reduces distractions, improves focus
Epilepsy Safe Mode
Dims colors and stops blinking
Content Modules
Font Size

Default

Line Height

Default

Color Modules
Orientation Modules