Crafting with kids doesn’t have to be complicated. With a few basic supplies and a bit of imagination, you can turn a dull afternoon into a colorful, laughter-filled memory!
The Easter season is a time of joy, renewal, and celebration — and what better way to mark this special time of year than with a unique and personal craft that captures the essence of Easter, while allowing kids to explore their creative side.
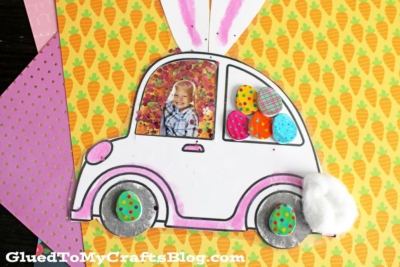
In this blog post, we’ll guide you through a delightful Easter Bunny Car Photo Ornament craft idea that is not only fun to make, but will also become a cherished memento for years to come.
Craft Supplies:
- Car Printable – on our landing page
- White Cardstock Paper
- Crayons, Markers or Coloring Pencils
- Scissors
- Contact Paper
- Single Hole Punch
- Ribbon or String
- Embellishments
- Printed Picture
Directions:
- First things first – grab the car printable listed above in the supply list.
- Print out the provided file on white cardstock paper. One print gives you TWO chances to do this craft at once.
- Now color in one of the car designs.
- When done, use scissors to trim it out as well the front window of the car.
- At this point in time you should grab a SECOND piece of white cardstock paper and cut out TWO bunny ears for your piece.
- Now grab your printed picture and trim it down so it fits inside the window of the car design.
- Before you add ANY embellishments, you will want to seal everything together with the contact paper. Go ahead and cut off two pieces that are bigger than your ornament.
- Peel the backing off of one piece of contact paper and lay it down, sticky side up, on your work surface.
- Lay the decorated car cutout AND the two bunny ear cutouts, on top. as well the photo inside.
- At this point in time, if you choice, you can sprinkle some loose craft glitter in the empty spaces that are around the photo.
- Now peel the backing off the second piece of contact paper and lay it on top of the first. Use your hand to make sure everything is sealed together and that no bubbles exist.
- When ready, use scissors to trim off the excess contact paper from around the edges.
- Finally, add ANY and all embellishments to give their Easter bunny themed car ornament piece a personalized look. I added Easter stickers and a cotton ball tail to ours but this is where your child’s personality will really shine!
- And that’s it! Don’t forget to write your child’s name, age and date on the back of the finished product as well.
- Then display/gift away proudly your child’s beautiful spring photo ornament piece!
RELATED —> Paper Plate Easter Bunny Car
Crafting with children is more than just about the end result; it’s an experience that fosters creativity, patience, and a sense of achievement.
On that note, we hope you are inspired to take the opportunity to bond with your little ones over this simple yet rewarding project that’s just as much about the process as it is about the finished product. Happy crafting, my friends!
Easter Bunny Car Photo Ornament
Here’s your checklist of supplies to bring this craft to life:
- White Cardstock Paper
- Car Ornament Printable
- Clear Contact Paper
- Craft Ribbon
- Embellishments
- Printed Picture
Prepare your creative haven by laying down a protective cover before the crafting magic begins!
Directions:
- First things first - grab the car printable listed above in the supply list.
- Print out the provided file on white cardstock paper. One print gives you TWO chances to do this craft at once.
- Now color in one of the car designs.
- When done, use scissors to trim it out as well the front window of the car.
- At this point in time you should grab a SECOND piece of white cardstock paper and cut out TWO bunny ears for your piece.
- Now grab your printed picture and trim it down so it fits inside the window of the car design.
- Before you add ANY embellishments, you will want to seal everything together with the contact paper. Go ahead and cut off two pieces that are bigger than your ornament.
- Peel the backing off of one piece of contact paper and lay it down, sticky side up, on your work surface.
- Lay the decorated car cutout AND the two bunny ear cutouts, on top. as well the photo inside.
- At this point in time, if you choice, you can sprinkle some loose craft glitter in the empty spaces that are around the photo.
- Now peel the backing off the second piece of contact paper and lay it on top of the first. Use your hand to make sure everything is sealed together and that no bubbles exist.
- When ready, use scissors to trim off the excess contact paper from around the edges.
- Finally, add ANY and all embellishments to give their Easter bunny themed car ornament piece a personalized look. I added Easter stickers and a cotton ball tail to ours but this is where your child's personality will really shine!
- And that's it! Don't forget to write your child's name, age and date on the back of the finished product as well.
- Then display/gift away proudly your child's beautiful spring photo ornament piece!


NEED MORE HELP DOWNLOADING OUR FREE PRINTABLES? PLEASE REFER TO OUR FAQ PAGE


