With just popsicle sticks, glue and paint, you can make your own nativity photo frame craft that will be cherished for years to come!

Create a timeless, unique holiday decoration with your kids this year! Get creative with our easy to follow popsicle stick nativity photo frame craft idea and free printable below!

Looking for a meaningful and creative holiday activity? This Popsicle Stick Nativity Photo Frame Craft is the perfect way to combine crafting fun with the heartwarming story of Christmas.
Using simple supplies like popsicle sticks, cupcake liners, and our free printable, you and your kids can create a beautiful keepsake that captures the essence of the season.
Whether it’s for a family project, a Sunday school activity, or a unique holiday decoration, this craft is easy to make and will be cherished for years to come. Follow our step-by-step guide and bring the nativity story to life!
Keep your little ones busy (and their Christmas spirit alive) with this fun and easy wood popsicle stick nativity photo frame craft! Get creative, be inspired, and capture holiday memories that will last a lifetime!
Craft Supplies:
- Five Jumbo Popsicle Sticks – 5 per craft
- Brown Cardstock Paper
- School Glue
- Brown Craft Paint
- Small Paint Brush
- Printed Picture
- White Cardstock Paper
- Free Printable – on our landing page
- Crayons
- LARGE Brown Cupcake Liners – three per craft
- Stapler
- Embellishments
Directions:
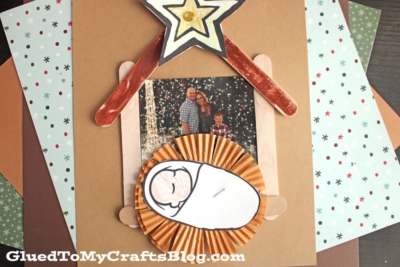
- First things first – use the school glue to glue down your FIVE JUMBO POPSICLE STICKS into a house formation, in the center of the colored cardstock paper. I started with the bottom and then added the triangle roof on top.
- Go ahead and use a small paint brush to paint the two roof pieces brown.
- Next up – grab your printed picture and trim it down so you can place it inside the frame. Secure that in place with some glue on the back.
- Now grab the printable, along with your crayons.
- Color in one of the babies and a star.
- Trim them both out with scissors.
- Now for the bed of straw. Grab your three cupcake liners and stapler.
- Flatten each set out with your hands and stack them on top of each other.
- Use the stapler to secure them together in the center.
- Next use the scissors to cut a simple fringe around the edge.
- Use your fingers to “fluff” it up and give it even more dimension.
- Finally, the last step! Go ahead and glue down both paper pieces on the picture frame design. The star goes at the top while the baby goes on the bottom.
- Add any other embellishments you see fit.
- Then allow it to dry completely before you display it proudly for all to see!
RELATED —> Paper Plate Nativity Wreath

Love this Popsicle Stick Manger Picture Frame craft idea from us? Then be sure to also check out our Paper Plate Manger tutorial, as well!
We love connecting with our readers and fans! Come join our PRIVATE FACEBOOK GROUP so we can become crafty BFF’s!!!

Popsicle Stick Nativity Photo Frame Craft
With just popsicle sticks, glue and paint, you can make your own nativity photo frame craft that will be cherished for years to come!
Here’s your checklist of supplies to bring this craft to life:
- 5 Jumbo Popsicle Sticks
- Craft Paint
- Cardstock Paper
- Christmas Printable - Landing Page
- Printed Picture
- Cupcake Liners light brown
- Embellishments
- School Glue
Prepare your creative haven by laying down a protective cover before the crafting magic begins!
Directions:
- First things first - use the school glue to glue down your FIVE JUMBO POPSICLE STICKS into a house formation, in the center of the colored cardstock paper. I started with the bottom and then added the triangle roof on top.
- Go ahead and use a small paint brush to paint the two roof pieces brown.
- Next up - grab your printed picture and trim it down so you can place it inside the frame. Secure that in place with some glue on the back.
- Now grab the printable, along with your crayons.
- Color in one of the babies and a star.
- Trim them both out with scissors.
- Now for the bed of straw. Grab your three cupcake liners and stapler.
- Flatten each set out with your hands and stack them on top of each other.
- Use the stapler to secure them together in the center.
- Next use the scissors to cut a simple fringe around the edge.
- Use your fingers to "fluff" it up and give it even more dimension.
- Finally, the last step! Go ahead and glue down both paper pieces on the picture frame design. The star goes at the top while the baby goes on the bottom.
- Add any other embellishments you see fit.
- Then allow it to dry completely before you display it proudly for all to see!


NEED HELP DOWNLOADING OUR FREE PRINTABLES? PLEASE REFER TO OUR FAQ PAGE
If you've enjoyed our content or have any thoughts to share, we'd love to hear from you! Mention @gluedtomycrafts or tag #gluedtomycrafts on Instagram!