Get ready to welcome the new season with a fun and simple activity for the little ones in your life. This Toilet Roll Stamped Beehive craft is the perfect way to get creative while celebrating the buzz of spring. It uses everyday materials you likely already have at home, making it an easy and budget-friendly project for a rainy afternoon. Let’s gather our supplies and make a craft that’s as sweet as honey!
Materials You’ll Need
Before you start, collect these simple craft supplies:
- An empty toilet paper roll (or a craft tube)
- Yellow washable craft paint
- A small paper plate
- White construction paper
- Black marker
- Optional: Bee stickers, glitter, or other embellishments
Step-by-Step Instructions
Follow these easy steps to create your own beehive masterpiece.
Step 1: Prepare Your Paint Station
First, set up your crafting area. Squeeze a generous amount of yellow washable paint onto the paper plate. This will serve as your ink pad for the stamp. Having everything ready makes the process smooth and fun for kids.
Step 2: Create the Honeycomb Stamp
Take your empty toilet paper roll and gently press one end into the yellow paint on the paper plate. Make sure the rim is evenly coated with paint. This simple tube is now your beehive or honeycomb stamp!
Step 3: Stamp Your Beehive
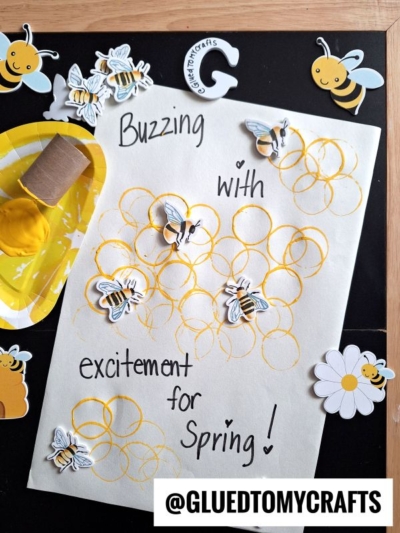
Now for the fun part! Press the paint-covered end of the toilet paper roll onto your white construction paper. Lift it to reveal a perfect yellow circle. Repeat this process, stamping circles close together to create a honeycomb pattern. You can overlap them slightly to make it look like a real beehive. Cover as much of the paper as you like.
Step 4: Decorate
Finally, add your wording and bee stickers to bring the theme together.
Step 5: Let It Dry
Once you are happy with your stamped beehive pattern, set the paper aside to dry completely. This is a great time to clean up any paint spills and wash your hands. Once it’s completely dry, display!
RELATED —> Handprint Beehive Gnome Craft Idea

If using a toilet paper roll is not your jam, you can also use plastic eggs to recreate this craft as well!
This activity is not only a great way to recycle household items but also a chance to talk to your children about the important role bees play in our environment.
We encourage you to get creative and add your own unique touches. Display your finished artwork on the fridge or give it as a cheerful spring card to a friend or family member. On that note – happy crafting, my friends!


Toilet Roll Stamped Beehive Craft Idea For Spring
Here’s your checklist of supplies to bring this craft to life:
- Construction Paper
- Craft Paint
- Embellishments
- Toilet Paper Roll
Prepare your creative haven by laying down a protective cover before the crafting magic begins!
Directions:
- First, set up your crafting area. Squeeze a generous amount of yellow washable paint onto the paper plate. This will serve as your ink pad for the stamp. Having everything ready makes the process smooth and fun for kids.
- Take your empty toilet paper roll and gently press one end into the yellow paint on the paper plate. Make sure the rim is evenly coated with paint. This simple tube is now your beehive or honeycomb stamp!
- Now for the fun part! Press the paint-covered end of the toilet paper roll onto your white construction paper. Lift it to reveal a perfect yellow circle. Repeat this process, stamping circles close together to create a honeycomb pattern. You can overlap them slightly to make it look like a real beehive. Cover as much of the paper as you like.
- Finally, add your wording and bee stickers to bring the theme together.
- Once you are happy with your stamped beehive pattern, set the paper aside to dry completely. This is a great time to clean up any paint spills and wash your hands. Once it's completely dry, display!
CLICK HERE TO PRINT THE DIRECTIONS FOR THIS CRAFT