Are you looking for a fun, tactile craft to keep little hands busy this holiday season? Making homemade ornaments is a wonderful way to build memories, practice fine motor skills, and create adorable keepsakes for your family tree.
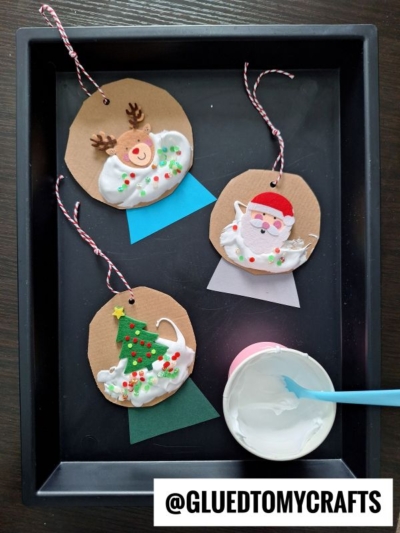
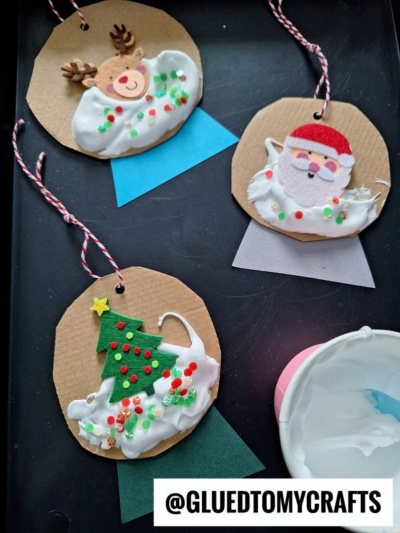
We love crafts that use simple, accessible materials you likely already have around the house. That is exactly why these cardboard snow globe ornaments are a perfect weekend project. By combining recycled cardboard with a homemade “puffy paint” mixture, you can create a wonderful three-dimensional snow effect that kids absolutely love.
Materials You Will Need
Before you start, gather your supplies. You probably have most of these items hiding in your craft closet or pantry.
The Snow Globe Base
- Sturdy cardboard: Empty shipping boxes work perfectly.
- Colored cardstock or heavy construction paper: Any color you like!
- Festive twine or ribbon: Red and white striped baker’s twine gives a classic holiday look.
The Homemade Puffy Paint
- White school glue: Any standard liquid white craft glue will do.
- White shaving cream: Use the foam kind, not the gel. This gives the paint its signature fluffy texture.
Embellishments
- Holiday felt stickers: I personally grabbed mine from Hobby Lobby recently.
- Sequins and glitter: Something to add dimension to the snow.
- Basic tools: Scissors, a pencil, a hole punch, a small mixing bowl, and a plastic spoon or craft stick.
Step-by-Step Instructions
Follow these simple steps to build your beautiful winter wonderlands.
Step 1: Cut the Cardboard Bases
- Start by creating the main globe shape. Find a round object like a small bowl or a wide mug to trace onto your cardboard.
- Use your pencil to draw a circle, and then carefully cut it out. Depending on the age of your crafters, an adult might need to handle the cardboard cutting.
- Next, grab your hole punch. Punch a single hole near the top edge of the cardboard circle. This is where your hanging twine will go later.
Step 2: Create the Snow Globe Stand
- Every snow globe needs a sturdy base. Grab your colored cardstock and cut out a trapezoid shape. It should be wide enough at the top to overlap slightly with the bottom edge of your cardboard circle.
- Use a glue stick or liquid glue to attach this colored trapezoid to the bottom front of your cardboard circle.
Step 3: Mix the Puffy Paint Snow
- Now comes the best part! In your small mixing bowl or a paper cup, mix equal parts white school glue and shaving cream foam.
- Stir the mixture together with a craft stick or plastic spoon until it looks like thick, glossy whipped cream.
- Make sure you mix this right before you plan to use it, as the foam will eventually lose its air if left sitting out for too long.
Step 4: Apply the Winter Snow
- Use your craft stick or a small paintbrush to scoop up the puffy paint.
- Spread a generous, thick layer across the bottom half of your cardboard circle, right above the cardstock base.
- Do not worry about making it perfectly smooth. Snow is naturally clumpy and uneven. The texture is exactly what makes this craft so special.
Step 5: Place Your Holiday Characters
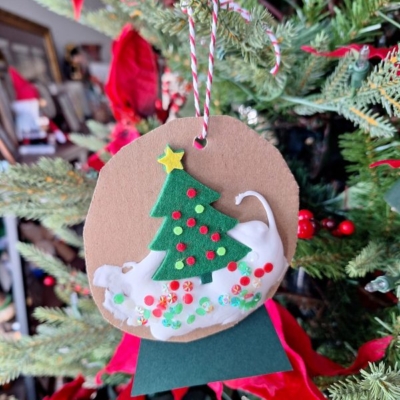
- While the puffy paint is still wet, gently press your felt holiday stickers into the “snow.” You might choose a smiling Santa, a cute reindeer, or a decorated Christmas tree. Because the puffy paint contains so much glue, it will act as a strong adhesive to hold the felt pieces firmly in place once everything dries.
Step 6: Sprinkle on the Magic
- Before the snow dries, let the kids sprinkle their sequins over the white paint. Press them down very lightly so they sink into the paint just a tiny bit.
Step 7: Add the Hanger and Let Dry
- Cut a short length of your baker’s twine.
- Thread it through the hole you punched at the top of the cardboard circle and tie it in a knot to create a hanging loop.
- Finally, set the ornaments aside in a safe place to dry completely. Because the puffy paint is applied thickly, it can take anywhere from a few hours to overnight to fully set. As it dries, it will retain that incredible 3D texture and feel slightly spongy to the touch.
RELATED —> Handprint Reindeer Snow Globe Craft
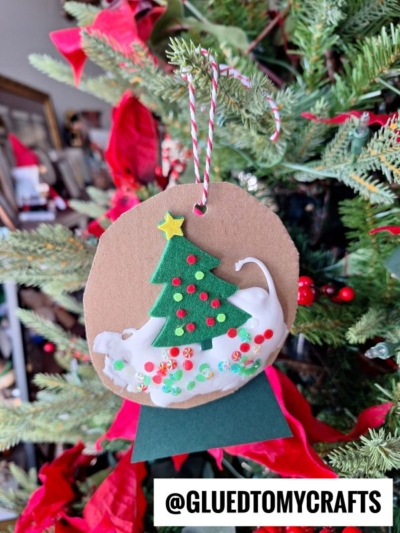
We hope you and your family enjoy getting a little messy and making some beautiful holiday decor together. Hang these proudly on your tree, string them into a festive garland, or attach them to holiday gifts as a special handmade tag.
Did you try making these puffy paint ornaments? We would love to see how they turned out! Share your magical winter creations with us by tagging our page on Facebook, and be sure to check back for more easy, kid-friendly craft tutorials to keep your creativity flowing all year long. Happy crafting, my friends!

DIY Puffy Paint Snow Globe Ornaments for Kids
Learn how to make adorable puffy paint and cardboard snow globe ornaments with this easy, kid-friendly holiday craft tutorial.
Here’s your checklist of supplies to bring this craft to life:
- Large Piece of Cardboard
- Loose Craft Glitter
- Embellishments
- Ribbon or String
- School Glue
- Shaving Cream
Prepare your creative haven by laying down a protective cover before the crafting magic begins!
Directions:
- Start by creating the main globe shape. Find a round object like a small bowl or a wide mug to trace onto your cardboard.
- Use your pencil to draw a circle, and then carefully cut it out. Depending on the age of your crafters, an adult might need to handle the cardboard cutting.
- Next, grab your hole punch. Punch a single hole near the top edge of the cardboard circle. This is where your hanging twine will go later.
- Every snow globe needs a sturdy base. Grab your colored cardstock and cut out a trapezoid shape. It should be wide enough at the top to overlap slightly with the bottom edge of your cardboard circle.
- Use a glue stick or liquid glue to attach this colored trapezoid to the bottom front of your cardboard circle.
- Now comes the best part! In your small mixing bowl or a paper cup, mix equal parts white school glue and shaving cream foam.
- Stir the mixture together with a craft stick or plastic spoon until it looks like thick, glossy whipped cream.
- Make sure you mix this right before you plan to use it, as the foam will eventually lose its air if left sitting out for too long.
- Use your craft stick or a small paintbrush to scoop up the puffy paint.
- Spread a generous, thick layer across the bottom half of your cardboard circle, right above the cardstock base.
- Do not worry about making it perfectly smooth. Snow is naturally clumpy and uneven. The texture is exactly what makes this craft so special.
- While the puffy paint is still wet, gently press your felt holiday stickers into the "snow." You might choose a smiling Santa, a cute reindeer, or a decorated Christmas tree. Because the puffy paint contains so much glue, it will act as a strong adhesive to hold the felt pieces firmly in place once everything dries.
- Before the snow dries, let the kids sprinkle their sequins over the white paint. Press them down very lightly so they sink into the paint just a tiny bit.
- Cut a short length of your baker's twine.
- Thread it through the hole you punched at the top of the cardboard circle and tie it in a knot to create a hanging loop.
- Finally, set the ornaments aside in a safe place to dry completely. Because the puffy paint is applied thickly, it can take anywhere from a few hours to overnight to fully set. As it dries, it will retain that incredible 3D texture and feel slightly spongy to the touch.
CLICK HERE TO PRINT THE DIRECTIONS FOR THIS CRAFT
If you've enjoyed our content or have any thoughts to share, we'd love to hear from you! Mention @gluedtomycrafts or tag #gluedtomycrafts on Instagram!