Halloween brings out the best in kids’ creativity. If you want a simple, engaging activity that uses items you already have around the house, you need to try process art. This quick tutorial shows you how to make potato masher stamped monsters. It turns a boring kitchen utensil into a fantastic crafting tool!
Kids love getting messy with paint, and adding a bunch of googly eyes makes everything better. You can set this project up in minutes, making it a perfect afternoon activity for parents, teachers, or anyone looking to entertain little ones.
Materials You Need for Potato Masher Monsters
Before you start stamping, gather a few basic supplies. You probably have most of these hiding in your craft bins or kitchen drawers.
- Construction paper: Dark colors like black or bright orange work perfectly for Halloween themes.
- Washable kid’s paint: Neon colors like lime green, purple, bright pink, and yellow really pop against dark paper.
- A wire potato masher: A traditional masher with a grid or zig-zag pattern creates the best texture for monster bodies.
- Paper plates: Use these to hold your paint pools.
- Googly eyes: Grab a mix of different sizes.
- Markers: Thick black or bright neon markers for drawing arms, legs, and facial features.
- Craft glue: To stick the googly eyes down securely.
Step-by-Step Instructions for Stamped Monsters
Follow these simple steps to help your kids build an entire family of wacky monsters.
Step 1: Prepare Your Paint Station
Squeeze small pools of your chosen paint colors onto a paper plate. Make sure the pool is wide enough to fit the head of your potato masher. Lay your construction paper flat on the table. You might want to put down some newspaper first to protect your surfaces from enthusiastic stampers!
Step 2: Stamp the Monster Bodies
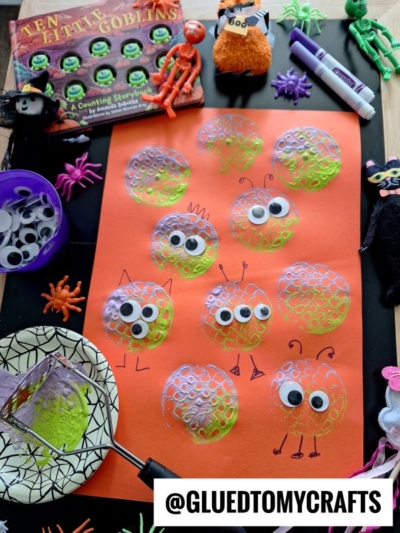
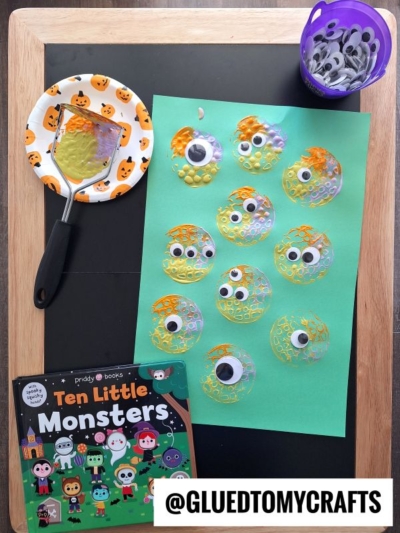
Dip the flat end of the potato masher directly into the paint. Press it firmly onto the paper plate a few times to spread the paint evenly across the grid. Next, press the masher firmly onto your construction paper. Lift it straight up to reveal a cool, textured circle. Repeat this process as many times as you want to create a whole group of monster bodies.
Step 3: Let the Paint Dry
Because the masher leaves a thick layer of paint, you need to let the paper dry completely before moving on to the next step. Grab a snack or read a Halloween counting book while you wait.
Step 4: Bring Your Monsters to Life
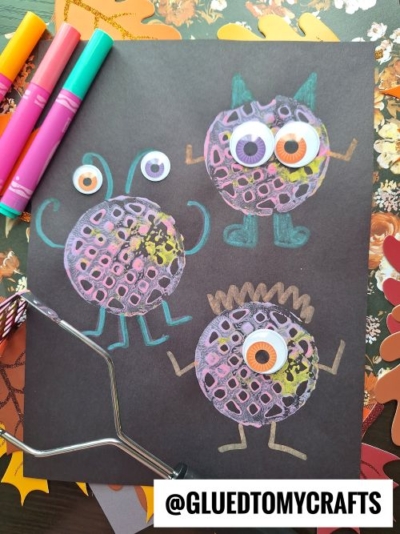
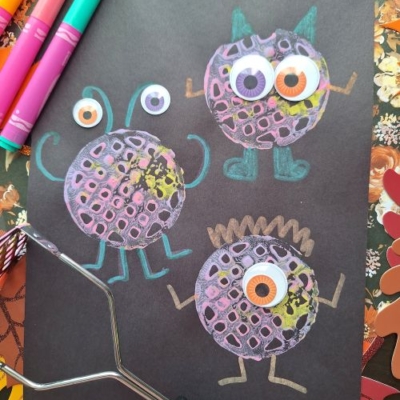
Once the paint is totally dry, the real fun begins! Use your craft glue to attach googly eyes to each stamped circle. Monsters can have one giant eye, three medium eyes, or even five tiny eyes scattered around.
Grab your markers and draw unique features for every creature. Add squiggly antennae, sharp horns, silly grins, and stick-figure legs. There is absolutely no right or wrong way to decorate them.
RELATED —> Potato Masher Stamped Pumpkin Pie Craft Idea
Making potato masher stamped monsters is sure to bring an afternoon filled with giggles and creativity. Try experimenting with different paint colors, or maybe test out other kitchen utensils like forks or spatulas to see what kinds of textures they create. Most importantly, have fun and let your creativity run wild. Wishing you a fantastically fun and spooky Halloween filled with color, laughter, and lots of monster magic!

Potato Masher Stamped Monster Craft Idea
Here’s your checklist of supplies to bring this craft to life:
- Cardstock Paper
- Craft Paint
- Wiggle Eyes
- Embellishments
Prepare your creative haven by laying down a protective cover before the crafting magic begins!
Directions:
- Squeeze small pools of your chosen paint colors onto a paper plate. Make sure the pool is wide enough to fit the head of your potato masher. Lay your construction paper flat on the table. You might want to put down some newspaper first to protect your surfaces from enthusiastic stampers!
- Dip the flat end of the potato masher directly into the paint. Press it firmly onto the paper plate a few times to spread the paint evenly across the grid. Next, press the masher firmly onto your construction paper. Lift it straight up to reveal a cool, textured circle. Repeat this process as many times as you want to create a whole group of monster bodies.
- Because the masher leaves a thick layer of paint, you need to let the paper dry completely before moving on to the next step. Grab a snack or read a Halloween counting book while you wait.
- Once the paint is totally dry, the real fun begins! Use your craft glue to attach googly eyes to each stamped circle. Monsters can have one giant eye, three medium eyes, or even five tiny eyes scattered around.
- Grab your markers and draw unique features for every creature. Add squiggly antennae, sharp horns, silly grins, and stick-figure legs. There is absolutely no right or wrong way to decorate them.
CLICK HERE TO PRINT THE DIRECTIONS FOR THIS CRAFT