Valentine’s Day gives us a wonderful excuse to break out the craft supplies and make something special with the kids. This popsicle stick mail truck is an adorable, hands-on project that celebrates the fun of delivering love notes.
We love pairing this activity with a cozy reading session featuring holiday favorites like The Day It Rained Hearts or Splat the Cat. It is the perfect afternoon project for the classroom or the kitchen table. Grab your supplies and let’s build a special delivery truck!
Materials Needed
You only need a few basic craft stash staples to bring this mail truck to life:
- Jumbo popsicle sticks (8 per truck)
- White craft paint and a paintbrush
- Markers (red, pink, and black)
- Cardstock or construction paper (black, grey, and red)
- Heart stickers and rhinestones
- Craft glue or school glue
- Scissors
Step-by-Step Instructions
Step 1: Build the Truck Base
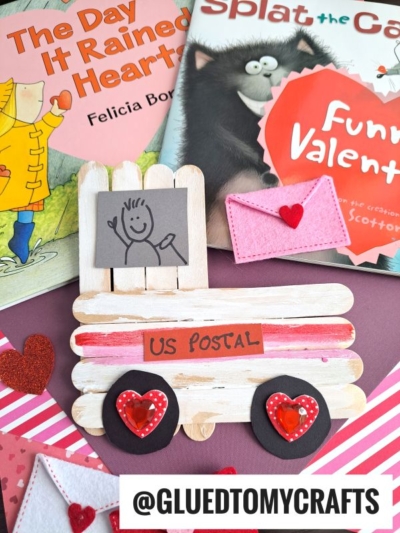
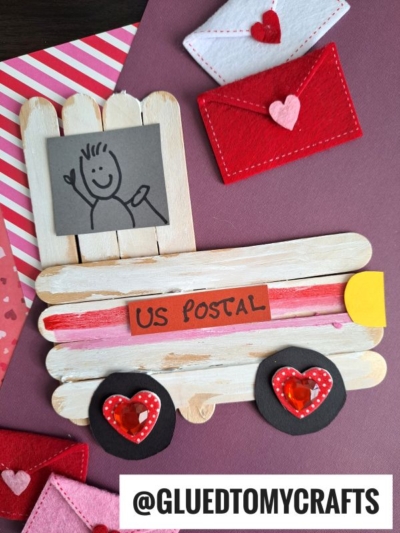
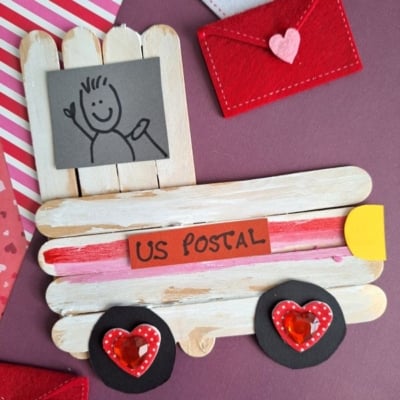
Start by lining up five popsicle sticks horizontally to form the main body of the truck. Next, arrange three popsicle sticks vertically and attach them to the top left side of the horizontal sticks to form the driver’s cab. Use craft glue to secure everything in place. You can glue a couple of scrap sticks across the back to hold it all together. Let the glue dry completely.
Step 2: Paint the Truck
Once the glue is dry and the base is solid, paint the entire popsicle stick structure white. Set it aside to dry.
Step 3: Add the Postal Details
Use your red and pink markers to draw a bright stripe straight across the middle of the truck’s body. Cut a small rectangular strip from your red paper, write “US POSTAL” on it with a black marker, and glue it right onto the side of the truck.
Step 4: Create the Wheels
Cut two circles out of your black cardstock. To give them a festive touch, layer a heart sticker and a small red rhinestone gem in the center of each wheel. Glue the finished wheels to the bottom edge of the truck.
Step 5: Make the Driver
Cut a small rectangle out of grey paper to represent the truck’s window. Use a black marker to draw a happy, waving stick figure inside. Glue this piece to the vertical cab section of the truck.
RELATED —> Cupcake Liner Snail Mail Card
Now you have a wonderful little mail truck ready to deliver smiles! Encourage the kids to get creative and make this craft their own. They can paint their trucks pink or purple, add glitter, or design their own custom license plates.
We always enjoy seeing how these projects turn out. Display them on the fridge, use them as homemade Valentine cards, or share your kids’ wonderful creations with friends and family. Have a fantastic time crafting!

Popsicle Stick Valentine's Day Mail Truck Craft
Here’s your checklist of supplies to bring this craft to life:
- 8 Jumbo Popsicle Sticks
- Cardstock Paper
- Craft Paint
- Embellishments
- School Glue
Prepare your creative haven by laying down a protective cover before the crafting magic begins!
Directions:
- Start by lining up five popsicle sticks horizontally to form the main body of the truck. Next, arrange three popsicle sticks vertically and attach them to the top left side of the horizontal sticks to form the driver's cab.
- Use craft glue to secure everything in place. You can glue a couple of scrap sticks across the back to hold it all together. Let the glue dry completely.
- Once the glue is dry and the base is solid, paint the entire popsicle stick structure white. Set it aside to dry.
- Use your red and pink markers to draw a bright stripe straight across the middle of the truck's body. Cut a small rectangular strip from your red paper, write "US POSTAL" on it with a black marker, and glue it right onto the side of the truck.
- Cut two circles out of your black cardstock. To give them a festive touch, layer a heart sticker and a small red rhinestone gem in the center of each wheel. Glue the finished wheels to the bottom edge of the truck.
- Cut a small rectangle out of grey paper to represent the truck's window. Use a black marker to draw a happy, waving stick figure inside. Glue this piece to the vertical cab section of the truck.
CLICK HERE TO PRINT THE DIRECTIONS FOR THIS CRAFT