The holiday season brings a special kind of magic into our homes, filled with twinkling lights, warm cocoa, and the joy of creating memories together. One of the best ways to capture this festive spirit is by gathering around the kitchen table for some hands-on holiday crafting. If you want a simple, engaging project that your kids will absolutely love, this paper plate and handprint reindeer craft hits all the right marks.
You do not need expensive supplies or hours of prep time to make something adorable. This project transforms basic household items into a charming little Rudolph. Plus, incorporating your child’s handprints creates a sweet keepsake that you can treasure long after the snow melts.
Supplies You Need:
Before you start, gather your materials. You likely already have most of these items hiding in your craft closet or kitchen pantry.
Here is what you need to make your reindeer:
- Large plain white paper plates (the cheap, uncoated ones work best for painting)
- Brown acrylic paint or washable tempera paint
- A large paintbrush or sponge brush
- Tan or light brown construction paper (for the antlers)
- Red cardstock or construction paper (for the nose)
- Large plastic googly eyes
- A black permanent marker
- Q-tips or small detail paintbrushes
- Small amounts of red, yellow, and green paint (for the Christmas lights)
- Kid-friendly craft glue or a glue stick
- Scissors
Step-by-Step Instructions:
Follow these steps to create your festive reindeer. Remember, the goal is fun, not perfection. If the paint smears or the antlers sit a little crooked, it just adds to your reindeer’s unique personality.
Step 1: Prep the Paper Plate Face
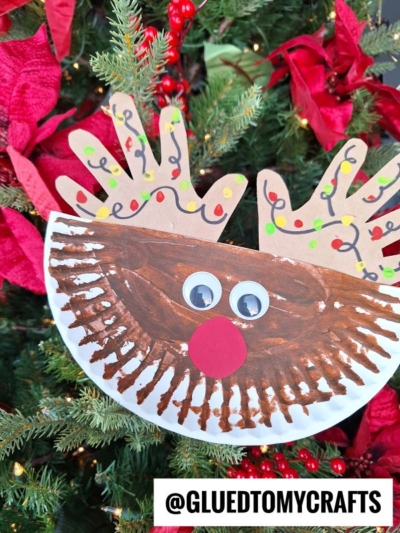
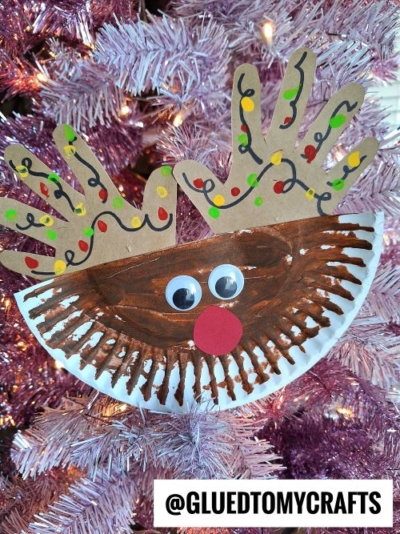
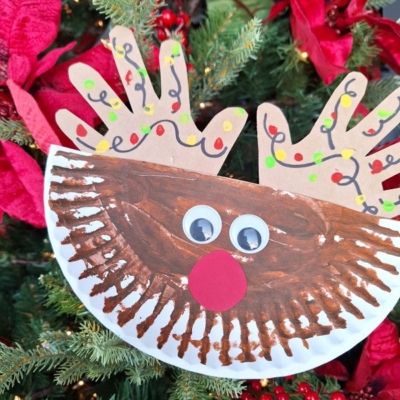
- Start by taking a single white paper plate and cut it directly in half to create a semi-circle. This shape forms the sturdy base of your reindeer’s face.
- Next, have your child paint their plate piece with brown paint.
- When they are done, set the plate aside to dry completely.
Step 2: Trace and Cut the Handprint Antlers
- While the brown paint dries, grab your tan or light brown construction paper. Have your child place their hands flat on the paper, spreading their fingers wide. Use a pencil or pen to carefully trace both the left and the right hand.
- Use your scissors to cut out both handprints. If your child is old enough to practice their scissor skills, let them tackle this step safely. These two cutouts will serve as your reindeer’s antlers.
Step 3: Decorate the Antlers with Christmas Lights
- This step adds a brilliant pop of color and makes the craft stand out. Take the black permanent marker and draw a single, looping “string” across the fingers of the handprint cutouts.
- Next, dip a Q-tip or a small detail brush into your red, yellow, and green paint. Press small dots along the black line you just drew. These colorful dots represent a glowing string of Christmas lights tangled in the reindeer’s antlers. Allow these painted dots to dry before moving on to assembly.
Step 4: Bring Rudolph to Life
- Now it is time to give your reindeer a face! Grab your red cardstock and cut out a large, solid circle for the nose.
- Take the dried, brown paper plate piece. Apply a generous dab of glue to the back of the large red circle and stick it right in the center, near the bottom curved edge of the plate.
- Next, glue your two large googly eyes just above the red nose. Make sure they are centered so your reindeer looks right back at you.
Step 5: Assemble Your Reindeer
- For the final step, attach the decorated handprint antlers. Apply glue to the bottom palm section of each handprint. Press them firmly against the back of the straight, edge of your painted paper plate. Hold them in place for a few seconds to ensure the glue grips the paper firmly.
- Set the completed craft aside to dry completely before putting it on display.
RELATED —> Handprint & Popsicle Stick Reindeer Craft

Crafting together creates the best kind of holiday magic. We hope you and your family enjoy spending time making this simple, sweet paper plate and handprint reindeer craft.
We would absolutely love to see how your festive friends turn out! Snap a photo of your child’s finished masterpiece and share it with us on social media using the hashtag #GluedToMyCrafts. Have a wonderful, creative, and very merry holiday season!

Paper Plate Handprint Reindeer Craft for Christmas
Create magical holiday memories with this simple paper plate and handprint reindeer craft. Perfect for toddlers and preschoolers!
Here’s your checklist of supplies to bring this craft to life:
- Cardstock Paper
- Craft Paint
- Large Paper Plate
- Embellishments
Prepare your creative haven by laying down a protective cover before the crafting magic begins!
Directions:
- Start by taking a single white paper plate and cut it directly in half to create a semi-circle. This shape forms the sturdy base of your reindeer's face.
- Next, have your child paint their plate piece with brown paint.
- When they are done, set the plate aside to dry completely.
- While the brown paint dries, grab your tan or light brown construction paper. Have your child place their hands flat on the paper, spreading their fingers wide. Use a pencil or pen to carefully trace both the left and the right hand.
- Use your scissors to cut out both handprints. If your child is old enough to practice their scissor skills, let them tackle this step safely. These two cutouts will serve as your reindeer's antlers.
- This step adds a brilliant pop of color and makes the craft stand out. Take the black permanent marker and draw a single, looping "string" across the fingers of the handprint cutouts.
- Next, dip a Q-tip or a small detail brush into your red, yellow, and green paint. Press small dots along the black line you just drew. These colorful dots represent a glowing string of Christmas lights tangled in the reindeer's antlers. Allow these painted dots to dry before moving on to assembly.
- Now it is time to give your reindeer a face! Grab your red cardstock and cut out a large, solid circle for the nose.
- Take the dried, brown paper plate piece. Apply a generous dab of glue to the back of the large red circle and stick it right in the center, near the bottom curved edge of the plate.
- Next, glue your two large googly eyes just above the red nose. Make sure they are centered so your reindeer looks right back at you.
- For the final step, attach the decorated handprint antlers. Apply glue to the bottom palm section of each handprint. Press them firmly against the back of the straight, edge of your painted paper plate. Hold them in place for a few seconds to ensure the glue grips the paper firmly.
- Set the completed craft aside to dry completely before putting it on display.
CLICK HERE TO PRINT THE DIRECTIONS FOR THIS CRAFT
If you've enjoyed our content or have any thoughts to share, we'd love to hear from you! Mention @gluedtomycrafts or tag #gluedtomycrafts on Instagram!