Glued To My Crafts

Join thousands of others who have gotten GLUED to our craft tutorials!

  • Home
  • Privacy Policy
  • Craft Safety Guidelines
  • Seasonal Themes
    • New Years
    • Valentine’s Day
    • St. Patrick’s Day
    • Spring
    • Easter
    • Mother’s Day
    • Summer
    • Father’s Day
    • Patriotic
    • Halloween
    • Thanksgiving
    • Fall
    • Winter
    • Christmas
    • Snowmen
    • Story Time
  • About Us
  • Our Amazon Storefront
  • Monthly Themes
    • January Craft Ideas
    • February Craft Ideas
    • March Craft Ideas
    • April Craft Ideas
    • May Craft Ideas
    • June Craft Ideas
    • July Craft Ideas
    • August Craft Ideas
    • September Crafts
    • October Crafts
    • November Crafts
    • December Crafts

Paint Squish Heart Craft: A Last-Minute Soaring Success!

Two photos show a heart-shaped paper painted with red and white in a marbled squish pattern. The bottom image includes a handwritten note reading, You make my heart soar! - Alex. Craft supplies are nearby.

Need a quick and fun craft that delivers a big “wow” factor? This paint squish heart is the perfect activity for an afternoon of creativity. With just a few simple supplies, you and your little artists can create a beautiful, symmetrical piece of art that makes a wonderful Valentine’s Day card or decoration. The magic happens when you “squish” the paint, and the final reveal is always a fun surprise!

Let’s get started and make a heart that’s ready to take flight!

Four-step collage showing a pink paper heart craft. Step 1: Red and white paint spread on an open card. Step 2: Card pressed together, paint forms a pattern. Step 3: Heart shape cut out. Step 4: Heart with a you make my heart soar label.

What You’ll Need:

  • White or light-colored cardstock paper
  • Washable craft paint in a few colors (we love red, pink, and white!)
  • Scissors
  • Pencil or marker
  • School Glue

Step-by-Step Guide:

Step 1: Fold Your Paper

Take a sheet of cardstock and fold it perfectly in half. Crease it well with your finger. This fold is the key to creating your symmetrical design.

Step 2: Add Your Paint

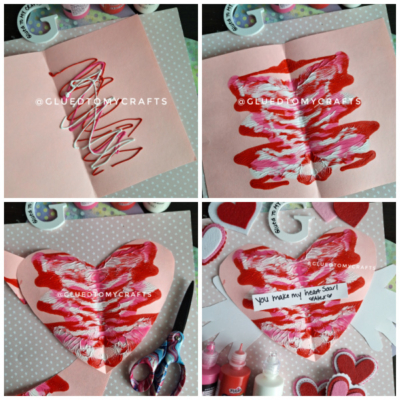
Open the folded paper. On one of the inside halves, squeeze several drops and lines of paint. Don’t be shy! You can use two, three, or even more colors. Alternate the colors to create a more interesting pattern when they mix. There’s no right or wrong way to do this, so let your creativity flow.

Step 3: The “Squish”

Now for the best part! Fold the clean half of the paper back over onto the painted side. Gently press down with your hands and “squish” the paint around. You can smooth your hands from the center fold outwards to help the colors spread and mingle. You’ll feel the paint moving under the paper.

Step 4: The Big Reveal

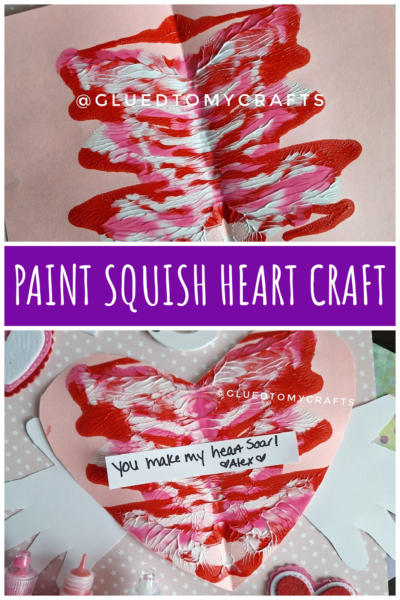
Carefully open your paper to reveal a beautiful, one-of-a-kind symmetrical design! The two sides will be a mirror image of each other. Set your masterpiece aside and let it dry completely. This might take a few hours, depending on how much paint you used.

Step 5: Create Your Heart

Once the paint is dry, fold the paper in half again with the painted side facing out. With a pencil, draw half of a heart shape along the folded edge. Cut along the line you drew. When you open it up, you’ll have a perfectly shaped, beautifully painted heart.

Step 6: Make it Soar!

To complete the craft, trace your child’s hands on a separate piece of cardstock and cut them out. Glue these handprint “wings” to the back of your heart. Finally, write a sweet message on the front, like “You make my heart soar!”

A handmade Valentine’s card features a large heart with red, pink, and white paint swirls, a note reading You make my heart soar! Alex, felt hearts, and bottles of puffy paint. @GLUETOMYCRAFTS is written at the bottom.

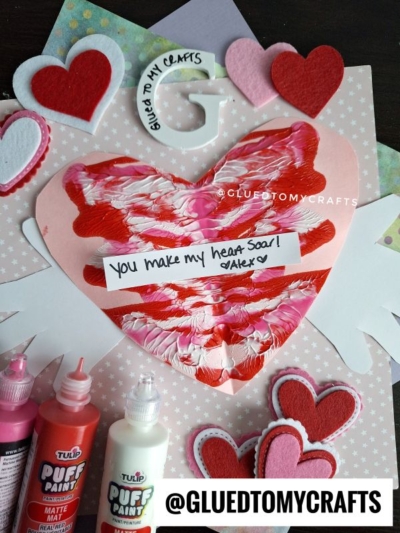
Now you’re ready to spread some joy! Try making a few of these hearts to give to friends, family, or classmates. Don’t forget to have fun creating – each heart is one-of-a-kind, just like the person who receives it. Happy crafting, my friends!

Stacey Glued To My Crafts website signature


OUR PRIVACY POLICY

OUR COPYRIGHT POLICY

  • Email
  • Facebook
  • Instagram
  • Pinterest
  • Twitter
  • YouTube

LOOKING FOR SOMETHING?

EXPLORE OUR SITE:

TRENDING TODAY:

  • A pink hand-shaped bookmark with red heart stickers and star confetti surrounds a round note that reads a heartfelt message about love and reading. The image is from GluedToMyCraftsBlog.com. Handprint Bookmark Keepsake: A Gift That Holds Your Spot
  • A handmade Valentine’s Day craft featuring a red rose made of torn paper, two green handprint leaves, a glue bottle, heart decorations, and a message: “LOOK WHAT I MADE - A ROSE THAT WON’T FADE! WISHING YOU LOVE THIS VALENTINE’S DAY!”. Torn Paper Rose Card Craft Tutorial for Valentine’s Day
  • A colorful craft project featuring a yellow felt moon, sparkly stars, and heart shapes, with glue and a heartfelt message. Torn Paper Love You To The Moon and Back Card Craft Idea For Kids
  • A handmade card with a rocket drawing, hearts, and messages of love. Felt hearts and an envelope are around it. Handprint Rocket Keepsake - I Love You Because
  • A colorful paper craft featuring a red and pink painted paper plate with yellow circles in the center, green handprint cutouts as leaves, surrounded by craft supplies, heart decorations, and paint bottles. Paint Splat Valentine's Day Flower Craft Idea
  • A vibrant Valentine's Day craft showcasing a torn-paper bumblebee with googly eyes on a white sheet, accompanied by the text "MY VALENTINE!" The scene is decorated with felt hearts, heart-shaped gems, and patterned papers, with a glue bottle and crafting supplies adding to the creative atmosphere. Torn Paper Bee My Valentine Card Craft Idea For Valentine's Day
  • A flat lay of handmade Valentine’s Day cards and decorations, including paper flowers, felt hearts, an envelope, and printed cards with romantic poems, arranged on a gray and pink background. Capture Memories With These 6 Handprint Flower Poems
  • Flat lay of a torn paper dandelion craft featuring a white sheet with a black dandelion outline. Torn yellow, pink, and purple paper pieces are glued to the dandelion head, simulating seeds. Surrounding the craft are Elmer's glue, felt hearts, paper flowers, and patterned scrapbook paper. The text 'MAKING WISHES, ONE PIECE OF PAPER AT A TIME.' and 'GluedToMyCraftsBlog.com' are printed on the white sheet. Torn Paper Dandelion Craft: Making Wishes, One Piece at a Time
  • A playful torn paper cactus craft with hearts and flowers. Includes glue and felt hearts. Torn Paper Cactus Card: A Sweet Mother's Day Craft
  • A colorful handprint craft made from purple paper with glitter edges sits on a multicolored polka dot background. A round tag with a poem is attached below, tied with red and white string. Flowers are visible in the corner. Easy Handprint Flower Craft with Poem – Perfect Spring DIY for Kids

© 2012–2026 Glued To My Crafts
All activities should be supervised by an adult at all times. Please refer to our safety guidelines for more information.


Please note that all the content of the website, including printables, are for classroom and personal use only. This means that any digital item you download from our site can be used for non-commercial use only. We kindly request that you do not reproduce or sell our creations. We appreciate your understanding and cooperation in respecting our content and intellectual property rights.

Accessibility Adjustments

Powered by OneTap

How long do you want to hide the toolbar?
Hide Toolbar Duration
Select your accessibility profile
Vision Impaired Mode
Enhances website's visuals
Seizure Safe Profile
Clear flashes & reduces color
ADHD Friendly Mode
Focused browsing, distraction-free
Blindness Mode
Reduces distractions, improves focus
Epilepsy Safe Mode
Dims colors and stops blinking
Content Modules
Font Size

Default

Line Height

Default

Color Modules
Orientation Modules