Summer afternoons call for simple, engaging activities that keep little hands busy and creative minds working. If you want a quick and delightful art project to try with your kids, this fork painted ice cream cone craft is an absolute winner. It combines sensory play with basic craft supplies you likely already have tucked away in your cupboards.
This project is perfectly imperfect. It encourages young artists to explore textures and shapes without worrying about staying perfectly inside the lines. Plus, there is something incredibly satisfying about using an everyday eating utensil to create beautiful, textured art.
Let us dive right into how you can set up this sweet summer craft for your toddlers, preschoolers, or kindergarteners.
Materials Needed for Your Art Project
You only need a few basic supplies to bring this deliciously textured art project to life. Gather the following items before you begin:
- Light pink cardstock or heavy construction paper for your background
- Tan or light brown kraft paper for the ice cream cone
- A black marker
- Scissors
- A glue stick or school glue
- Thick pink craft paint
- A plastic fork
- Iridescent glitter
- A small red glittery foam heart or a red pom-pom for the cherry
Step-by-Step Instructions
Ready to create some art? Follow these straightforward steps to make your textured ice cream cones.
Step 1: Prepare the Waffle Cone
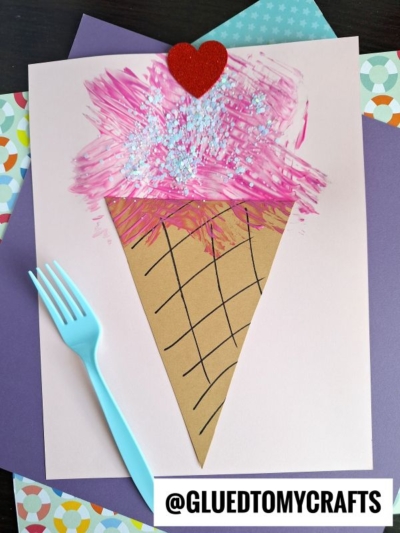
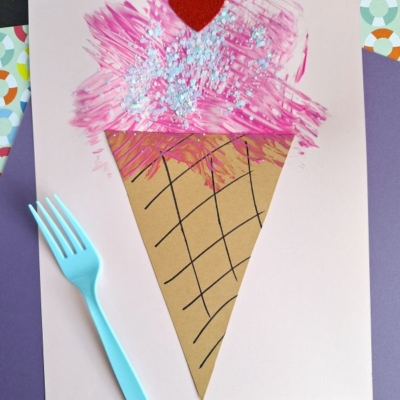
Start by cutting a triangle out of your tan kraft paper. This will serve as your ice cream cone. To give it that realistic waffle cone look, use your black marker to draw a simple diagonal grid pattern across the triangle. Once your cone is ready, glue it down onto the bottom center of your light pink cardstock background.
Step 2: Add the Ice Cream Scoop
Next, it is time for the messy fun. Squeeze a generous dollop of thick pink paint directly above the waffle cone on your cardstock. Do not worry about making a perfect circle. A slightly messy, organic shape makes the ice cream look authentic and delicious.
Step 3: Create Texture with the Fork
Hand your child the plastic fork and let them spread the pink paint around to form the scoop of ice cream. Encourage them to press the tines of the fork down into the paint and drag it to create deep ridges and textured streaks. This is the magic step that brings the ice cream to life and gives it a realistic, fluffy appearance.
Step 4: Add the Sweet Toppings
While the pink paint is still completely wet, sprinkle your iridescent glitter over the top. The wet paint will act as a natural adhesive, holding the glitter in place as it dries. Finally, place your red glitter foam heart right at the top of the ice cream scoop to act as the cherry.
Step 5: Let the Masterpiece Dry
Set the completed artwork safely aside to dry flat. Because the paint is applied thickly to create the fork texture, it may take a few hours to dry completely. Once dry, you will have a beautiful, dimensional piece of summer art ready to display on the fridge.
Fun Variations to Try
Once your kids master the basic technique, let them experiment with different flavors. Swap the pink paint for brown to make chocolate ice cream, or use light green paint and add real chocolate chips for a mint chocolate chip cone. You can even stack multiple triangles and paint colors to create a towering double or triple scoop masterpiece.
RELATED —> Popsicle Stick Ice Cream Gnome Craft for Kids
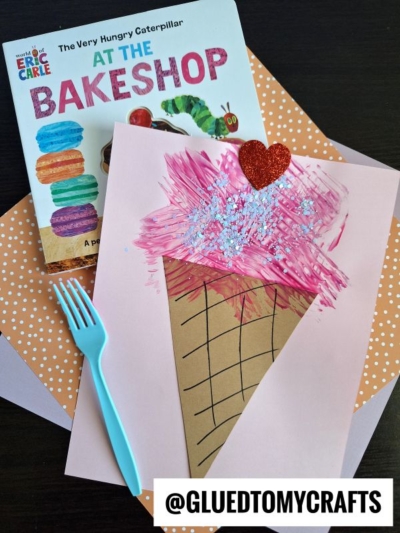
Pairing a craft with a beloved children’s book makes the activity even more special. Before or after creating your fork painted ice cream cones, read a food-themed story together. It’s sure to bring even more smiles to the moment!
On that note, we hope you and your little ones have a fantastic time bringing this sweet craft to life. Grab your supplies, embrace the messy fun, and watch your children light up as they create.

Fork Painted Ice Cream Cone Craft Idea For Summer
Here’s your checklist of supplies to bring this craft to life:
- Cardstock Paper
- Craft Paint
- Embellishments
- School Glue
Prepare your creative haven by laying down a protective cover before the crafting magic begins!
Directions:
- Start by cutting a triangle out of your tan kraft paper. This will serve as your ice cream cone. To give it that realistic waffle cone look, use your black marker to draw a simple diagonal grid pattern across the triangle. Once your cone is ready, glue it down onto the bottom center of your light pink cardstock background.
- Next, it is time for the messy fun. Squeeze a generous dollop of thick pink paint directly above the waffle cone on your cardstock. Do not worry about making a perfect circle. A slightly messy, organic shape makes the ice cream look authentic and delicious.
- Hand your child the plastic fork and let them spread the pink paint around to form the scoop of ice cream. Encourage them to press the tines of the fork down into the paint and drag it to create deep ridges and textured streaks. This is the magic step that brings the ice cream to life and gives it a realistic, fluffy appearance.
- While the pink paint is still completely wet, sprinkle your iridescent glitter over the top. The wet paint will act as a natural adhesive, holding the glitter in place as it dries. Finally, place your red glitter foam heart right at the top of the ice cream scoop to act as the cherry.
- Set the completed artwork safely aside to dry flat. Because the paint is applied thickly to create the fork texture, it may take a few hours to dry completely. Once dry, you will have a beautiful, dimensional piece of summer art ready to display on the fridge.
CLICK HERE TO PRINT THE DIRECTIONS FOR THIS CRAFT