Winter brings chilly weather that often keeps families bundled up indoors. When the temperature drops, you need engaging activities to keep little hands busy and creative minds flowing.
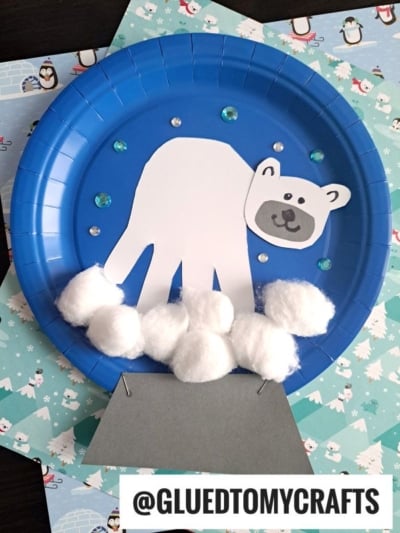
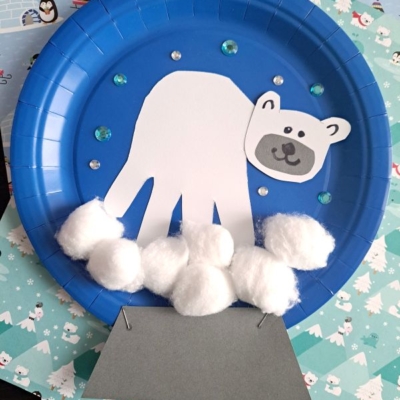
If you want a joyful, budget-friendly project to brighten up a dreary afternoon, we have the perfect solution. This paper plate and handprint polar bear snow globe craft transforms basic household supplies into a magical winter scene.
Materials You Need for Your Snow Globe
Gathering your supplies beforehand ensures a smooth and enjoyable crafting session for everyone involved. For this paper plate and handprint polar bear snow globe, you will need the following items:
- Blue paper plates: A standard blue paper plate serves as the chilly night sky background for the snow globe. If you only have white plates, you can easily paint them blue before you start.
- White cardstock or construction paper: You will use this sturdy paper to trace your child’s handprint for the polar bear’s body and cut out the bear’s head.
- Grey cardstock: You need a small piece of grey paper to create the sturdy base of the snow globe.
- Cotton balls: These soft, fluffy spheres will become the textured snow resting at the bottom of your globe.
- Rhinestones or sequins: Small, sparkling gems in silver or light blue act as twinkling stars or falling snow in the background.
- A pencil or pen: You need this for tracing those adorable little hands.
- Markers: Grab a black marker and a grey marker to draw the polar bear’s facial features.
- Kid-friendly scissors: Keep safety scissors nearby for the kids to use, ensuring they can safely participate in the cutting steps.
- Craft glue and a stapler: Liquid school glue works best for the cotton balls and rhinestones, while a stapler securely attaches the heavy base to the paper plate.
Step-by-Step Instructions
Follow these simple steps to bring your polar bear snow globe to life. Before you begin, cover your table with a piece of newspaper or a plastic mat to catch any stray glue.
Step 1: Create the Polar Bear Handprint
Grab your white cardstock and your pencil. Have your child place their hand flat on the paper, keeping their fingers close together but pointing straight down. Carefully trace around their hand.
Use your scissors to cut out the handprint. Turn the handprint upside down so the fingers point toward the table. The palm of the handprint represents the polar bear’s arched back, while the four fingers become the bear’s sturdy legs. You can trim the thumb off entirely or tuck it behind the body, as you only need four legs for the bear.
Step 2: Draw the Polar Bear Head
Take another piece of white cardstock and draw a simple circle for the polar bear’s head. Add two small semi-circles on top of the head for the ears. Cut out this head shape.
Use your grey marker to draw a small oval near the bottom of the face to create the muzzle. Then, take your black marker and add two dots for the eyes, a dark nose inside the grey muzzle, and a sweet, curved smile. Apply a dab of glue to the back of the head and attach it to the side of your handprint body. Your polar bear is now fully formed!
Step 3: Build the Snow Globe Base
Take your piece of grey cardstock and cut out a trapezoid shape. This shape should have a wide flat bottom, angled sides, and a slightly narrower flat top. This piece represents the wooden or metal base of a traditional snow globe.
Line up the top edge of the grey trapezoid with the bottom rim of your blue paper plate. Use your stapler to secure the two pieces together. Two staples – one on the left and one on the right – should hold the base firmly in place.
Step 4: Add the Fluffy Snow
Now it is time to build the arctic terrain! Squeeze a generous line of liquid craft glue across the bottom inside edge of the blue paper plate, just above where you attached the base.
Take your cotton balls and gently pull them apart to make them look fluffy and cloud-like. Press the stretched cotton balls directly into the glue. Layer them up slightly to create a deep, textured snowbank for your polar bear to walk on.
Step 5: Assemble the Scene
Take your completed polar bear handprint and apply glue to the back. Press the bear firmly into the center of the blue paper plate. Position the bear so its finger-legs slightly overlap the fluffy cotton ball snowbank. This makes it look like the bear is tramping through deep arctic snow.
Step 6: Add the Starry Night Sky
To finish your magical winter scene, you need to add some sparkle. Squeeze tiny dots of glue scattered across the empty blue space above the polar bear. Have your child carefully place a silver or light blue rhinestone onto each dot of glue.
These shiny gems catch the light beautifully, mimicking the look of sparkling stars or freshly falling snow inside a real glass snow globe. Let the entire project sit flat on the table until the glue dries completely.
RELATED —> Paint Splat Polar Bear Craft
Crafting offers a wonderful way to slow down, disconnect from screens, and connect with your family during the long winter months. This paper plate and handprint polar bear snow globe requires minimal supplies but delivers maximum joy. Gather your materials, clear off the kitchen table, and invite your family to make their very own arctic scenes today!

Easy Handprint Polar Bear Snow Globe Craft
Here’s your checklist of supplies to bring this craft to life:
- Cardstock Paper
- Large Paper Plate
- White Cotton Balls
- Embellishments
- School Glue
Prepare your creative haven by laying down a protective cover before the crafting magic begins!
Directions:
- Grab your white cardstock and your pencil. Have your child place their hand flat on the paper, keeping their fingers close together but pointing straight down. Carefully trace around their hand.
- Use your scissors to cut out the handprint. Turn the handprint upside down so the fingers point toward the table. The palm of the handprint represents the polar bear's arched back, while the four fingers become the bear's sturdy legs. You can trim the thumb off entirely or tuck it behind the body, as you only need four legs for the bear.
- Take another piece of white cardstock and draw a simple circle for the polar bear's head. Add two small semi-circles on top of the head for the ears. Cut out this head shape.
- Use your grey marker to draw a small oval near the bottom of the face to create the muzzle. Then, take your black marker and add two dots for the eyes, a dark nose inside the grey muzzle, and a sweet, curved smile. Apply a dab of glue to the back of the head and attach it to the side of your handprint body. Your polar bear is now fully formed!
- Take your piece of grey cardstock and cut out a trapezoid shape. This shape should have a wide flat bottom, angled sides, and a slightly narrower flat top. This piece represents the wooden or metal base of a traditional snow globe.
- Line up the top edge of the grey trapezoid with the bottom rim of your blue paper plate. Use your stapler to secure the two pieces together. Two staples - one on the left and one on the right - should hold the base firmly in place.
- Now it is time to build the arctic terrain! Squeeze a generous line of liquid craft glue across the bottom inside edge of the blue paper plate, just above where you attached the base.
- Take your cotton balls and gently pull them apart to make them look fluffy and cloud-like. Press the stretched cotton balls directly into the glue. Layer them up slightly to create a deep, textured snowbank for your polar bear to walk on.
- Take your completed polar bear handprint and apply glue to the back. Press the bear firmly into the center of the blue paper plate. Position the bear so its finger-legs slightly overlap the fluffy cotton ball snowbank. This makes it look like the bear is tramping through deep arctic snow.
- To finish your magical winter scene, you need to add some sparkle. Squeeze tiny dots of glue scattered across the empty blue space above the polar bear. Have your child carefully place a silver or light blue rhinestone onto each dot of glue.
- These shiny gems catch the light beautifully, mimicking the look of sparkling stars or freshly falling snow inside a real glass snow globe. Let the entire project sit flat on the table until the glue dries completely.
CLICK HERE TO PRINT THE DIRECTIONS FOR THIS CRAFT