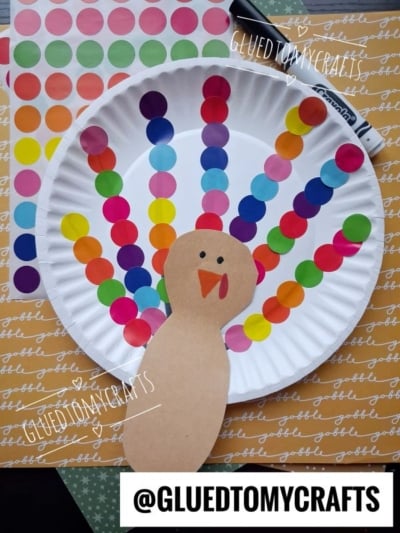
Thanksgiving crafts don’t need to be messy or complicated to be memorable. This paper plate turkey uses a handful of simple supplies, takes about 20 minutes, and gives little hands plenty of happy work to do. The best part is watching a plain white plate burst into a rainbow of feathers, one tiny sticker at a time.
It’s a fall favorite for toddlers and preschoolers. There’s no paint to spill, no glitter to vacuum, and very little prep. Kids peel, stick, and press their way to a colorful turkey they’ll be proud to hang on the fridge.
GRAB RAINBOW COLORED DOT STICKERS VIA OUR AMAZON AFFILIATE LINK
Craft Supplies:
- 1 white paper plate (one per turkey craft)
- Brown cardstock or kraft paper
- Colorful dot stickers in assorted colors
- Markers
- Scissors
- Glue (a glue stick or white school glue works well)
Helpful hint: Round color-coding labels from an office supply store work perfectly as dot stickers. They come in big packs, peel easily, and are budget friendly for classrooms.
Directions:
Step 1: Cut Out the Turkey Body
Draw a peanut or figure-eight shape on your brown cardstock. The smaller top circle becomes the head, and the larger bottom circle becomes the body. Aim for a shape about one-third the height of your plate so it sits nicely at the bottom without hiding the feathers.
Step 2: Give Your Turkey a Face
Now it’s time to bring your turkey to life. On the head:
- Draw two small dots for eyes with your brown or black marker.
- Add a small orange triangle pointing down for the beak.
- Draw a red teardrop shape right next to the beak for the wattle (that funny, floppy bit turkeys have).
Want more texture? Cut the beak and wattle from orange and red paper scraps and glue them on instead. Kids love this extra layer.
Step 3: Draw the Feather Spokes
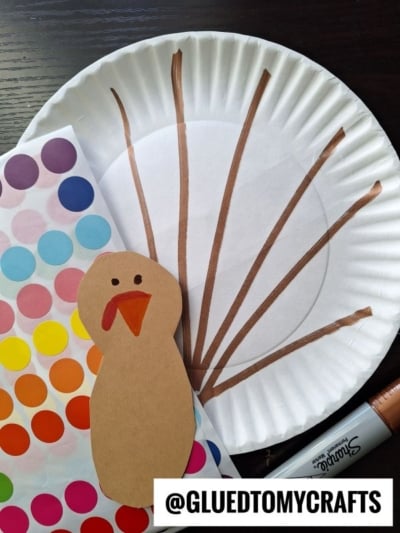
Place your plate on the table. Using a marker, draw 7 to 8 lines that fan out from the bottom center of the plate toward the rim. Think of the spokes on a bike wheel or the rays of a half sun.
Spread the lines evenly so each feather gets its own space. These lines act as a guide for your child, showing them exactly where to place their stickers.
Step 4: Peel and Stick the Feathers
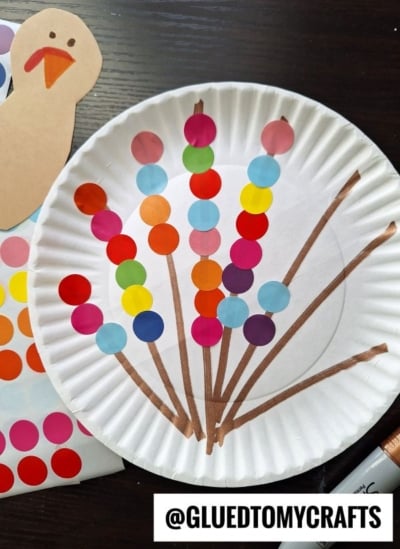
Here comes the fun part! Hand your child the sticker sheets and let them peel dots and press them along each line. Encourage them to work from the bottom of each line up to the rim.
There’s no wrong way to do this. Some kids line up dots neatly, while others overlap them in happy clusters. Both look fantastic. Keep going until every spoke is covered in bright, colorful “feathers.”
Talk while you work. Try questions like “Which color comes next?” or “How many dots can you fit on this line?”
Step 5: Glue the Turkey in Place
Once the feathers are finished, flip the turkey body over and add glue to the back. Press it onto the bottom center of the plate, right where all the lines meet. This makes the feathers look like they’re fanning out from behind your turkey.
Press firmly for a few seconds, then let it dry. Your colorful turkey is ready to show off!
RELATED —> Thumbprint Turkey Feathers On Paper

GRAB RAINBOW COLORED DOT STICKERS VIA OUR AMAZON AFFILIATE LINK
Your paper plate turkey is done, and it’s every bit as bright and cheerful as the little one who made it. Hang it on the fridge, tape it to the classroom door, or use it to decorate your Thanksgiving table.
We’d love to see how your turkeys turn out! Snap a photo of your finished craft and share it with us on Facebook and Instagram by tagging @GLUEDTOMYCRAFTS in your caption. Every turkey is unique, and each one tells a sweet story about the small hands that made it. We can’t wait to see {and hear!} all about it! Happy crafting, and happy Thanksgiving!
