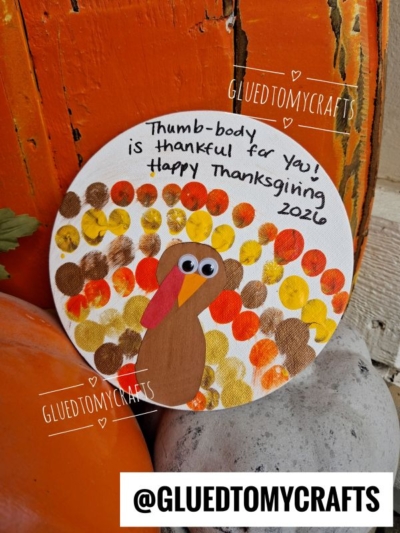
There’s something magical about a craft that captures your child’s tiny fingerprints forever. Years from now, you’ll look back at this little turkey and remember exactly how small those hands used to be. That’s what makes this Thumbprint Turkey Keepsake Canvas so special. It’s more than a cute Thanksgiving decoration. It’s a memory you can hold onto.
This project is simple enough for toddlers, fun enough for big kids, and pretty enough to display on your holiday table year after year. Whether you’re a parent looking for a cozy afternoon activity, a teacher planning a classroom craft, or a blogger hunting for your next seasonal post, this one checks all the boxes. Let’s make something you’ll treasure.
Craft Supplies:
Here’s everything to gather before you begin:
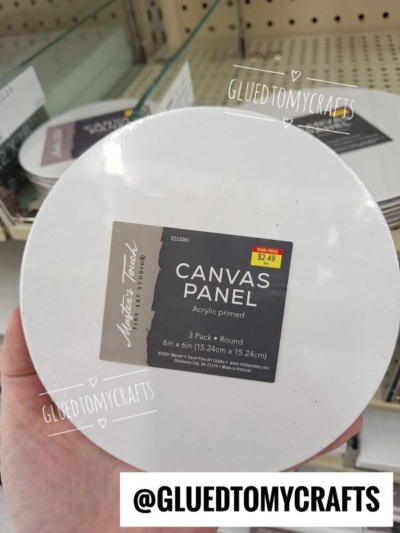
- Round canvas panel – A 6-inch acrylic-primed round canvas from Hobby Lobby (Master’s Touch Fine Art Studio). They come in a 3-pack for just $2.49, so you can make one for each kid.
- Fall-colored paints – Orange, yellow, brown, and gold for the feathers
- Brown construction paper – For the turkey’s body
- Googly eyes – Two small ones for a playful face
- Yellow paper – For the beak
- Red paper – For the wattle
- Black marker or pen – To write your message
- Glue – A glue stick or craft glue works great
- Optional: a small paint plate, paper towels, and a damp cloth for quick cleanup
A quick tip: lay down some newspaper or a wipeable mat first. Thumbprint painting is joyful, but it can get delightfully messy.
Directions:
Step 1: Paint the Thumbprint Feathers
Squeeze small dollops of your orange, yellow, brown, and gold paint onto a plate. Have your little one press a thumb into one color, then stamp it onto the canvas.
Start near the bottom-center of the canvas, where the turkey’s body will sit, and work outward in a fan shape. Create semi-circular rows of thumbprints that arc across the upper part of the canvas like a rainbow of feathers. Mix up the colors as you go for that festive, layered look.
Don’t worry about perfection here. Wonky, overlapping prints only add to the charm. Once you’re happy with the feathers, set the canvas aside to dry completely.
Step 2: Assemble the Turkey Body
While the paint dries, cut a peanut-shaped body from your brown construction paper. Think of a rounded figure-eight, wider at the bottom for the belly and smaller at the top for the head.
Once the thumbprints are dry, glue the brown body to the bottom-center of the canvas, right where all those colorful feathers meet. This anchors your turkey and makes the feathers look like they’re fanning out behind him.
Step 3: Add the Face Details
Now for the fun part that brings your turkey to life. Glue two googly eyes near the top of the head.
Cut a small triangle from your yellow paper for the beak, and glue it just below the eyes. Then snip a little squiggly shape from your red paper for the wattle. Glue it so it drapes down beside the beak. That wobbly red wattle gives your turkey loads of personality.
Take a moment to admire your little guy. He’s already looking pretty proud.
Step 4: Write the Keepsake Message
Grab your black marker and write your message across the open space in the upper half of the canvas. The classic line is:
“Thumb-body is thankful for you! Happy Thanksgiving”
Feel free to add your child’s name and age in small print near the bottom. Trust me, future-you will be so glad you did. If your child is old enough, let them sign their own name for an extra dose of keepsake sweetness.
RELATED —> From Little Hands to Big Memories: Thanksgiving Keepsake Crafts

This Thumbprint Turkey Keepsake Canvas proves that the best Thanksgiving traditions don’t need to be fancy or expensive. With a few dollars in supplies and a little sticky-fingered fun, you’ll create something worth keeping long after the pumpkin pie is gone.
So roll up those sleeves, dip those thumbs, and make a memory this season. We’d love to see how yours turns out! Tag us @GluedToMyCrafts and show off your happy little flock. Happy crafting, my friends!
