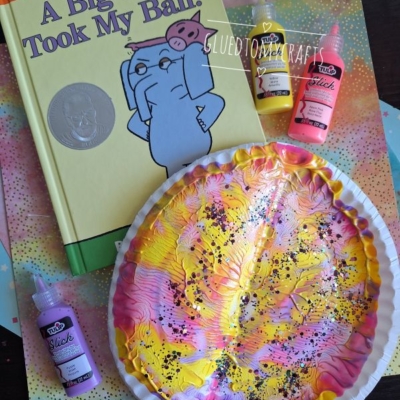
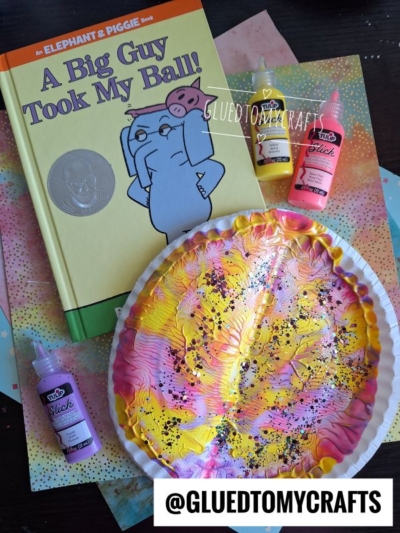
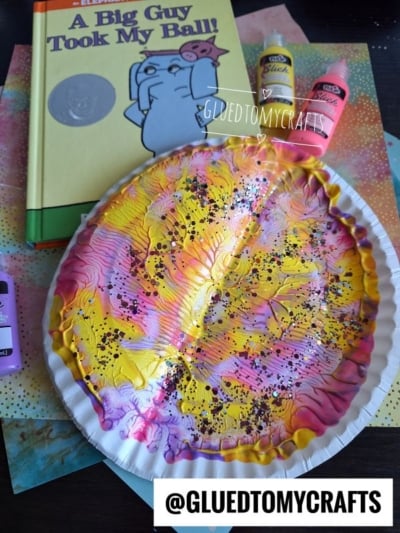
Bring Mo Willems' "A Big Guy Took My Ball!" to life with this fun paper plate paint splat ball craft. It's an easy and colorful storytime activity for kids.
Looking for a fun way to bring story time to life? This Paper Plate & Paint Splat Ball Craft is one of our favorites here at Glued To My Crafts. It’s colorful, easy, and tied to a book your little ones will giggle over again and again.
The smush painting technique means no two “balls” will ever look the same. Each child gets a one-of-a-kind creation, and that’s half the magic. Grab a few simple supplies, pull out a beloved picture book, and let’s make some art together!
This tutorial works great for a classroom story time station, a rainy day at home, or a library reading group!
Craft Supplies:
Gather these simple supplies before you begin:
- White paper plate – you need one per craft
- Tulip Slick 3D Fashion Paint – we used yellow, neon pink, and purple
- Multicolored glitter
Directions:
Ready to make your paint splat ball? Just follow these easy steps:
- Start with a clean white paper plate. Lay down a protective cover on your work surface first – paint and glitter can get messy!
- Fold the paper plate in half, then unfold it again so you have a clear crease down the middle.
- Squirt your paint onto one side of the plate. Add a few dots or squiggles of paint. Remember, less is more!
- Fold the plate back together along the crease and gently press it closed.
- Rub your hand all over the folded plate. This spreads the paint into a fun, marbled splat inside.
- Carefully unfold the plate to reveal your colorful paint splat design. Surprise – every one looks different!
- Sprinkle multicolored glitter over the wet paint while it’s still sticky, so it sets right in.
- Set your ball aside to dry completely before displaying it proudly.
Tips & Tricks:
Want to make this craft even smoother? Keep these pointers in mind:
- Use less paint than you think you need. A few small dots go a long way once you smush the plate together.
- Keep paint away from the edges so it doesn’t squeeze out when you press.
- Work on a covered surface or use a smock to keep clothes clean.
- Let little ones do the smushing. Pressing and rubbing the plate is the most fun part for kids!
- Try different color combos to match a season, a holiday, or your child’s favorite shades.
RELATED —> Paint Splat Troll Hair Craft
Pairing a good book with a hands-on craft is one of the easiest ways to make reading stick with little ones. This Paper Plate & Paint Splat Ball Craft turns a fun Mo Willems story into a colorful keepsake your kids will be proud of.
Give it a try at home or in the classroom, then show off those creations! Tag us @gluedtomycrafts or use #gluedtomycrafts on Instagram – we’d love to see your one-of-a-kind paint splat ball designs. Happy crafting, my friends!

Paper Plate & Paint Splat Ball Craft Idea For Story Time
Bring Mo Willems' "A Big Guy Took My Ball!" to life with this fun paper plate paint splat ball craft. It's an easy and colorful storytime activity for kids.
Here’s your checklist of supplies to bring this craft to life:
Prepare your creative haven by laying down a protective cover before the crafting magic begins!
Directions:
- Start with a clean white paper plate. Lay down a protective cover on your work surface first - paint and glitter can get messy!
- Fold the paper plate in half, then unfold it again so you have a clear crease down the middle.
- Squirt your paint onto one side of the plate. Add a few dots or squiggles of paint. Remember, less is more!
- Fold the plate back together along the crease and gently press it closed.
- Rub your hand all over the folded plate. This spreads the paint into a fun, marbled splat inside.
- Carefully unfold the plate to reveal your colorful paint splat design. Surprise - every one looks different!
- Sprinkle multicolored glitter over the wet paint while it's still sticky, so it sets right in.
- Set your ball aside to dry completely before displaying it proudly.
CLICK HERE TO PRINT THE DIRECTIONS FOR THIS CRAFT
If you've enjoyed our content or have any thoughts to share, we'd love to hear from you! Mention @gluedtomycrafts or tag #gluedtomycrafts on Instagram!