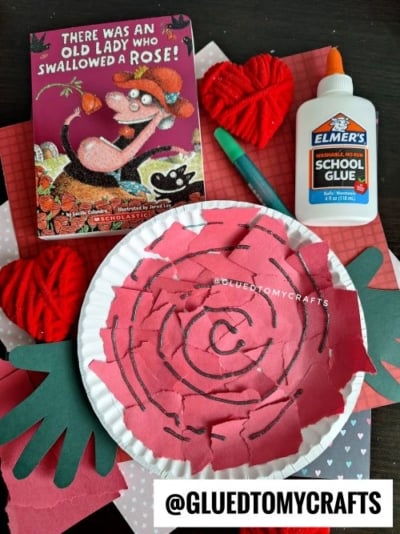
There’s something magical about pairing a good story with a hands-on activity. If your little ones love the bouncy rhymes of Lucille Colandro’s There Was an Old Lady Who Swallowed a Rose!, this craft is the perfect follow-up. After reading about the silly old lady and her flowery feast, kids can create their very own rose using simple supplies you probably already have at home or in the classroom.
This project is wonderfully low-stress. There’s no need for perfect petals or straight lines. Torn paper and little handprints do all the work, which means even the youngest crafters can join in and feel proud of the result. Let’s make a rose that’s bursting with color and personality.
Craft Supplies:
Gather these supplies before you start. Having everything ready makes the whole process smoother and more fun.
- 1 white paper plate
- Red construction paper
- Dark green construction paper
- Elmer’s washable school glue
- Green glitter glue
- Scissors
That’s it! Each item plays a part, and the short list means less prep and more crafting.
Directions:
Step 1: Trace and Cut the Handprint Leaves
Start with the leaves, since they form the base of your rose. Lay a child’s hand flat on the dark green construction paper, fingers spread slightly. Trace around the hand with a pencil, then carefully cut out the shape with scissors.
Repeat this once or twice so you have two or three green handprints. These will peek out from behind the rose and look just like leaves. Younger kids may need a grown-up’s help with the cutting, so this is a great moment to work side by side.
Step 2: Tear the Red Paper
Now for the fun part. Hand your child a few sheets of red construction paper and let them tear away. The goal is to create lots of small, rough pieces, roughly the size of a coin.
Don’t worry about neat edges. The torn, uneven shapes are exactly what give the rose its soft, petal-like texture. This step is also a sneaky way to build fine motor skills while kids think they’re just having fun.
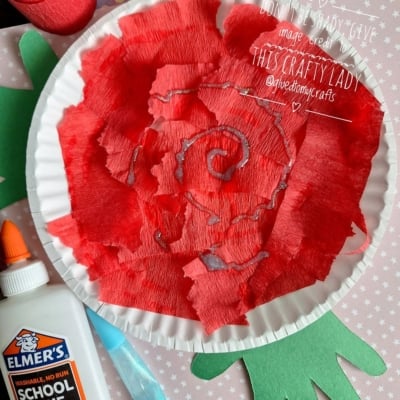
Step 3: Glue the Petals onto the Plate
Tuck the green handprint leaves under the edge of the paper plate so they stick out like real leaves. A dab of glue holds them in place.
Next, spread Elmer’s washable school glue across the surface of the plate. Have your child press the torn red pieces onto the glue, layering them so they overlap. Start from the outer edge and work toward the center, building up the petals as you go. Encourage your child to fill in any white gaps so the whole plate blooms with color.
Step 4: Add the Glitter Glue Spiral
Once the plate is covered, it’s time for the finishing touch. Using green glitter glue, draw a swirling spiral starting from the center of the plate and winding outward.
This spiral mimics the natural swirl you see at the heart of a real rose, and the glitter adds a little sparkle. Let your child go slow and enjoy the squeeze. Then set the craft aside to dry completely, which usually takes a few hours.
RELATED —> Clothespin Flowers Made With Handprints

Crafting together is about more than the finished product. It’s the giggles while tearing paper, the proud smile after squeezing that last glitter swirl, and the connection you build along the way. Every rose will turn out a little different, and that’s exactly the point.
So grab the book, gather your supplies, and enjoy the mess. Your young crafter just made something beautiful, and they did it all on their own. Happy crafting, my friends!
RELATED —> Torn Paper Rose Card Craft Tutorial

Paper Plate Rose Craft Idea For Valentine's Day
Here’s your checklist of supplies to bring this craft to life:
Prepare your creative haven by laying down a protective cover before the crafting magic begins!
Directions:
- Start with the leaves, since they form the base of your rose. Lay a child's hand flat on the dark green construction paper, fingers spread slightly. Trace around the hand with a pencil, then carefully cut out the shape with scissors.
- Repeat this once or twice so you have two or three green handprints. These will peek out from behind the rose and look just like leaves. Younger kids may need a grown-up's help with the cutting, so this is a great moment to work side by side.
- Now for the fun part. Hand your child a few sheets of red construction paper and let them tear away. The goal is to create lots of small, rough pieces, roughly the size of a coin.
- Don't worry about neat edges. The torn, uneven shapes are exactly what give the rose its soft, petal-like texture. This step is also a sneaky way to build fine motor skills while kids think they're just having fun.
- Tuck the green handprint leaves under the edge of the paper plate so they stick out like real leaves. A dab of glue holds them in place.
- Next, spread Elmer's washable school glue across the surface of the plate. Have your child press the torn red pieces onto the glue, layering them so they overlap. Start from the outer edge and work toward the center, building up the petals as you go. Encourage your child to fill in any white gaps so the whole plate blooms with color.
- Once the plate is covered, it's time for the finishing touch. Using green glitter glue, draw a swirling spiral starting from the center of the plate and winding outward.
- This spiral mimics the natural swirl you see at the heart of a real rose, and the glitter adds a little sparkle. Let your child go slow and enjoy the squeeze. Then set the craft aside to dry completely, which usually takes a few hours.
CLICK HERE TO PRINT THE DIRECTIONS FOR THIS CRAFT