Create a fun handprint Christmas tree gift tag! This easy kids' craft makes a perfect keepsake. Get our festive step-by-step tutorial today.

The holiday season is filled with magic, especially for the little ones. What better way to capture a moment in time than with a craft that doubles as a cherished keepsake? These “This is the Hand You Used to Hold” printable gift tags are a sweet and personal way to adorn your presents.
They feature your child’s handprint, turning a simple gift tag into a memory you’ll both treasure for years to come. This simple tutorial will guide you through creating these adorable tags, perfect for adding a personal touch to gifts for grandparents, teachers, and other loved ones.
Craft Supplies:
Gathering your materials is the first step to crafting fun. You likely have most of these items at home already.
- Free Gift Tag Printable – from our landing page
- White Cardstock Paper {two sheets!}
- Washable Green Craft Paint
- Paper Plate
- Large Paint Brush
- Clear Contact Paper
- Scissors
- Embellishments
Directions:
Let’s get crafting! This process is simple enough for even the youngest helpers to get involved.
- Print the Tags: First, download and print the gift tag template onto your cardstock. Use scissors to carefully cut out each individual gift tag along the lines.
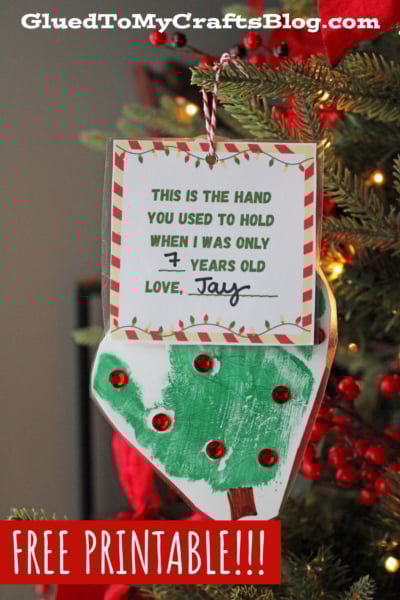
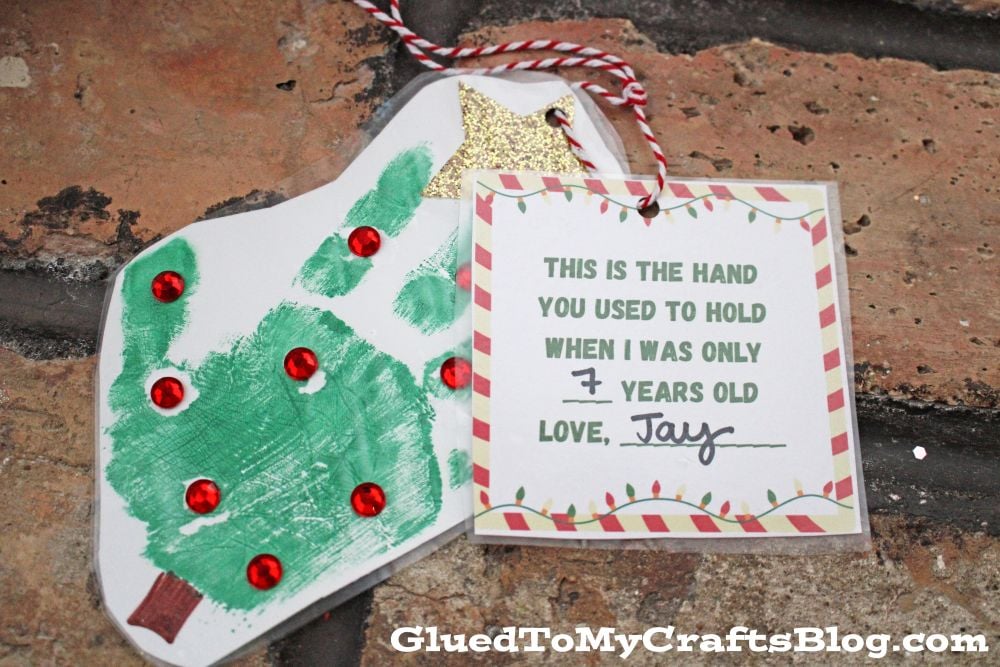
- Add a Name and Date: Don’t forget to write your child’s name and the age on the tag. This is what turns it from a simple decoration into a precious memento.
- Prepare Your Paint Station: Pour a small amount of washable green craft paint onto your paper plate. It’s a good idea to lay down some newspaper or a disposable tablecloth to protect your workspace from any potential spills or splatters. Have some wet wipes or paper towels ready for quick cleanup.
- Make the Handprint: This is the fun part! You can either have your child press their hand into the paint on the plate or use a paintbrush to apply an even coat of paint to their palm and fingers. Help your child carefully press their painted hand onto a single sheet of white cardstock paper. Press down firmly but gently on the back of their hand to ensure a clear print.
- Lift and Clean: Slowly lift their hand straight up to avoid smudging the print. Immediately wash their hand with soap and water or use wet wipes.
- Decorate: Use a brown marker or paint pen to draw a small tree trunk at the base of the handprint (near the wrist area). Leave other decorations till later on.
- Let it Dry: Set the printed sheet aside in a safe place to dry completely. This might take an hour or two, depending on how much paint was used.
- Laminate for Durability: Once dry, trim out the handprint cutout from the paper. Place your cutout {and tag!} in between two pieces of clear contact paper.
- Cut and Punch: Carefully cut out the handprint design from the paper. Decorate the handprint to resemble a tree, then punch a hole in both the handprint and the tag from earlier.
- Make It An Ornament: Thread a piece of festive ribbon or twine through the hole{s} and tie your unique, handmade tree AND tag together. Gift away or display proudly!
RELATED —> Popsicle Stick Snowman Picture Frame Ornament
This craft isn’t just for families at home – teachers can make these handprint Christmas tree tags with their students as a heartfelt holiday gift for parents. Imagine the joy on a parent’s face unwrapping a present adorned with their child’s handprint!
Whether at home or in the classroom, these tags turn simple materials into cherished keepsakes. Happy crafting, my friends!

Handprint Christmas Tree Poem Ornament
Create a fun handprint Christmas tree gift tag! This easy kids' craft makes a perfect keepsake. Get our festive step-by-step tutorial today.
Here’s your checklist of supplies to bring this craft to life:
- Cardstock Paper
- Christmas Printable - Landing Page
- Clear Contact Paper
- Craft Paint green
- Embellishments
- School Glue
Prepare your creative haven by laying down a protective cover before the crafting magic begins!
Directions:
- Print the Tags: First, download and print the gift tag template onto your cardstock. Use scissors to carefully cut out each individual gift tag along the lines.
- Add a Name and Date: Don't forget to write your child's name and the age on the tag. This is what turns it from a simple decoration into a precious memento.
- Prepare Your Paint Station: Pour a small amount of washable green craft paint onto your paper plate. It's a good idea to lay down some newspaper or a disposable tablecloth to protect your workspace from any potential spills or splatters. Have some wet wipes or paper towels ready for quick cleanup.
- Make the Handprint: This is the fun part! You can either have your child press their hand into the paint on the plate or use a paintbrush to apply an even coat of paint to their palm and fingers. Help your child carefully press their painted hand onto a single sheet of white cardstock paper. Press down firmly but gently on the back of their hand to ensure a clear print.
- Lift and Clean: Slowly lift their hand straight up to avoid smudging the print. Immediately wash their hand with soap and water or use wet wipes.
- Decorate: Use a brown marker or paint pen to draw a small tree trunk at the base of the handprint (near the wrist area). Leave other decorations till later on.
- Let it Dry: Set the printed sheet aside in a safe place to dry completely. This might take an hour or two, depending on how much paint was used.
- Laminate for Durability: Once dry, trim out the handprint cutout from the paper. Place your cutout {and tag!} in between two pieces of clear contact paper.
- Cut and Punch: Carefully cut out the handprint design from the paper. Decorate the handprint to resemble a tree, then punch a hole in both the handprint and the tag from earlier.
- Make It An Ornament: Thread a piece of festive ribbon or twine through the hole{s} and tie your unique, handmade tree AND tag together. Gift away or display proudly!

NEED HELP DOWNLOADING OUR FREE PRINTABLES? PLEASE REFER TO OUR FAQ PAGE
If you've enjoyed our content or have any thoughts to share, we'd love to hear from you! Mention @gluedtomycrafts or tag #gluedtomycrafts on Instagram!