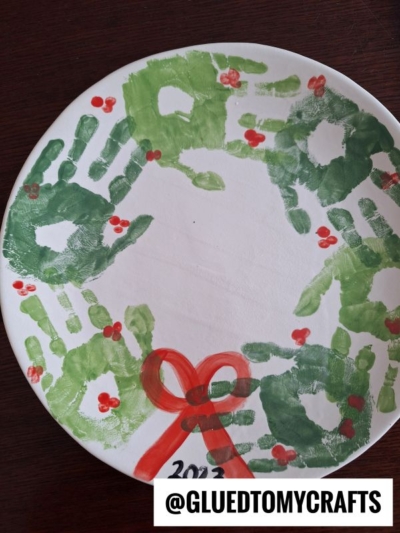
There’s something about tiny handprints that stops time. One year they barely span your palm, and the next they’re reaching for the car keys. This holiday season, you can capture that fleeting moment forever by turning your child’s handprints into a festive Christmas wreath, glazed and fired onto a keepsake pottery plate.
This isn’t your average paper craft that fades and curls by New Year’s. A fired pottery plate becomes a permanent treasure, something you’ll unpack every December and smile over for decades. And the best part? You don’t need a kiln, a studio, or any fancy equipment at home. Your local pottery shop has everything waiting for you.
Let’s make something your family will cherish long after the ornaments come down.
Why Visit Your Local Pottery Shop?
You could dig around for supplies online and hope your oven-bake project holds up. Or you could walk into your neighborhood pottery studio and let the magic happen.
Here’s why a local shop makes this project so much better:
- They have the kiln. Firing is what transforms your painted plate into a food-safe, dishwasher-friendly heirloom. Home crafts just can’t compete with a professionally fired piece.
- Everything’s ready to go. Bisque plates, glazes, brushes, sponges, and a clean workspace are all set up for you. No shopping list, no cleanup at home.
- Staff are there to help. Nervous about smudging a handprint? The friendly folks at the studio have seen it all and will happily guide you.
- It’s an experience. Sipping cocoa while your little one presses their painted hand onto a plate becomes a memory in itself. You’re not just making a keepsake, you’re living one.
- You support your community. Small pottery studios are run by passionate local artists. Choosing them keeps creativity thriving in your town.
Call ahead to make sure they carry bisque plates and the glazes you need. Many shops even offer holiday sessions perfect for families.
What You’ll Need
Most of these items will be waiting for you at the studio, but here’s the full rundown so you know what to ask for:
- 1 round bisque pottery plate (a wide, flat plate works best for wreath placement)
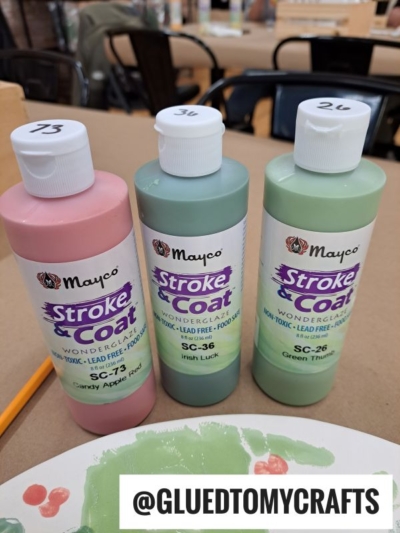
- Mayco Stroke & Coat glaze in SC-36 “Irish Luck” — a rich, dark forest green
- Mayco Stroke & Coat glaze in SC-26 “Green Thumb” — a soft, light sage green
- Mayco Stroke & Coat glaze in SC-73 “Candy Apple Red” — a bright, cheerful red
- A paint palette or small dishes for pouring out glaze
- A soft foam brush or sponge for applying glaze to the hand
- Fine detail brushes for the bow and lettering
- A pencil for planning your layout
- Paper towels and wet wipes for quick cleanup
- A smock or apron (glaze washes off skin easily, but clothes are another story)
These Mayco Stroke & Coat glazes are a favorite for good reason. They’re non-toxic, lead-free, and food safe once fired, so your finished plate is perfectly safe to use.
Step-by-Step Instructions
Step 1: Plan Your Handprint Placement
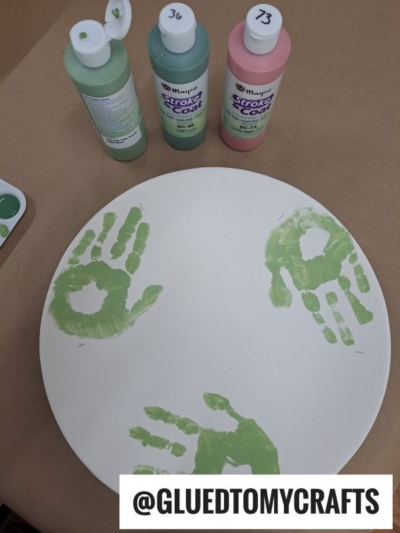
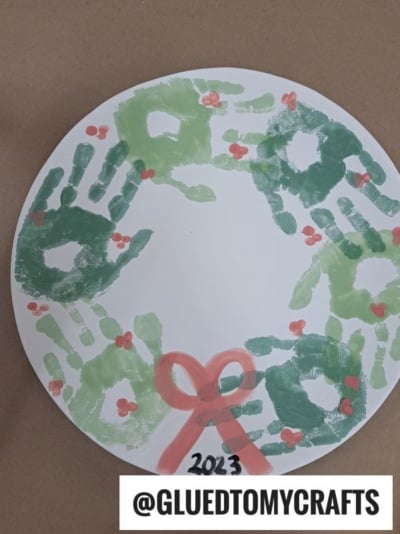
Before any paint touches the plate, grab your pencil. Lightly sketch small tick marks around the rim where each handprint will go. For a full, balanced wreath, aim for six handprints evenly spaced around the edge.
Have your child spread their fingers and do a “dry run,” pressing their clean hand onto the plate at each spot. This helps you see the spacing and gives them a feel for the motion. Adjust your pencil marks until the layout looks right.
Step 2: Stamp the Alternating Green Handprints
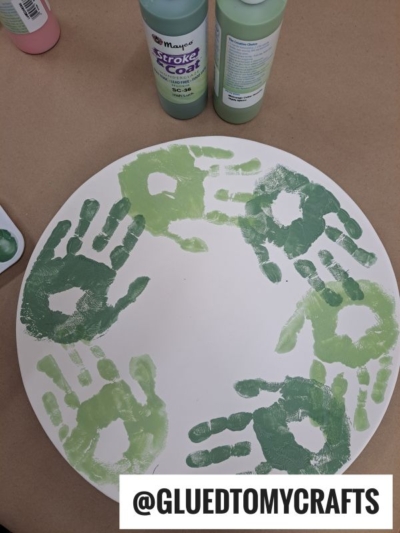
Now the fun begins. Pour a little “Irish Luck” (dark green) and “Green Thumb” (light green) into separate wells of your palette.
Using a foam brush or sponge, coat your child’s hand with an even layer of glaze. Two to three coats give the boldest, most opaque color once fired. Press their hand firmly onto the plate at your first pencil mark, with the fingers pointing outward to create that leafy wreath texture.
Alternate colors as you work around the circle: dark green, light green, dark green, and so on. Wipe their hand clean between each print. This alternating pattern gives the wreath depth and makes it look wonderfully full and realistic.
Take your time and let each handprint dry slightly before adding the next so you don’t smudge your progress.
Step 3: Add the Red Holly Berries
Every wreath needs berries. Pour out some “Candy Apple Red” glaze and dip your child’s fingertip or thumb into it.
Press little red dots throughout the green handprints, clustering them in groups of two or three. Scatter these clusters around the wreath for a natural, festive look. These tiny fingerprints are pure charm, and they’re another sweet way to capture your child’s touch.
Step 4: Paint the Red Bow
At the bottom center of the wreath, use a detail brush and the “Candy Apple Red” glaze to paint a classic holiday bow. Start with two loops that meet in the middle, then add two ribbon tails hanging down toward the edge of the plate.
Don’t stress about perfection here. A slightly wobbly, handmade bow only adds to the charm. If you want a softer, translucent effect, use a single coat so a hint of the green shows through.
Step 5: Write the Year
This is the detail that makes the plate truly priceless. Using a fine brush and red glaze, write the current year just beneath the bow. That simple number turns your craft into a time capsule, reminding you exactly how small those hands once were.
You can also add your child’s name or initials on the back if there’s room.
Step 6: Fire the Plate at the Pottery Shop
Once everything is painted and dry, hand your plate over to the studio staff. They’ll load it into the kiln and fire it to the proper temperature, usually over a day or two.
Firing is the moment your painted plate becomes something permanent. The glazes melt into a glossy, glass-like finish, the colors deepen and brighten, and your keepsake becomes durable and food safe. Most shops will call or text when your piece is ready for pickup.
RELATED —> Handprint Cookie Monster Plate Craft Idea
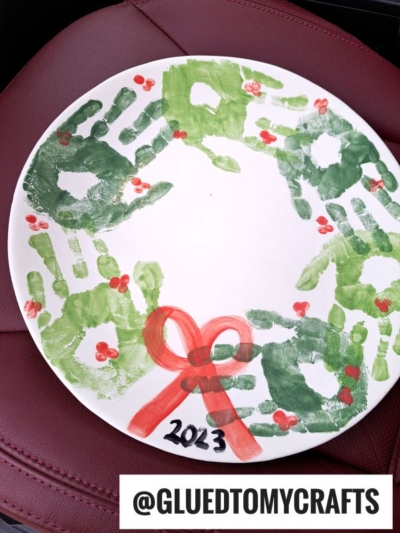
When you finally hold that finished plate, warm from the kiln and shining with color, you’ll understand why this craft is so special. Those handprints won’t fade, chip, or yellow with age. Years from now, you’ll pull this plate out of the holiday box and remember the afternoon you spent together, the giggles over painted palms, and just how tiny those hands used to be.
That’s the real gift of this project. You’re not just decorating a plate, you’re bottling up a moment in time.
So round up the kids, book a table at your local pottery shop, and make something your family will treasure for generations. This holiday season, the best keepsake isn’t one you buy. It’s one you make together.
