Bring a splash of color and excitement to your fall with this one-of-a-kind paint splat pumpkin craft for kids! This easy and creative paper plate craft idea is perfect for a messy, memorable afternoon.
Get ready to embrace the mess and make some memories this fall! If you’re looking for a fun, creative, and slightly chaotic craft that your kids will absolutely love, then this paint splat pumpkin activity is the perfect choice. It’s a fantastic way to decorate for the season, allowing each child to create a unique masterpiece with vibrant colors and energetic splatters.

We’ll guide you through everything you need to know, from gathering your supplies to recreating it with ease. Let’s get started on creating some spectacular paper plate & paint splat pumpkins!
Craft Materials:
Gathering your materials is the first step to a successful craft session. You likely have many of these items at home already. Here is a simple list of supplies to get you started on your pumpkin painting adventure.
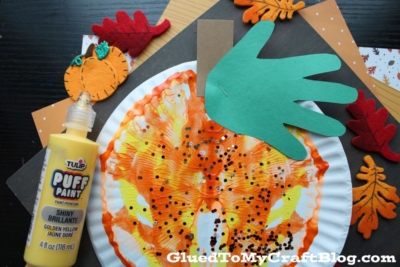
- Large Paper Plate
- Orange Tulip Puffy Paint
- Yellow Tulip Puffy Paint
- Brown Cardstock Paper
- Green Cardstock Paper
- Scissors
- Stapler
- optional – loose craft glitter
Directions:
Now for the fun part! Follow these simple steps to create your very own work of pumpkin art. Remember, the goal is to have fun, so don’t worry about perfection.
- Please make sure you have a good working area that can get dirty because paint will squeeze out of the sides of this craft!!!
- First fold your paper plate, straight in half {one per pumpkin craft you want to make today.}
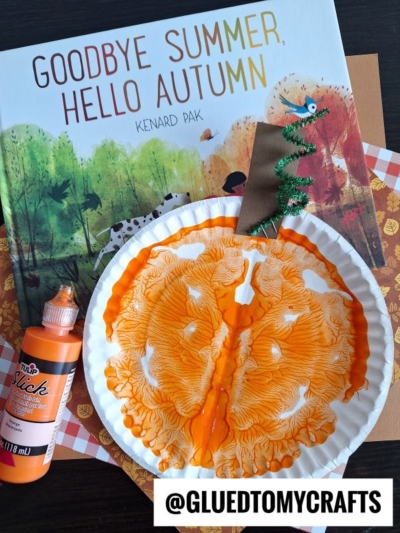
- Unfold and squirt the orange and yellow Tulip puffy paint on one side of the folded paper plate. Be sure to keep the paint inside the paper plate and not place too much down either.
- Once the paint is down, go ahead and fold up/squish your paper plate together again.
- Be sure to rub your hand all over the folded paper plate piece, so the paint will cover the inside nicely and make an even marbled look {paint WILL more than likely squeeze out the sides, so be sure to pay attention to that and clean up with baby wipes!}
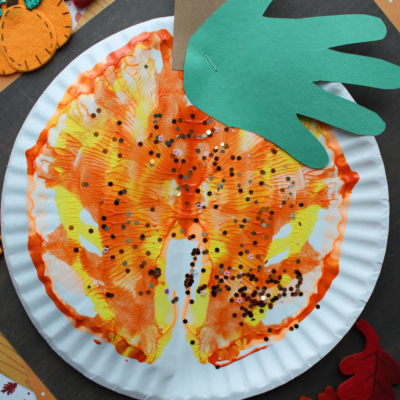
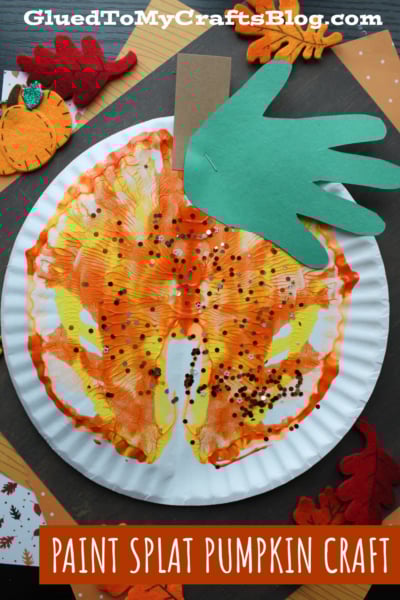
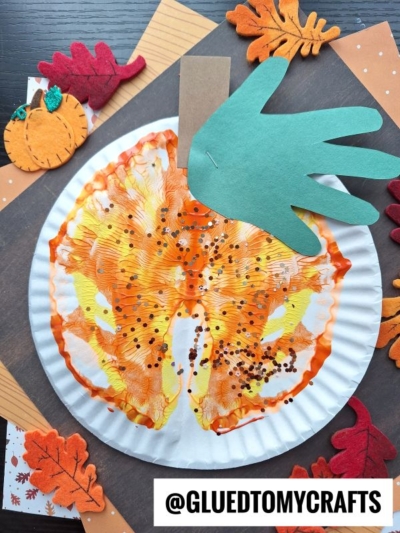
- Now carefully unfold your piece to reveal your “marbled pumpkin” design inside.
- If desired, sprinkle some loose craft glitter/rhinestones on top of the wet paint, to create more texture and sparkle.
- To finish the Paper Plate Marbled Pumpkin – cut out a small stem and handprint leaf shape from your cardstock paper.
- Go ahead and staple those to the top of the paint covered paper plate.
- Then step aside your decorated paper plate piece to allow it to dry completely.
- When ready – display it proudly for ALL to see and come share pictures with us if you can! #gluedtomycrafts
RELATED —> Torn Paper Pumpkin Card
Once your paint splat orange pumpkin is dry, find the perfect spot to display it! It can be hung on the fridge, propped on a bookshelf or add some colorful addition to your fall decor.
We’d love to see what you and your little artists create. Try this paint splat and paper plate orange pumpkin craft and share your finished masterpieces with us! Snap a photo and post it on social media. It’s a wonderful way to celebrate creativity and the beauty of fall. Happy crafting, my friends!

Paper Plate and Paint Splat Pumpkin Craft
Bring a splash of color and excitement to your fall with this one-of-a-kind paint splat pumpkin craft for kids! This easy and creative paper plate craft idea is perfect for a messy, memorable afternoon.
Here’s your checklist of supplies to bring this craft to life:
Prepare your creative haven by laying down a protective cover before the crafting magic begins!
Directions:
- Please make sure you have a good working area that can get dirty because paint will squeeze out of the sides of this craft!!!
- First fold your paper plate, straight in half {one per pumpkin craft you want to make today.}
- Unfold and squirt the orange and yellow Tulip puffy paint on one side of the folded paper plate. Be sure to keep the paint inside the paper plate and not place too much down either.
- Once the paint is down, go ahead and fold up/squish your paper plate together again.
- Be sure to rub your hand all over the folded paper plate piece, so the paint will cover the inside nicely and make an even marbled look {paint WILL more than likely squeeze out the sides, so be sure to pay attention to that and clean up with baby wipes!}
- Now carefully unfold your piece to reveal your "marbled pumpkin" design inside.
- If desired, sprinkle some loose craft glitter/rhinestones on top of the wet paint, to create more texture and sparkle.
- To finish the Paper Plate Marbled Pumpkin - cut out a small stem and handprint leaf shape from your cardstock paper.
- Go ahead and staple those to the top of the paint covered paper plate.
- Then step aside your decorated paper plate piece to allow it to dry completely.
- When ready - display it proudly for ALL to see and come share pictures with us if you can! #gluedtomycrafts

CLICK HERE TO PRINT THE DIRECTIONS FOR THIS CRAFT
If you've enjoyed our content or have any thoughts to share, we'd love to hear from you! Mention @gluedtomycrafts or tag #gluedtomycrafts on Instagram!