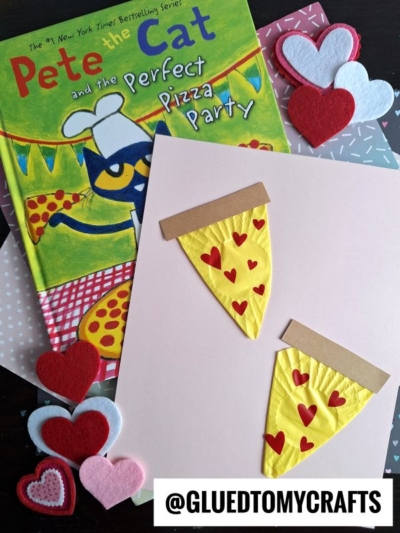
Our handmade valentine idea is sure to steal a "pizza" of your crafty heart today!

Try something new and super unique this Valentine’s Day, with our latest & greatest Cupcake Liner Valentine Pizza Card tutorial! It’s perfect for kids AND adults to make this holiday season!

Looking for a fun, easy, and creative craft that’s sure to be a hit with kids and adults alike? Say hello to our “Cupcake Liner Pizza Card” craft tutorial! This adorable DIY project combines everyone’s love for pizza with the joy of crafting, making it perfect for classrooms, rainy days, or even as a unique handmade greeting card.
With just a few simple materials like cupcake liners, construction paper, and a sprinkle of imagination, you can create a pizza-themed card that’s as delightful as it is personal.
Whether you’re crafting for fun or sending a slice of love to someone special, this project is guaranteed to bring smiles all around. Let’s get started! 🍕✨

All you need is a basic yellow muffin cup liner, cardstock paper and some creativity to make it happen! Keep scrolling because it’s sure to steal a “pizza” of your crafty heart today!
Card Supplies:
- Large Yellow Cupcake Liners
- Cardstock Paper
- Glue Stick
- Scissors
- Wiggle Eyes
- Markers
- Embellishments
Directions:
- First things first – take ONE large yellow cupcake liner and flatten it out with your hands.
- Next take the same flattened yellow cupcake liner and fold it into thirds/a triangle shape, to create the slice of cheese pizza.
- Glue it down, in the center of a single sheet of cardstock paper.
- Now grab your brown cardstock and scissors.
- Cut out a long, rectangle piece for the “crust” of the pizza.
- Secure it in place on the card front with the glue stick.
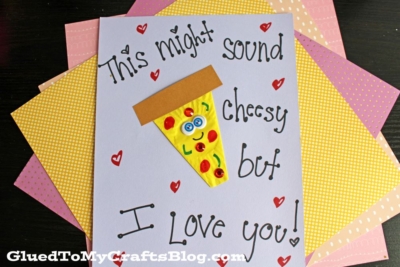
- Finally – the embellishments. Add the wiggle eyes, toppings and of course – a drawn on smile.
- To finish off the Cupcake Liner Cheese Pizza Valentine Card – write a cheesy Valentine’s Day saying around the slice design.
Pizza Sayings:
- You stole a PIZZA of my heart!
- I love you to PIZZAS!
- I love you with every PIZZA of my heart!
- No matter how you slice it, I love you!
- You have a PIZZA of my heart!
- You’re the pepperoni to my pizza!
- I love you more than pizza.
- This might sound cheesy…
RELATED —> Popsicle Stick Pizza Slice

AFFILIATE LINK – PAIR OUR CRAFT IDEA WITH THIS BOOK RECOMMENDATION
If you loved this DIY cupcake liner cheese pizza valentine card idea, you should also check out my super popular 5 Minute Cupcake Liner Card Crafts For Kids collection post, for a HUGE selection of ideas to recreate today! My personal favorite is our Valentine Camper Card tutorial!

Cupcake Liner Pizza Card Craft Idea
Our handmade valentine idea is sure to steal a "pizza" of your crafty heart today!
Here’s your checklist of supplies to bring this craft to life:
Prepare your creative haven by laying down a protective cover before the crafting magic begins!
Directions:
- First take ONE large yellow cupcake liner and flatten it out with your hands.Cupcake Liners
- Next take the flattened yellow cupcake liner and fold it into thirds/a triangle shape, to create the slice of cheese pizza.
- Glue it down, in the center of a single sheet of white cardstock.Cardstock Paper
- Now trim down that particular cardstock piece to placed on a colored cardstock card front.
- Use the glue stick to attach the two paper pieces together.
- Now grab your brown cardstock and scissors.
- Cut out a long, rectangle piece for the "crust" of the pizza.
- Secure it in place on the card front with the glue stick.
- Now grab the wiggle eyes. Secure those in place for the pizza slice comes to life.Wiggle Eyes
- Take the sharpie marker and draw on a smile as well.
- Finally - grab your small heart stickers and place a few of them all over the cupcake liner to represent the "pepperoni" on the pizza.Small Heart Stickers
- To finish off the Cupcake Liner Cheese Pizza Valentine Card - write a cheesy Valentine's Day saying on the outside, as well as in the inside.
- Add other embellishments you see fit and display/gift away proudly!

CLICK HERE TO PRINT THE DIRECTIONS FOR THIS CRAFT
If you've enjoyed our content or have any thoughts to share, we'd love to hear from you! Mention @gluedtomycrafts or tag #gluedtomycrafts on Instagram!