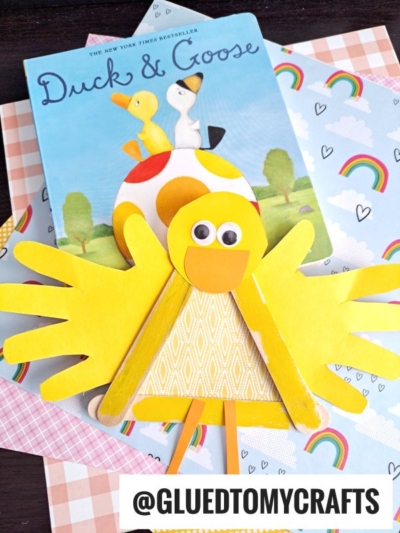
These adorable yellow ducklings are made out of popsicle sticks and are perfect for any Easter celebration!

This Popsicle Stick Duck craft tutorial is the perfect activity for any day of the week–it’s super easy, fun, and sure to put a smile on everyone’s face!

Spring brings warmer weather, blooming flowers, and the perfect opportunity to create memorable crafts with your children. This adorable popsicle stick duckling craft combines creativity, fine motor skill development, and seasonal fun into one delightful activity that kids of all ages will love.
This simple yet engaging project requires minimal supplies and can be completed in about 30 minutes. Your little ones will beam with pride as they create their own fluffy duckling friend to display or play with throughout the spring season.

Learn to create a charming popsicle stick duckling using everyday supplies. Perfect for kids and crafting enthusiasts.
Craft Supplies:
Gather these simple supplies before starting your duckling craft:
- Jumbo Popsicle Sticks – 3 per craft
- White School Glue
- Yellow Cardstock Paper
- Orange Cardstock Paper
- Yellow Scrapbook Paper
- Wiggle Eyes – 2 per craft
- Yellow Craft Paint
- Paint Brush
- Paper Plate
- Yellow Craft Feathers
- Craft Scissors
- Pencil or Marker
Directions:
- First grab three popsicle sticks {three per duckling} and glue them together to look like a triangle.
- Set aside to let it dry completely.
- Repeat for each duckling you want to make.
- Now grab the yellow craft paint.
- Squirt some on a paper plate and have children paint their popsicle stick frames completely yellow.
- Set aside.
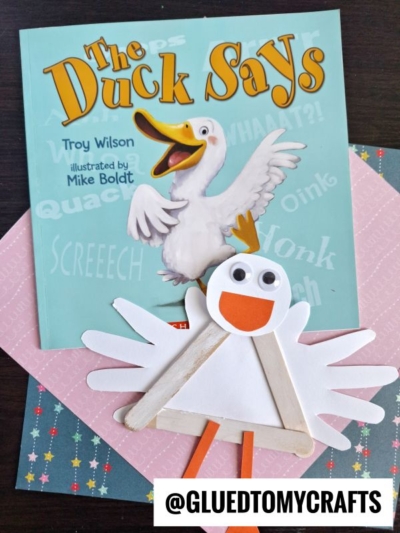
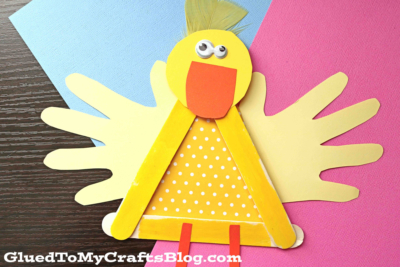
- While those are drying, grab your scrapbook paper and cut a triangular shape that will be placed within the popsicle stick design & be the body of the duck. At this time, you should also cut out a small circle for the head, some long legs, a triangular nose and TWO handprint wings out of the remaining cardstock.
- To finish off the Popsicle Stick Duckling – have children glue the paper pieces and feather wings/head/nose in place on the popsicle stick shape.
- Once done, add other embellishments you see fit and set aside to let it dry completely before displaying proudly!
- Show off your creations and tag us on your social media sites using @gluedtomycrafts or #gluedtomycrafts
RELATED —> “Lucky Duck To Have You As A Mom” Keepsake
We have everything you need in the kids craft department!
Be sure to also check out our Paper Plate Duck kids craft idea post for even more crafty inspiration from us!

Popsicle Stick Duckling Craft Idea For Kids
These adorable yellow ducklings are made out of popsicle sticks and are perfect for any Easter celebration!
Here’s your checklist of supplies to bring this craft to life:
- 1 Scissors
- 1 Pencil or Marker
Prepare your creative haven by laying down a protective cover before the crafting magic begins!
Directions:
- First grab three popsicle sticks {three per duckling} and glue them together to look like a triangle.
- Set aside to let it dry completely.
- Repeat for each duckling you want to make.
- Now grab the yellow craft paint.
- Squirt some on a paper plate and have children paint their popsicle stick frames completely yellow.
- Set aside.
- While those are drying, grab your scrapbook paper and cut a triangular shape that will be placed within the popsicle stick design & be the body of the duck. At this time, you should also cut out a small circle for the head, some long legs, a triangular nose and TWO handprint wings out of the remaining cardstock.
- To finish off the Popsicle Stick Duck – have children glue the paper pieces and feather wings/head/nose in place on the popsicle stick shape.
- Once done, add other embellishments you see fit and set aside to let it dry completely before displaying proudly!

CLICK HERE TO PRINT THE DIRECTIONS FOR THIS CRAFT
If you've enjoyed our content or have any thoughts to share, we'd love to hear from you! Mention @gluedtomycrafts or tag #gluedtomycrafts on Instagram!