Glued To My Crafts

Join thousands of others who have gotten GLUED to our craft tutorials!

  • Home
  • Privacy Policy
  • Craft Safety Guidelines
  • Seasonal Themes
    • New Years
    • Valentine’s Day
    • St. Patrick’s Day
    • Spring
    • Easter
    • Mother’s Day
    • Summer
    • Father’s Day
    • Patriotic
    • Halloween
    • Thanksgiving
    • Fall
    • Winter
    • Christmas
    • Snowmen
    • Story Time
  • About Us
  • Our Amazon Storefront
  • Monthly Themes
    • January Craft Ideas
    • February Craft Ideas
    • March Craft Ideas
    • April Craft Ideas
    • May Craft Ideas
    • June Craft Ideas
    • July Craft Ideas
    • August Craft Ideas
    • September Crafts
    • October Crafts
    • November Crafts
    • December Crafts

Handprint Butterfly Craft: Easy Mother’s Day DIY

A handmade butterfly craft made from a cut-out paper hand decorated with red heart stickers. The butterfly’s body is formed from pink fingerprint stamps, with a drawn-on smiling face and antennas on a blue background.

Moms love nothing more than freezing time. We cherish those tiny hands and little fingers, knowing they won’t stay small forever. That’s why handprint crafts are the gold standard for Mother’s Day gifts – they are a snapshot of childhood that a mother can hold onto long after her little ones have grown up.

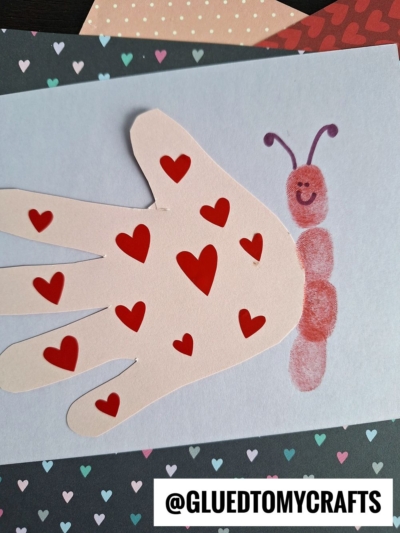
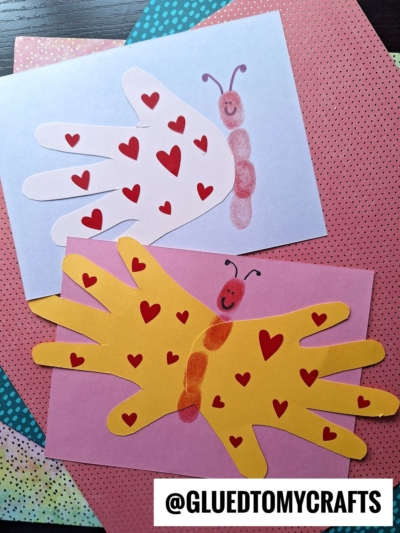
This adorable butterfly craft transforms a simple piece of paper into a heartwarming keepsake. Using your child’s handprint for the wings and their thumbprints for the body, it creates a unique piece of art that represents their growth and love. It’s simple, sweet, and guaranteed to earn a permanent spot on the fridge (or in the memory box).

Two handmade cards with butterflies made from cut-out hand shapes and red thumbprints as bodies. Each butterfly is decorated with red heart stickers. The cards are placed on colorful patterned paper.

Materials You’ll Need

Before you wrangle the kids, gather these supplies to keep the crafting process smooth and fun:

  • Colored Cardstock: You will need a variety of colors. We suggest a lighter color for the background (like light blue or pink) and bright colors (like yellow or purple) for the handprint wings.
  • Ink Pads: Washable ink pads work best. You’ll need colors for the thumbprint body (orange, red, or purple).
  • Scissors: For cutting out the handprints.
  • Glue Stick: To assemble the butterfly.
  • Pencil: For tracing the hand.
  • Black Marker: A fine-tip marker or pen to draw the face and antennae.
  • Small Heart Stickers: For decoration (red or pink works great).
  • Baby Wipes: Essential for quick clean-up of messy fingers!

Step-by-Step Instructions

Follow these simple steps to create your butterfly keepsake.

1. Trace and Cut the Wings

Start by choosing a bright color of cardstock for the butterfly’s wings. Place your child’s hand on the paper with their fingers spread wide. Trace around their hand with a pencil. You can choose to do just one handprint for a side-profile butterfly, or trace both left and right hands to create a full open-winged butterfly.

Once traced, carefully cut out the handprint shapes. If your child is older, this is great scissor practice; for toddlers, an adult should do the cutting.

2. Prepare the Background

Select a contrasting sheet of cardstock for your background. This will be the base of your card or art piece. Glue the handprint cutout onto the background paper.

  • For a side view: Place the handprint horizontally with the fingers pointing outward (to the left) and the palm area towards the center.
  • For a full view: Glue the two handprints with the palms touching or slightly overlapping in the center, fingers pointing outward to create wings.

3. Create the Thumbprint Body

This is the fun, sensory part! Press your child’s thumb onto the ink pad. Firmly press their inked thumb onto the paper right next to the palm edge of the handprint cutout.

Repeat this process to stack three thumbprints vertically. This creates the segmented body of the butterfly. The handprint acts as the wing attached to this little body.

4. Add the Details

Once the ink is dry (which should only take a moment), use your black marker to bring the butterfly to life.

  • Draw a small smiley face on the top thumbprint.
  • Sketch two curved antennae coming out from the top of the head.
  • If you want, you can add little legs on the bottom thumbprint.

5. Decorate with Love

Now it’s time to accessorize. Peel off the heart stickers and let your child stick them onto the handprint “wings.” This adds a pop of color and reinforces the Mother’s Day theme. You can also add glitter, drawings, or a written message like “Mom, you make my heart flutter!” on the background paper.

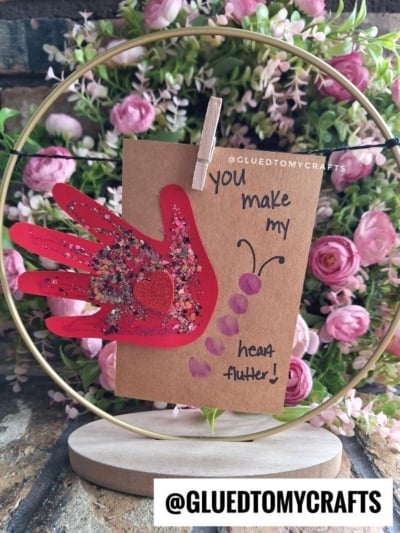
When the glue dries and the stickers are set, you have more than just a craft project. You have a tangible memory of how small your child’s hands once were. This handprint butterfly is a simple gesture that speaks volumes, making it the perfect heartfelt addition to breakfast in bed or a Mother’s Day gift basket! We hope you enjoy recreating it with your child today!

Stacey Glued To My Crafts website signature


OUR PRIVACY POLICY

OUR COPYRIGHT POLICY

  • Email
  • Facebook
  • Instagram
  • Pinterest
  • Twitter
  • YouTube

LOOKING FOR SOMETHING?

EXPLORE OUR SITE:

TRENDING TODAY:

  • A pink hand-shaped bookmark with red heart stickers and star confetti surrounds a round note that reads a heartfelt message about love and reading. The image is from GluedToMyCraftsBlog.com. Handprint Bookmark Keepsake: A Gift That Holds Your Spot
  • A handmade Valentine’s Day craft featuring a red rose made of torn paper, two green handprint leaves, a glue bottle, heart decorations, and a message: “LOOK WHAT I MADE - A ROSE THAT WON’T FADE! WISHING YOU LOVE THIS VALENTINE’S DAY!”. Torn Paper Rose Card Craft Tutorial for Valentine’s Day
  • A colorful craft project featuring a yellow felt moon, sparkly stars, and heart shapes, with glue and a heartfelt message. Torn Paper Love You To The Moon and Back Card Craft Idea For Kids
  • A handmade card with a rocket drawing, hearts, and messages of love. Felt hearts and an envelope are around it. Handprint Rocket Keepsake - I Love You Because
  • A colorful paper craft featuring a red and pink painted paper plate with yellow circles in the center, green handprint cutouts as leaves, surrounded by craft supplies, heart decorations, and paint bottles. Paint Splat Valentine's Day Flower Craft Idea
  • A vibrant Valentine's Day craft showcasing a torn-paper bumblebee with googly eyes on a white sheet, accompanied by the text "MY VALENTINE!" The scene is decorated with felt hearts, heart-shaped gems, and patterned papers, with a glue bottle and crafting supplies adding to the creative atmosphere. Torn Paper Bee My Valentine Card Craft Idea For Valentine's Day
  • A flat lay of handmade Valentine’s Day cards and decorations, including paper flowers, felt hearts, an envelope, and printed cards with romantic poems, arranged on a gray and pink background. Capture Memories With These 6 Handprint Flower Poems
  • Flat lay of a torn paper dandelion craft featuring a white sheet with a black dandelion outline. Torn yellow, pink, and purple paper pieces are glued to the dandelion head, simulating seeds. Surrounding the craft are Elmer's glue, felt hearts, paper flowers, and patterned scrapbook paper. The text 'MAKING WISHES, ONE PIECE OF PAPER AT A TIME.' and 'GluedToMyCraftsBlog.com' are printed on the white sheet. Torn Paper Dandelion Craft: Making Wishes, One Piece at a Time
  • A playful torn paper cactus craft with hearts and flowers. Includes glue and felt hearts. Torn Paper Cactus Card: A Sweet Mother's Day Craft
  • A colorful handprint craft made from purple paper with glitter edges sits on a multicolored polka dot background. A round tag with a poem is attached below, tied with red and white string. Flowers are visible in the corner. Easy Handprint Flower Craft with Poem – Perfect Spring DIY for Kids

© 2012–2026 Glued To My Crafts
All activities should be supervised by an adult at all times. Please refer to our safety guidelines for more information.


Please note that all the content of the website, including printables, are for classroom and personal use only. This means that any digital item you download from our site can be used for non-commercial use only. We kindly request that you do not reproduce or sell our creations. We appreciate your understanding and cooperation in respecting our content and intellectual property rights.

Accessibility Adjustments

Powered by OneTap

How long do you want to hide the toolbar?
Hide Toolbar Duration
Select your accessibility profile
Vision Impaired Mode
Enhances website's visuals
Seizure Safe Profile
Clear flashes & reduces color
ADHD Friendly Mode
Focused browsing, distraction-free
Blindness Mode
Reduces distractions, improves focus
Epilepsy Safe Mode
Dims colors and stops blinking
Content Modules
Font Size

Default

Line Height

Default

Color Modules
Orientation Modules